Halloween Hairstyles for Long Hair: 20 Creative Statement Looks

Halloween hairstyles for long hair offer endless possibilities because their length allows intricate braids, dramatic wrapped sections, sculptural twists, and cascading details that shorter hairstyles cannot always achieve. Instead of relying on ordinary loose waves or a basic ponytail with a seasonal accessory, statement hairstyles use the hair itself to create movement, texture, and unexpected shapes. From elaborate braided frameworks to wrapped ponytails with multiple layers, these designs turn long hair into an important part of the entire Halloween look.
The most successful statement hairstyle has a clear silhouette from the front, sides, and back. Some designs focus on a dramatic crown, while others use the full length of the hair to create a woven structure or a cascading pattern down the back. You can make these styles feel gothic, romantic, mysterious, futuristic, or whimsical by adjusting the finish and choosing accessories carefully. Whether your hair is straight, naturally wavy, or curly, these 20 creative Halloween hairstyles offer fresh ways to showcase its length and make a memorable impression. For a more romantic look, see our Halloween hairstyles with bows.
1. Triple-Structure Back Braid
The triple-structure back braid transforms a traditional long braid into a layered design with three distinct woven sections. Start by dividing the hair into three large panels: one down the center and one on either side. Create a separate loose braid with each panel, securing the ends temporarily. Then weave the three braids together into a larger central structure, alternating which braid passes over the others to create a dimensional, rope-like effect. Keep the upper section secure but not overly tight, allowing the woven layers to remain visible from the crown to the ends.
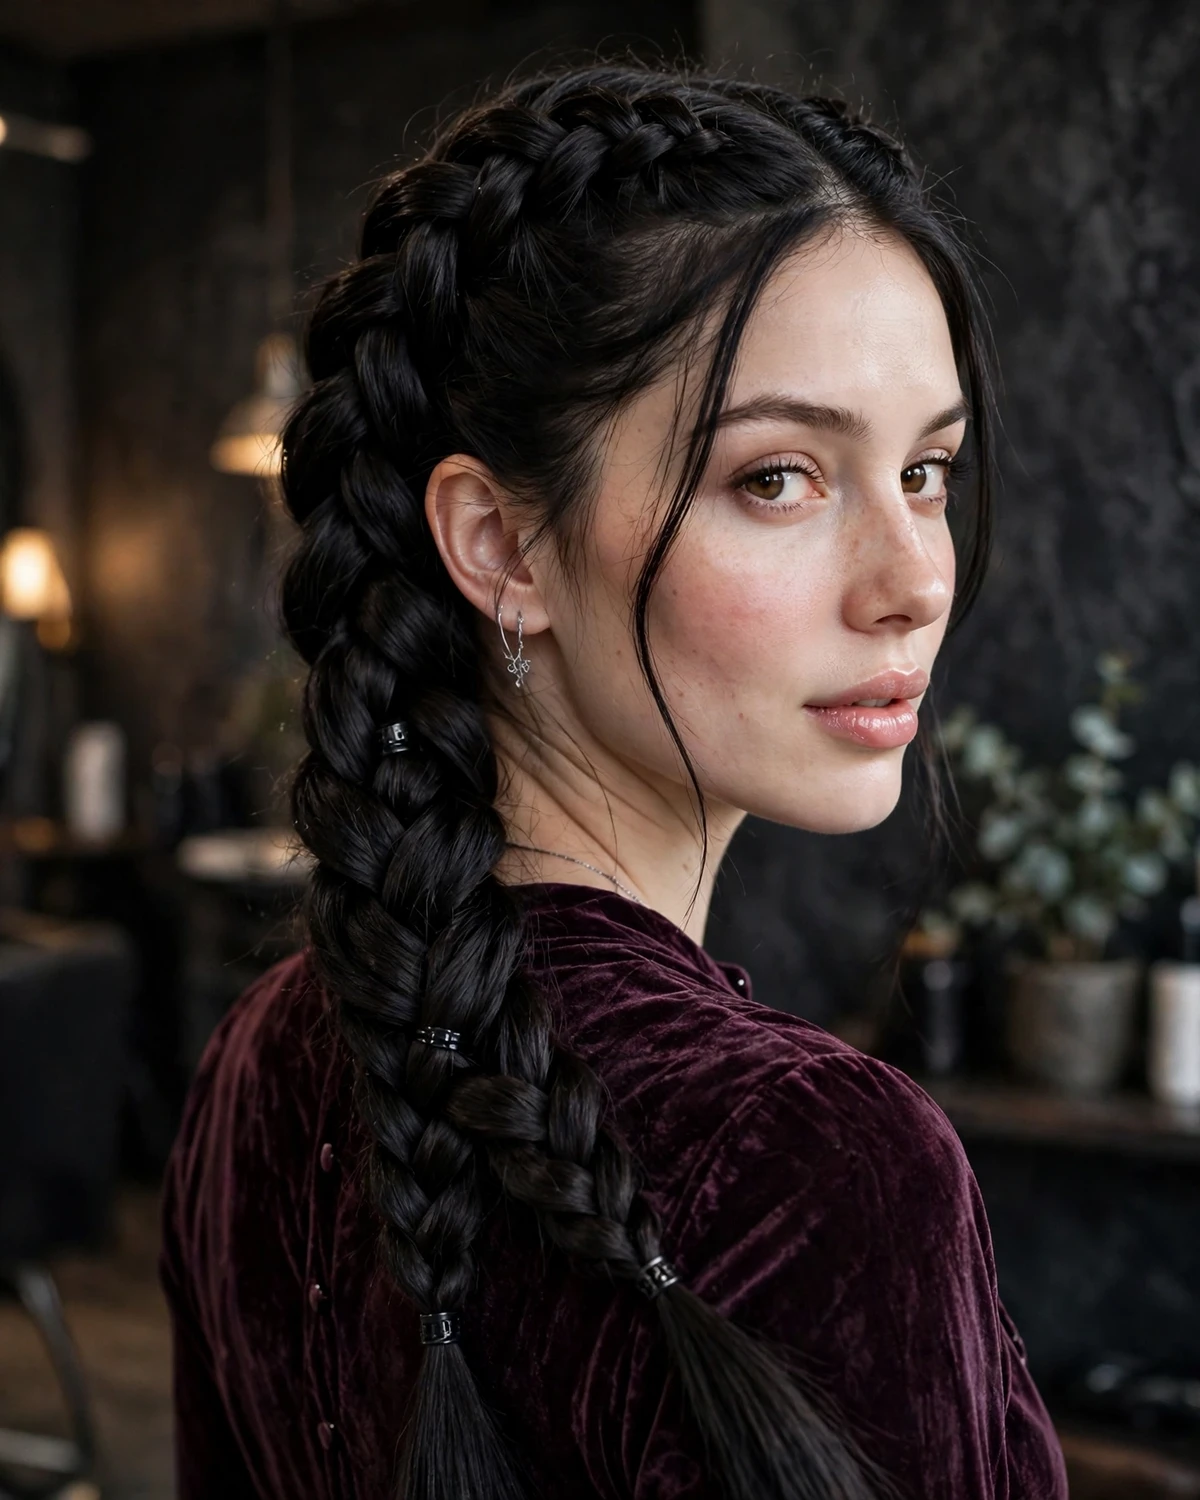
This hairstyle looks particularly impressive from behind because its depth comes from the overlapping braids rather than from accessories. A few small matte-black cuffs can be added at selected intersections for a darker Halloween finish, but leave enough of the braid uncovered to show its construction. If your hair is exceptionally thick, work with slightly smaller sections so the final braid does not become too heavy. For finer hair, gently loosen the outer edges to create fullness. The finished style pairs well with a gothic dress, a dark fairy outfit, or a dramatic high-neck ensemble because the braid provides a strong visual feature all on its own.
2. Five-Section Wrapped Ponytail
A five-section wrapped ponytail creates a striking, segmented shape along the full length of the hair. Begin with a high or mid-height ponytail and secure it firmly. Divide the ponytail into five visual sections by placing small elastics at regular intervals, then wrap a narrow strand of hair around each elastic to hide it. Instead of pulling every section into identical bubbles, vary the fullness slightly, making the top sections smoother and the lower ones more rounded. This gives the ponytail an architectural finish rather than the appearance of an ordinary bubble style.
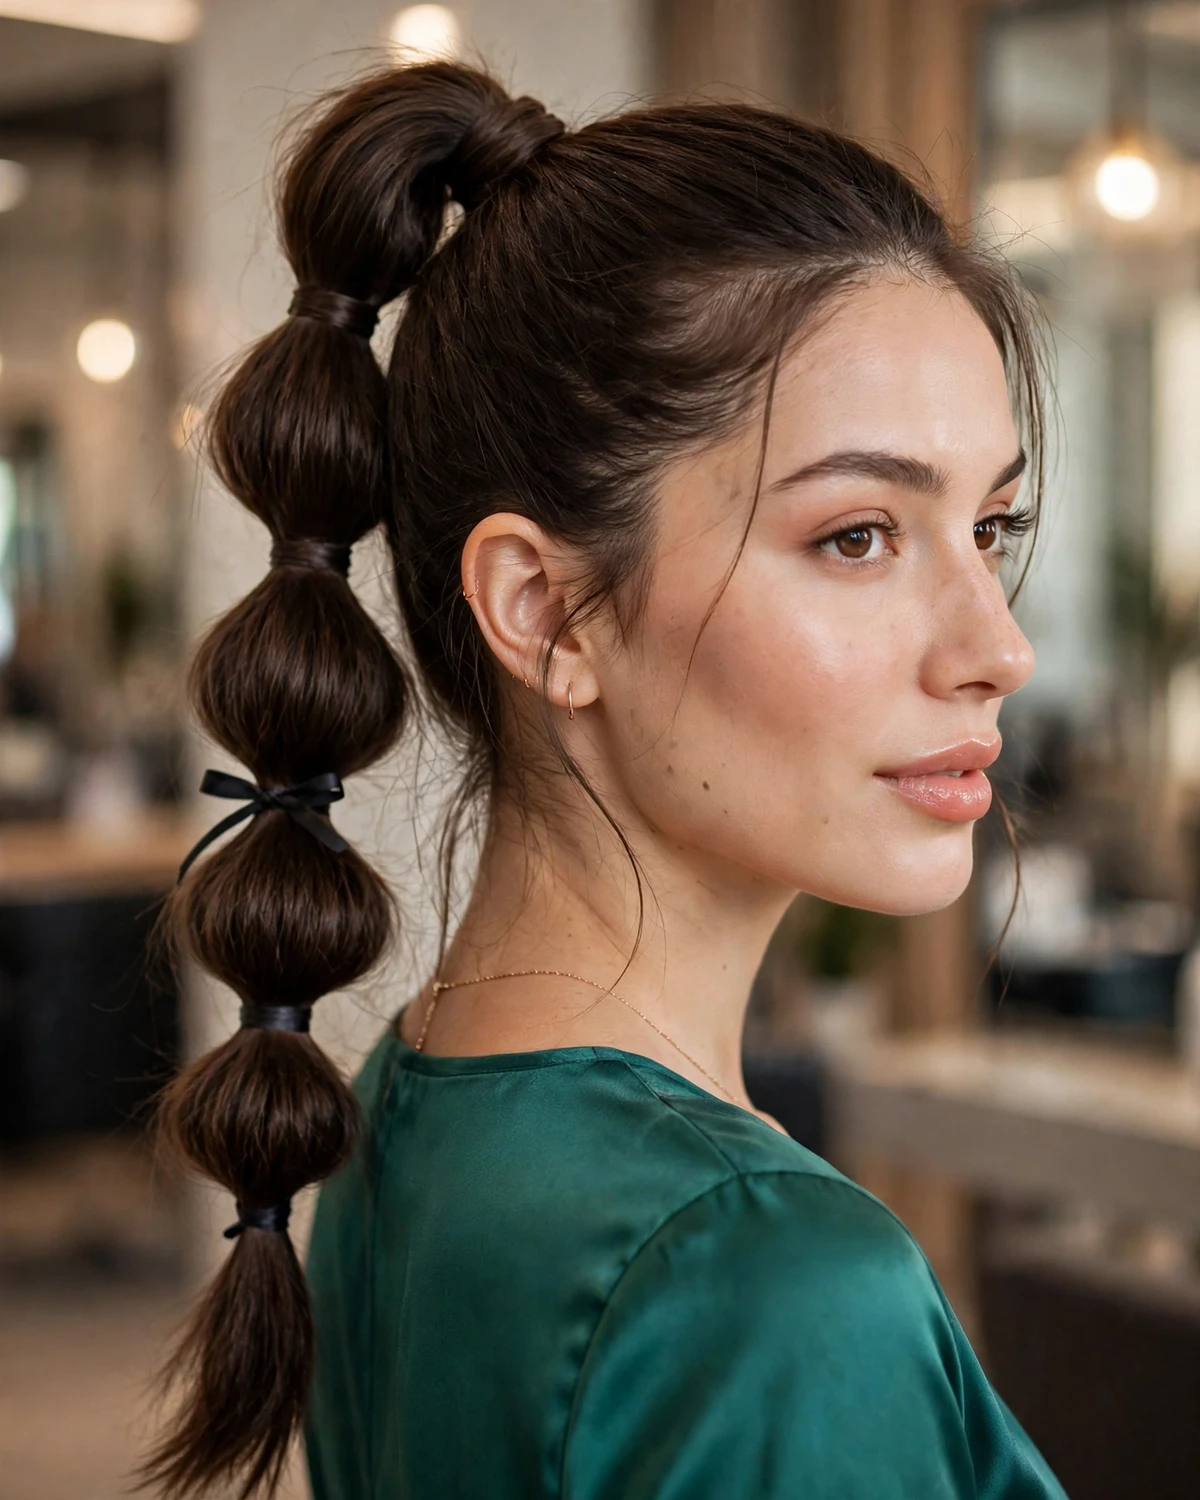
The main feature is the repeated wrapped detail, which creates a connected structure from the crown to the ends. Keep each wrap neat and secure the strand underneath with a small pin. For Halloween, a few narrow black ribbons can be woven around selected sections, but they should complement the hair rather than cover the segmented shape. This design works best on long hair because the repeated sections need enough length to remain visible. Straight hair produces a clean, graphic silhouette, while soft waves create a more romantic effect. It is a strong choice for anyone who wants a sleek hairstyle with an unusual back view.
3. Twisted Waterfall Cascade
The twisted waterfall cascade uses multiple twisting sections to create a flowing pattern that travels diagonally across the back of the head. Start above one temple and twist two narrow strands together, adding a small new section each time the twist moves backward. Allow selected strands to drop free beneath the twist, then continue the pattern toward the opposite side. Repeat the process one level lower, positioning the second cascade beneath the first so the twists form overlapping diagonal lines. Secure both sections discreetly and leave the remaining length in soft waves or brushed curls.
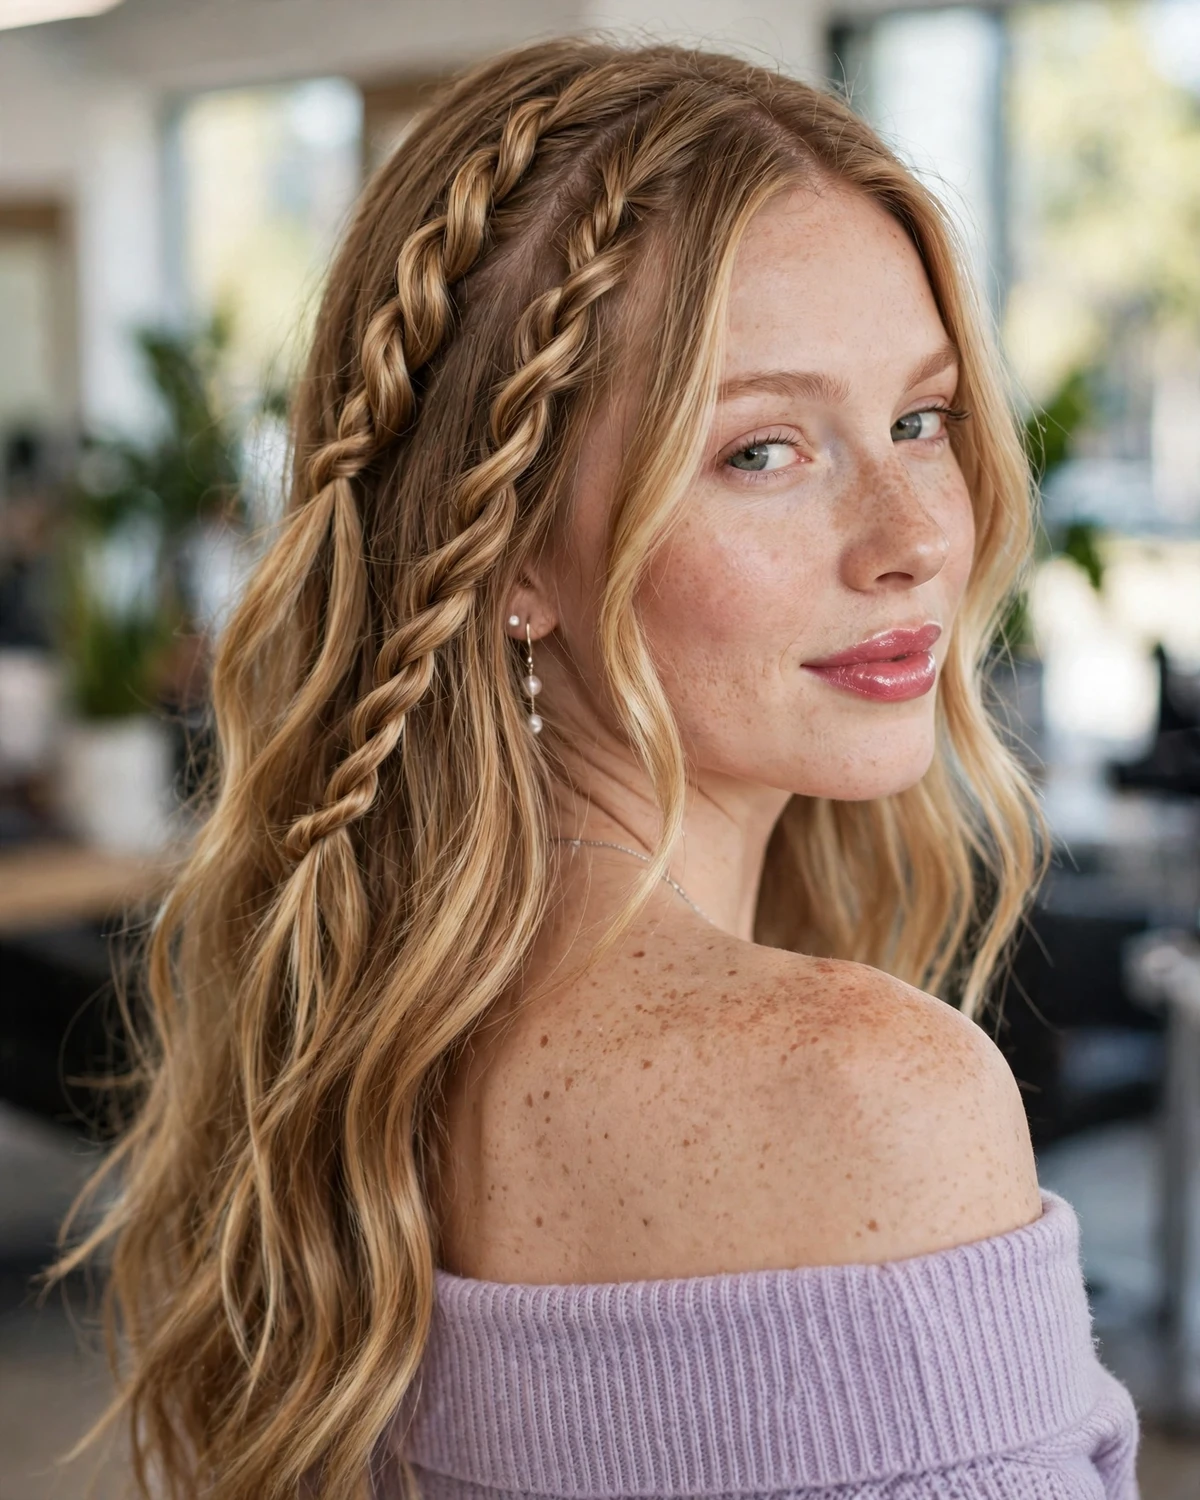
This hairstyle is particularly effective on long hair because the dropped strands create a continuous waterfall effect. The upper twists provide structure, while the lower lengths preserve movement. For a Halloween look, you can add a few tiny dark metallic pins where the twists meet, creating subtle points of contrast without overwhelming the design. The style is especially beautiful from a three-quarter rear angle, where the layered diagonal lines become easier to see. If your hair is very straight and slippery, use a light texturizing product before twisting. Keep the sections consistent enough to show the pattern, but leave the loose lengths soft so the overall result feels romantic rather than rigid.
4. Interlocking Rope Ponytail
The interlocking rope ponytail creates a dense, woven effect by combining multiple rope twists into one long structure. Secure the hair into a ponytail and divide it into four equal sections. Twist each section in the same direction, then pair the twists and wrap them around each other in the opposite direction to help the structure hold. Bring the resulting ropes together in alternating crossings, repeating the process down the length. Secure the end with a small elastic and wrap a strand of hair around it for a polished finish.
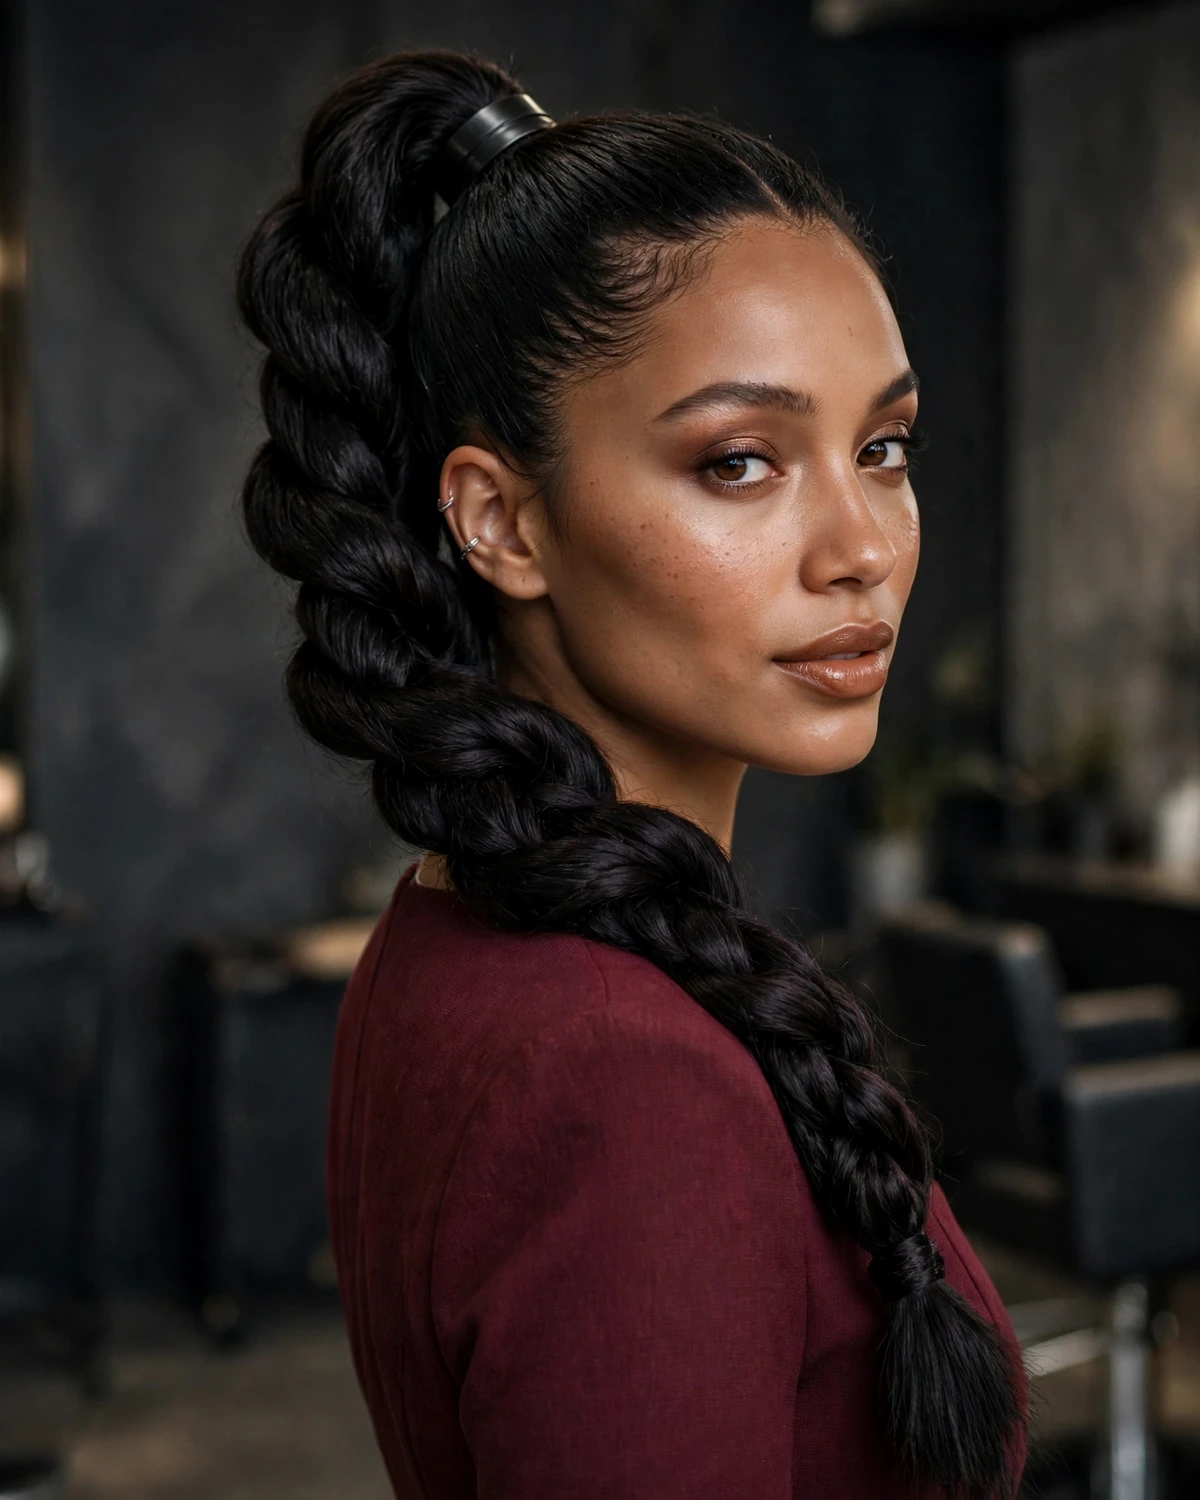
The technique produces a rounded, dimensional ponytail that looks much more intricate than a conventional braid. It works particularly well on long, thick hair, although finer hair can achieve the effect with smaller sections or discreet extensions. Keep the twists evenly tensioned so the structure remains balanced, and check the back as you work to ensure that the crossings do not disappear underneath one another. For a darker Halloween mood, add one or two slim metal cuffs near the upper section. Avoid placing decorations at every crossing because the rope pattern is already detailed. This hairstyle is ideal for a fantasy warrior, gothic queen, or futuristic character.
5. Crisscross Wrapped Low Ponytail
This low ponytail focuses on an intricate wrapped pattern at the back of the head. Begin by creating a smooth center part and gathering the hair into two low sections, leaving a narrow strand free from each side. Cross the two sections over one another at the nape, then secure them together with a small elastic. Take the free strands and wrap them diagonally around the joined ponytail base, crossing them again before pinning the ends underneath. Repeat the wrapping once more if the hair is long enough, creating a layered, interlaced finish above the ponytail.
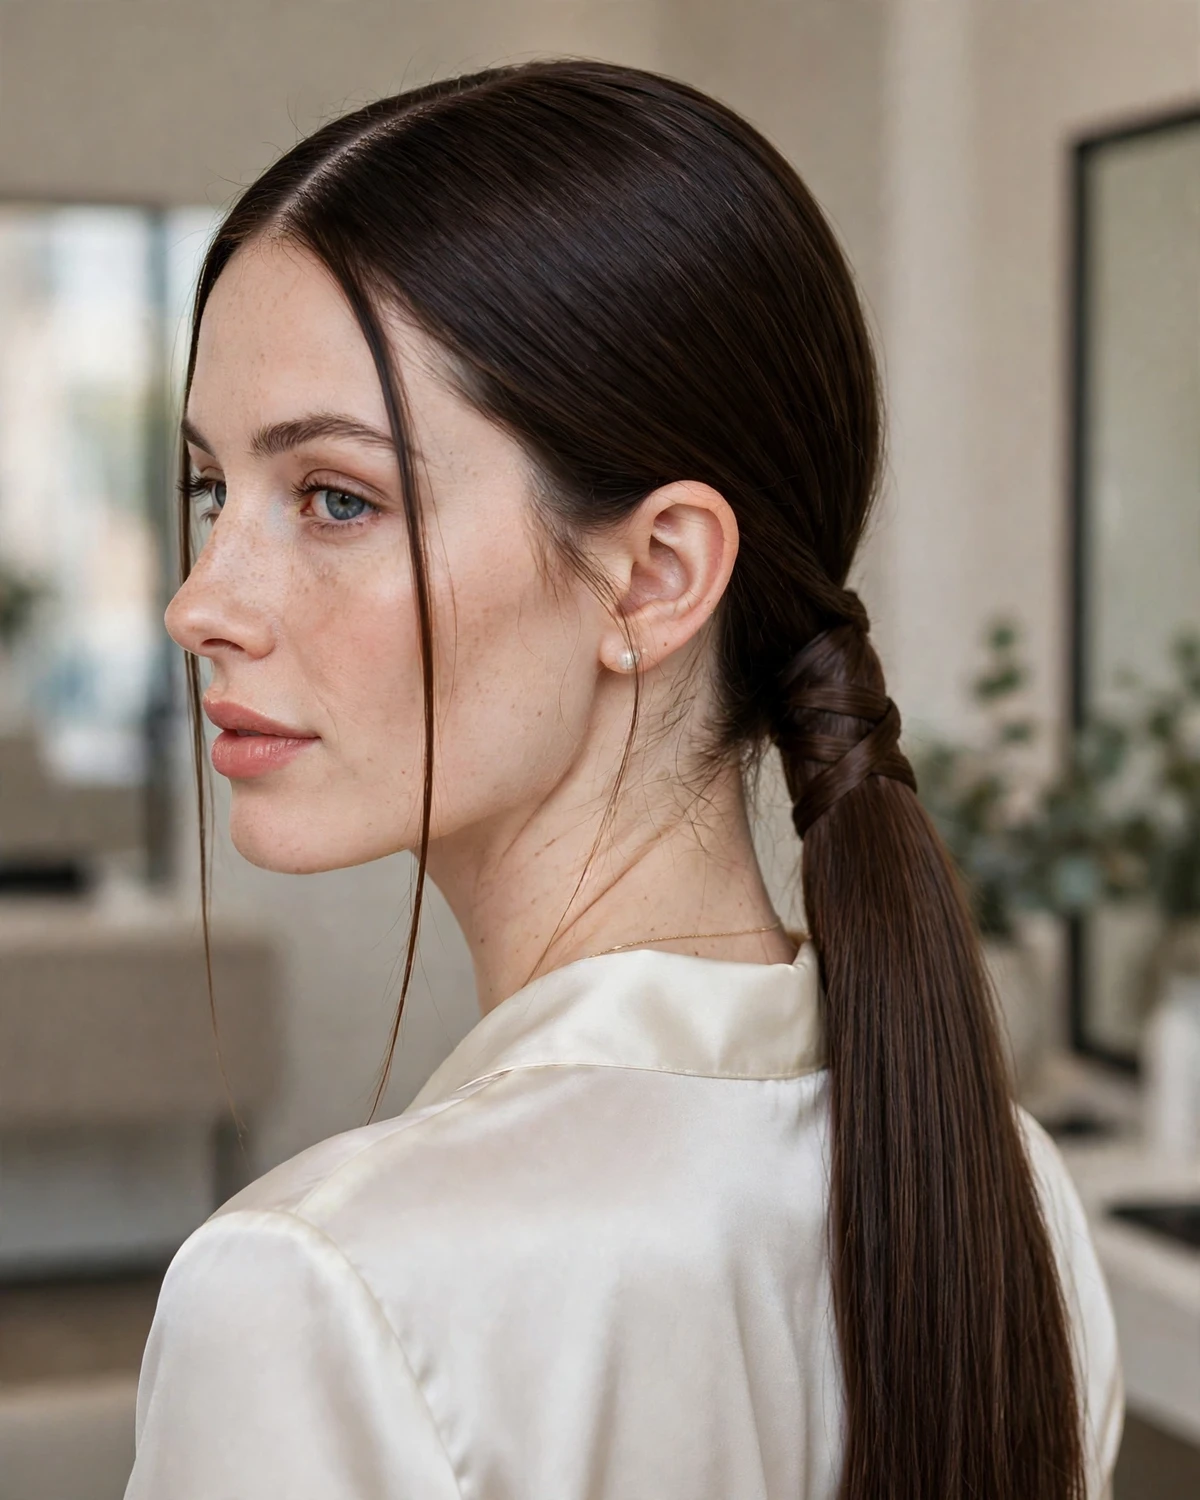
The result looks like a woven harness made from hair, with the longest lengths flowing freely beneath it. The back-view detail is the main attraction, so keep the front smooth and avoid bulky accessories near the nape. This design is especially flattering on straight or softly waved hair because the crossing pattern remains clear. A little shine serum can emphasize the smooth finish, while a few loose face-framing strands make the style less severe. For Halloween, it suits elegant gothic outfits and dark romantic costumes, particularly when you want a hairstyle that looks complex from behind but remains relatively restrained from the front.
6. Braided Crown with a Long Hanging Plait
A braided crown with a long hanging plait combines an elevated upper structure with a dramatic length-focused finish. Take sections from both sides of the head and create Dutch braids that follow the curve of the crown toward the back. Join the braids at the center, then incorporate the remaining hair into one long, thick plait that falls down the back. Instead of keeping the hanging braid uniform, use a slightly looser weave near the top and a tighter finish toward the lower half. This subtle change creates a more sculptural silhouette.
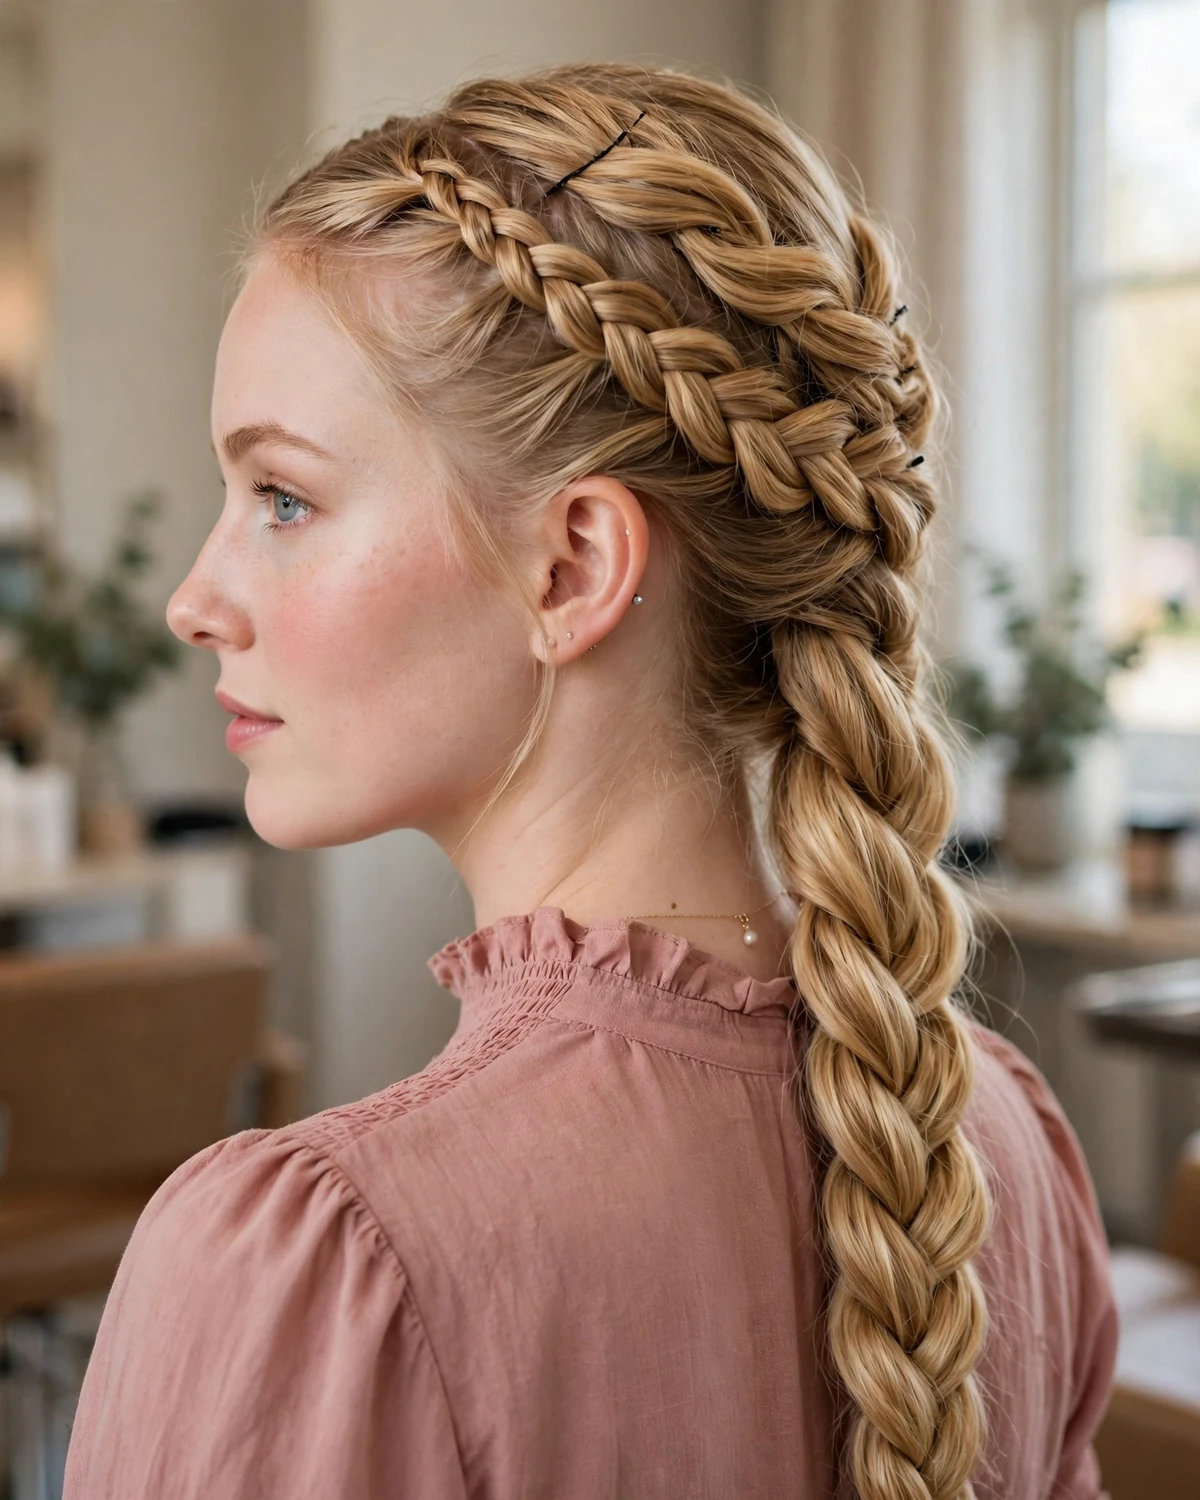
The crown frames the head while the extended braid draws the eye downward, making this design especially suitable for very long hair. From the back, the joined crown and hanging plait appear as one continuous construction. You can tuck tiny black pins into the crown for a gothic finish or leave the braid completely unadorned for a more dramatic, hair-focused look. If your hair is layered, secure shorter pieces with discreet pins before joining the plaits. For fine hair, gently widen the braid by pulling its edges outward. The style works beautifully with fantasy costumes, medieval-inspired clothing, or a dark romantic outfit that leaves the back of the hair visible.
7. Spiral-Wrapped Length Ponytail
The spiral-wrapped length ponytail creates a sweeping diagonal line around a long ponytail. Begin with a high ponytail and divide a narrow strand from its base. Wrap the strand diagonally down the ponytail, leaving a small gap between each turn so the underlying hair remains visible. Secure the strand at intervals with tiny pins hidden underneath. For a more dimensional effect, add a second narrow strand in the opposite direction, creating a subtle double spiral. The remaining ponytail should stay loose and full so the wrapping becomes a clear structural detail rather than a complete covering.

This style is especially striking when viewed from the back because the diagonal lines create movement along the length. The wrapping should be firm enough to stay in place but not so tight that it compresses the ponytail into a thin cord. Long, straight hair shows the pattern most clearly, while softly curled lengths create a more dramatic finish. You can use a narrow black ribbon for one of the spirals if you want a contrasting Halloween detail, but a hair-wrapped version looks more seamless. This hairstyle suits futuristic, gothic, or dark fantasy costumes and is a useful way to make a familiar ponytail look genuinely different.
8. Double Waterfall Braids into a Low Knot
This hairstyle combines two cascading braids with a compact knot at the nape. Create a waterfall braid from each temple, allowing loose sections to fall through the woven structure as you move toward the back. Join the two braids just above the nape and incorporate their ends into a low twisted knot. Keep the knot relatively small so the cascading sections remain the dominant feature. The loose lengths can be curled softly before styling, giving the dropped strands a fluid appearance as they emerge from the braids.
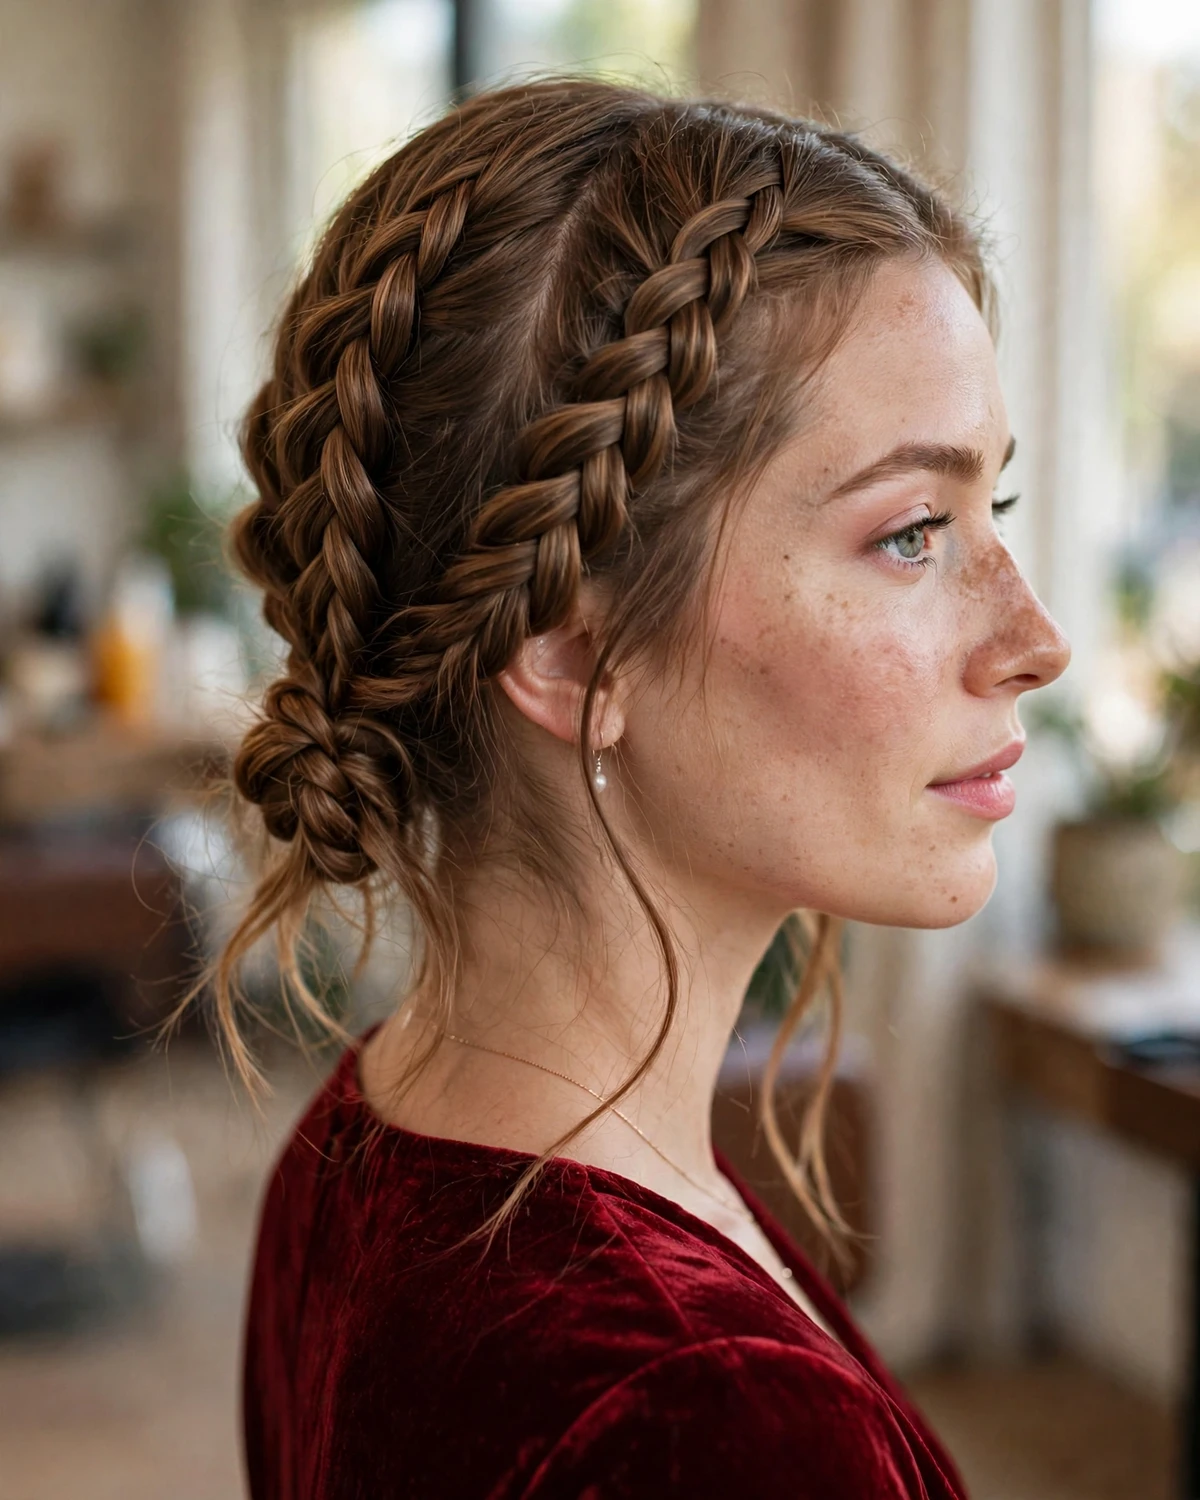
The back view reveals two diagonal patterns meeting at a central point, followed by a neat low finish. This creates more visual interest than a standard braided updo because the upper sections remain open and airy. For Halloween, you can use a few tiny dark pins at the joining point or leave the hairstyle completely free of accessories. It works best on medium-to-long hair, although very long hair creates a fuller cascade. Use discreet pins to secure the knot and avoid pulling the waterfall braids too tightly, as their loose sections are essential to the design. The overall look is romantic, intricate, and well suited to gothic fairy or Victorian-inspired costumes.
9. Multi-Layered Bubble Braid with Hidden Crossings
A multi-layered bubble braid can look architectural when the sections are connected with hidden crossings rather than simply separated by elastics. Begin with a long ponytail and create several rounded sections using small elastics. Before forming each new bubble, take a narrow strand from the previous section and cross it over the next elastic, pinning it underneath to create a continuous line through the structure. Repeat this process down the ponytail, alternating the direction of the crossing strands so the design develops a subtle interlaced pattern.
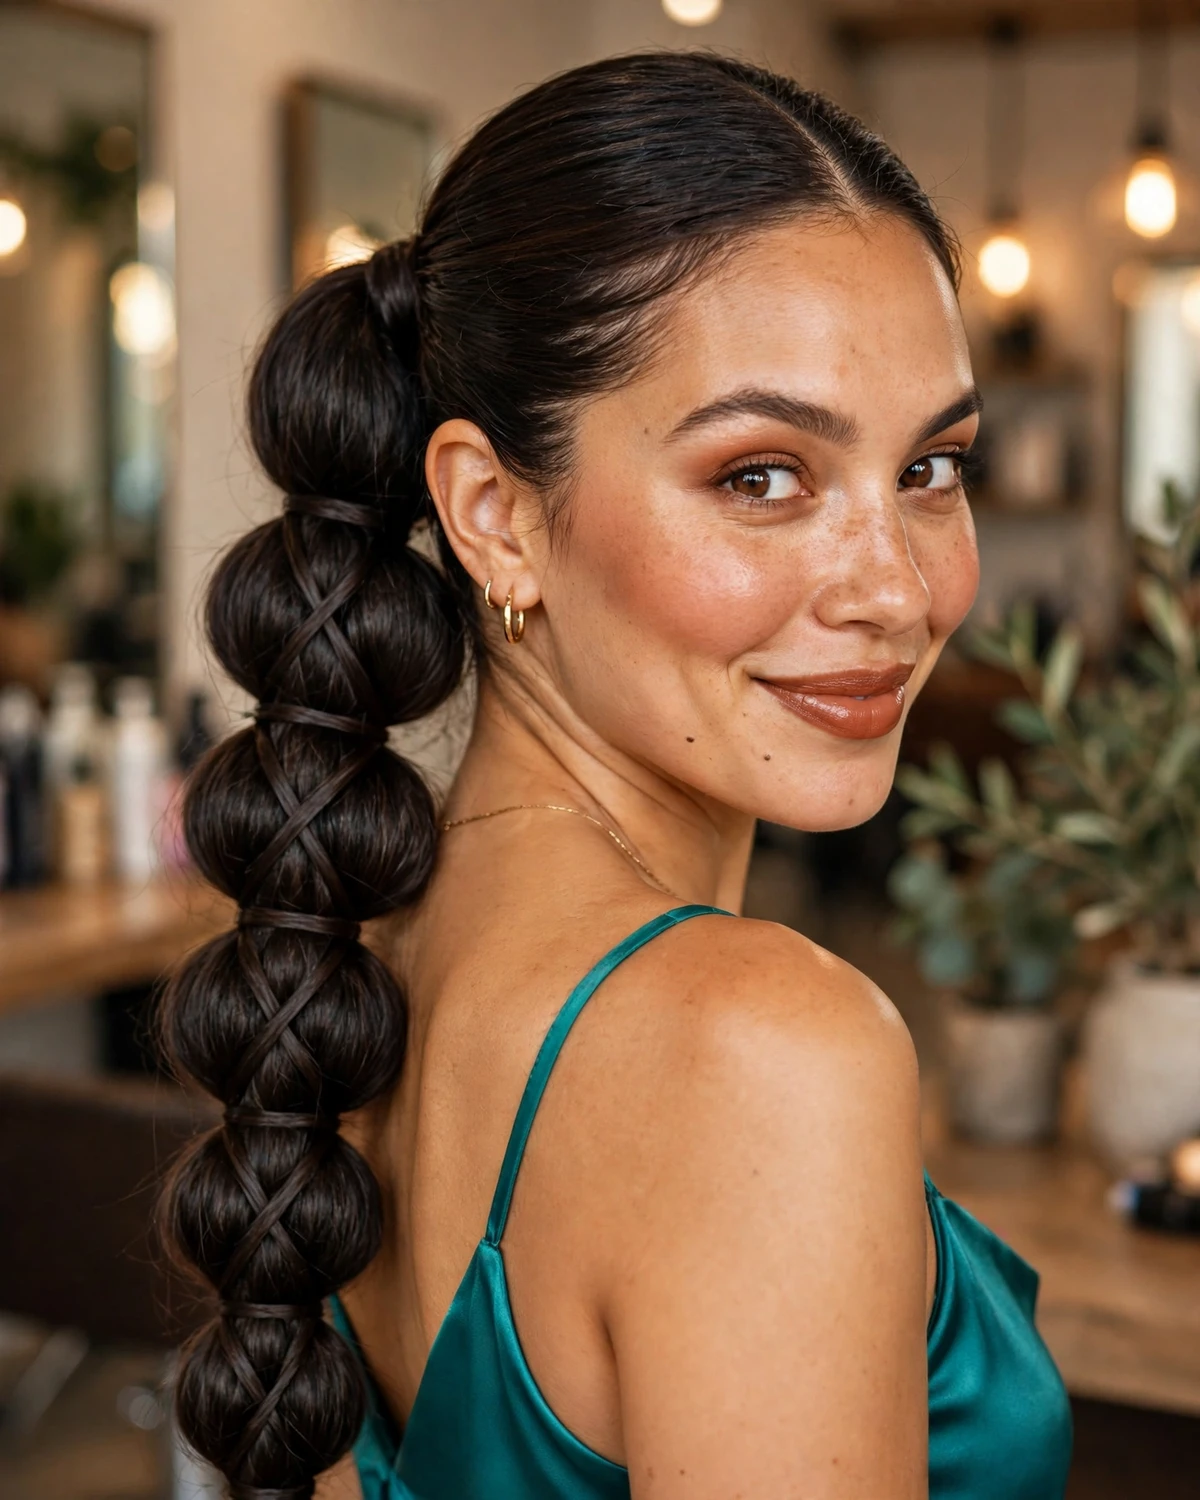
The result is a series of rounded shapes connected by delicate diagonal lines. This approach is different from a basic bubble ponytail because the connecting strands create a second layer of detail. Long hair is ideal for showing at least five or six sections, although the number can be adjusted to suit your length. Keep the bubbles balanced and avoid pulling them too far apart, as the crossed strands need a stable base. A matte-black elastic can disappear into dark hair, while a few discreet metallic accents may emphasize the intersections. This style offers a bold back view without requiring a complicated full-head braid.
10. Twisted Ribbon-Like Hair Cascade
This design creates the impression of long ribbons flowing down the back, using hair sections rather than fabric. Divide the upper hair into three sections and twist each one loosely from the crown toward the middle of the head. Pin the twists at different heights, leaving the remaining lengths hanging down. Then take the loose sections and curve them across one another in broad, ribbon-like loops before securing the ends lower down. The sections should overlap in a controlled way, creating a layered cascade that appears woven but still allows the hair to move.

The style depends on smooth curves rather than tight braiding, making it particularly effective on long hair with a silky or softly waved finish. Keep the loops broad enough to remain visible from behind and use hidden pins at the turning points. If the hair is very fine, lightly backcomb the underside of the sections to give the curves more stability. For a Halloween look, dark hair can create a shadowy sculptural effect, while lighter hair makes the overlapping shapes easier to distinguish in photographs. This hairstyle suits romantic gothic outfits and theatrical costumes that benefit from an elaborate back detail.
11. Four-Strand Side-to-Back Braid
The four-strand side-to-back braid follows an angled route across the head before extending into a long plait. Start above one ear and divide the hair into four sections. Weave the outer sections over and under the inner strands in a consistent sequence, adding hair gradually as the braid travels diagonally toward the back of the head. Once the braid reaches the center, continue with the four-strand technique down the remaining length. The diagonal placement makes the upper section look like a woven band, while the extended plait showcases the hair’s full length.
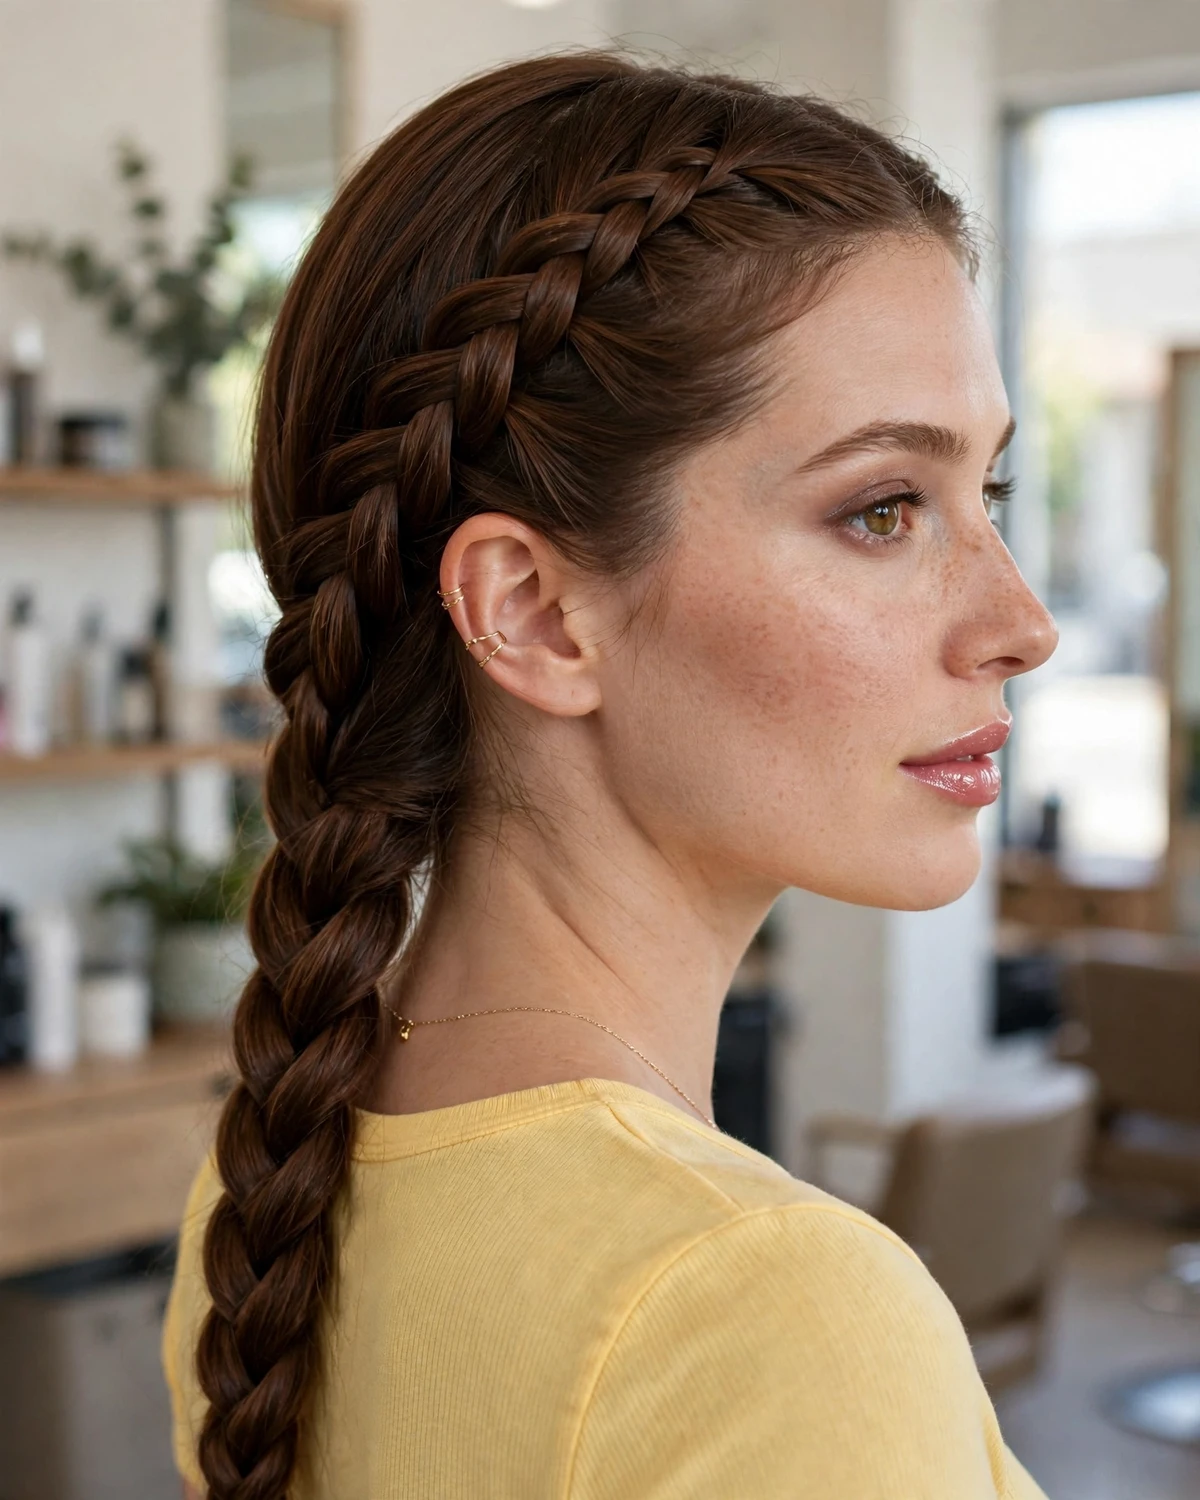
This design has a more intricate appearance than a standard three-strand braid because the extra section creates a flatter, more detailed pattern. It is best suited to long hair, where the technique remains visible well below the shoulders. Keep the braid firm enough to hold its shape but loosen the outer edges slightly after securing the end. This creates dimension without losing the woven pattern. For Halloween, you can add a small dark cuff near the point where the braid changes direction, but the structure itself should remain the main feature. The style looks especially effective with a side or three-quarter rear view.
12. Cascading Twist Ladder
The cascading twist ladder creates a series of horizontal twists down the back, connected by long vertical sections. Start by taking two small strands from one side of the crown and twisting them together toward the center. Secure the twist with a tiny elastic, then repeat on the opposite side at the same height. Connect the two twists with a narrow strand of hair, forming the first rung of the ladder. Continue with additional pairs lower down the head, leaving loose sections between each rung so the pattern resembles a ladder descending into the hair’s length.

The structure looks especially interesting from behind because the horizontal twists create a repeated pattern while the loose hair flows underneath. It works well on long, straight hair and can be adapted for waves if the connecting sections are kept neat. Use small elastics that match your hair color and conceal them with thin strands wherever possible. The rungs should be evenly spaced, but the lower ones can be slightly wider to follow the shape of the head. For Halloween, the ladder effect can feel eerie and unusual without needing spiders, ribbons, or other obvious accessories. It is a strong choice for anyone who wants a technique-driven hairstyle.
13. Sculptural Side Loop into a Long Braid
This hairstyle combines a raised loop near the side of the head with a long braid that travels down the back. Take a broad section from above one ear and fold it into a curved loop, pinning the base securely behind the ear. Bring the remaining length from that section toward the back and combine it with the rest of the hair in a long braid. The loop should appear to emerge from the braid rather than sit separately on top. Keep the opposite side relatively smooth so the asymmetry remains visible.
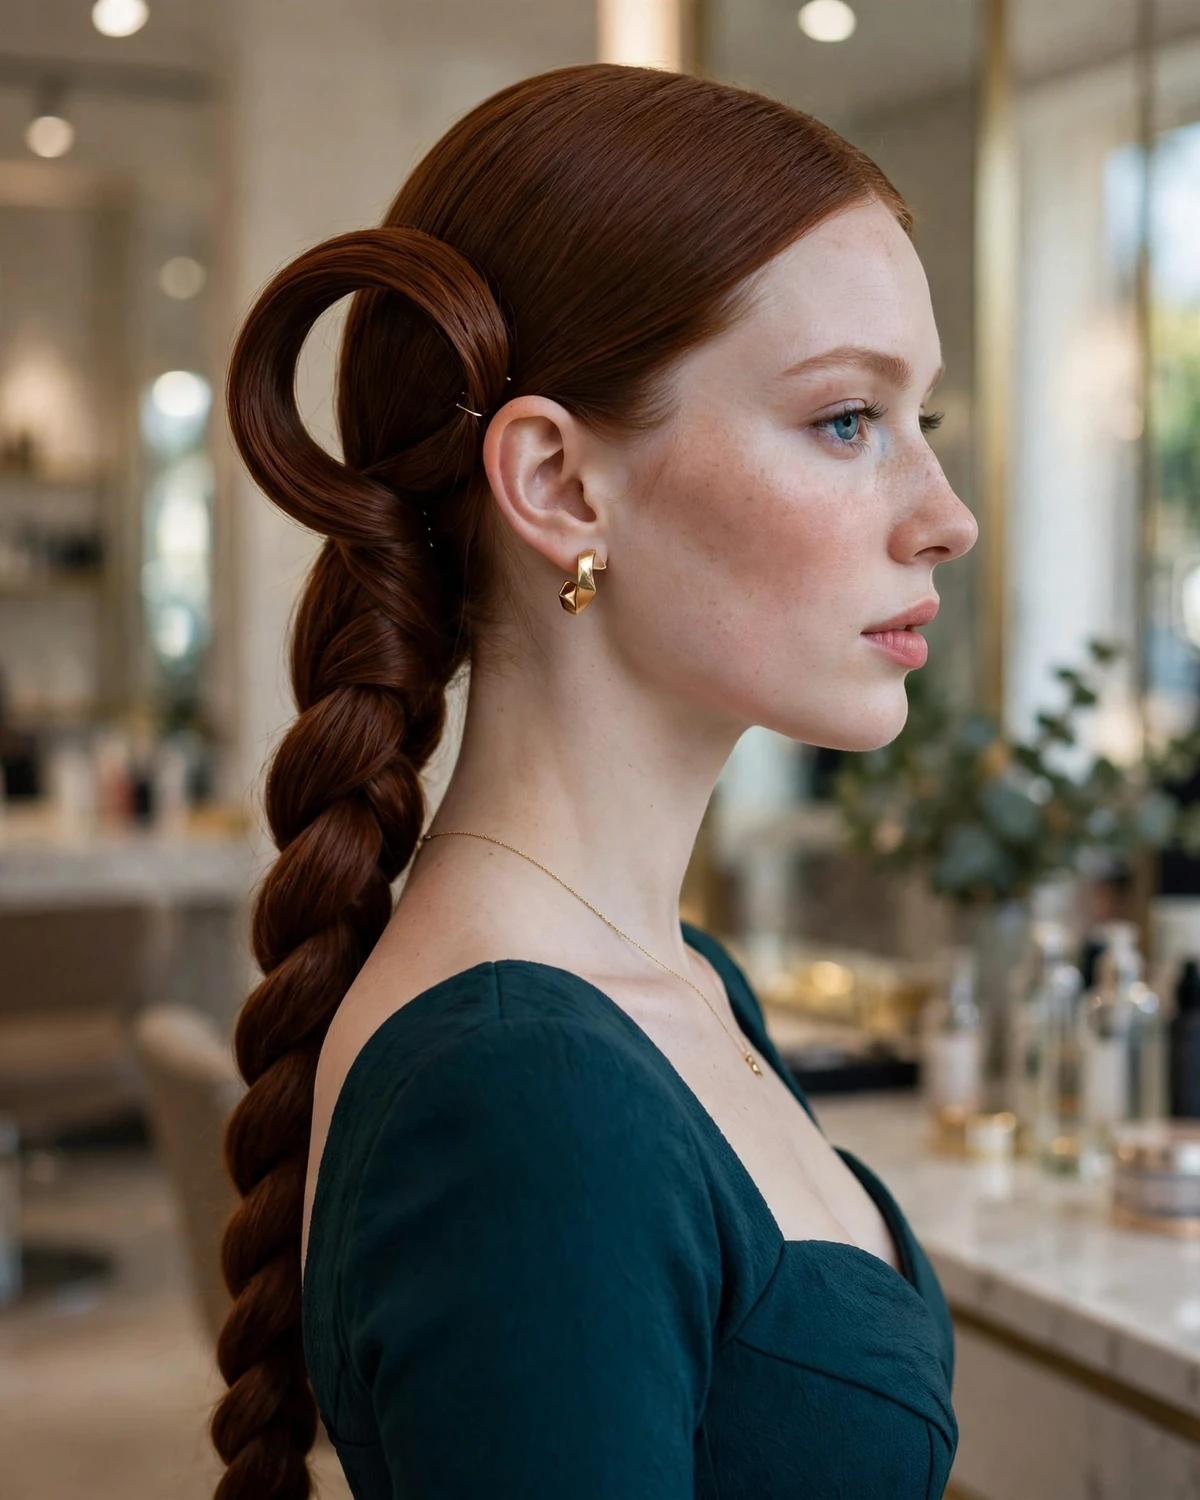
The contrast between the sculptural loop and the traditional woven length gives the hairstyle its distinctive character. It works best on long hair, especially when the loop has enough length to create a clear curve. If your hair is thick, the loop can be larger; finer hair may benefit from a smaller, more defined shape. Secure the base with crossed pins and check that the loop holds its curve when the head turns. A single metallic pin can be added near the loop’s base for a dark fantasy finish. The hairstyle is especially effective in side-view photographs because the raised loop creates an unusual profile.
14. Braided Spine with Side Cascades
The braided spine with side cascades places a narrow central braid down the back while leaving longer sections to flow on either side. Create a tight, clean part at the crown and begin a narrow Dutch braid along the center line. As the braid reaches the back of the head, gradually reduce the amount of hair added so the central structure becomes slimmer. Leave the side sections loose, or twist them gently before allowing them to fall over the shoulders. This creates a central line framed by two flowing curtains of hair.

The design is effective because it contrasts a precise, structured spine with loose movement on either side. It is particularly suitable for very long hair, where the side cascades can extend well below the central braid. A few small pins can emphasize the crown, but avoid bulky accessories that cover the central line. If you have naturally curly hair, preserve the side texture and keep the central braid smooth for a striking contrast. For a Halloween look, the hairstyle can feel mysterious and slightly futuristic, especially when paired with a high-neck outfit or a dramatic back detail. It is also a good option for anyone who wants a statement style without gathering all the hair into an updo.
15. Wrapped Twin Ponytails with a Shared Center
Instead of placing two ponytails separately, this design connects them through a shared wrapped structure at the back of the head. Divide the hair into two high or mid-height sections and secure each into a ponytail. Leave a narrow strand free from both sides. Cross the strands at the center back, wrap them around the opposite ponytail base, and pin them underneath. Repeat the crossing once more if the length allows, creating a linked bridge between the two ponytails.
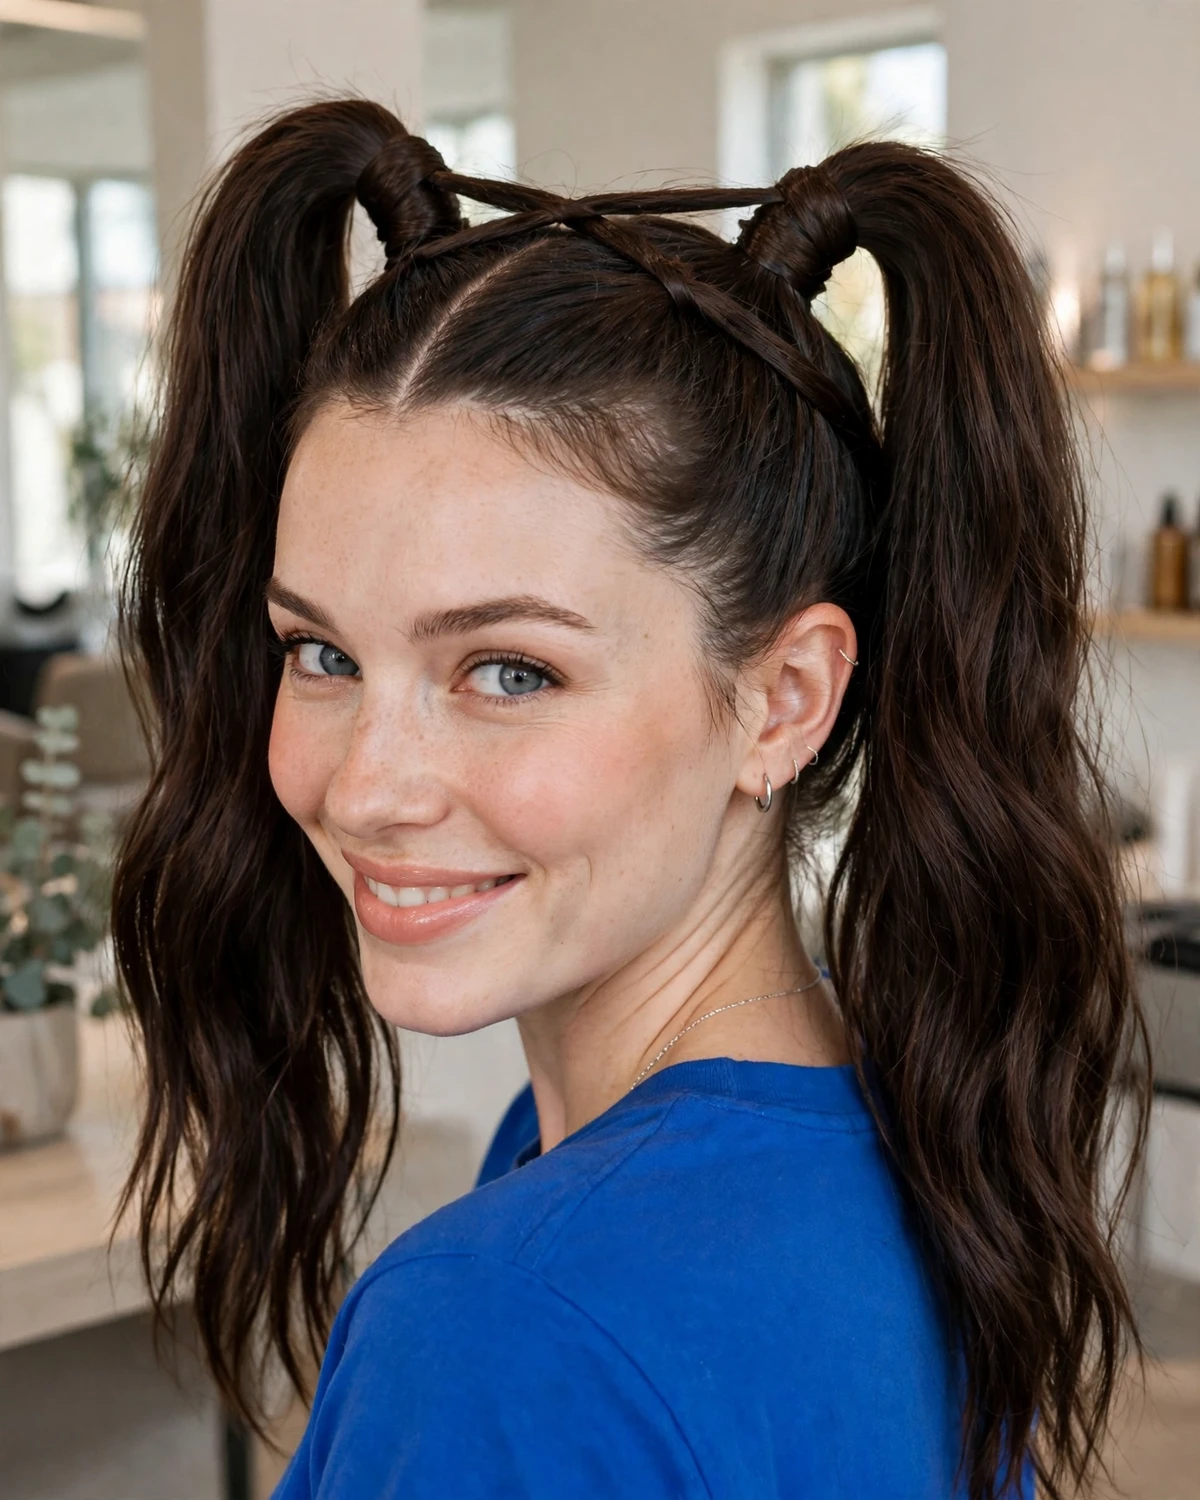
The finished style has two distinct lengths connected by a woven center, giving it a graphic, almost symmetrical appearance. Keep the ponytails full and flowing so the connection remains the focal point rather than making the entire hairstyle look too compact. This design works best on long hair because the wrapping strands need enough length to cross and secure comfortably. You can curl the ponytails for a dramatic effect or leave them straight for a sharper silhouette. For Halloween, the linked structure works well with futuristic, fantasy, or gothic-inspired outfits. The style is unusual because its interest comes from the connection between the ponytails, not simply from having two of them.
16. Inverted French Braid into a Twisted Tail
An inverted French braid that transitions into a twisted tail creates a strong change in texture along the length. Begin a Dutch braid at the nape with the head tilted slightly forward, adding sections as you move upward toward the crown. Once the braid reaches the top, gather the remaining hair into a high ponytail. Divide the ponytail into two sections and twist them together, securing the end with a small elastic. This reverses the familiar direction of a crown-starting braid and makes the hairstyle more distinctive from behind.

The design combines a close-fitting woven base with a long, rounded twist. It is particularly striking on long hair because the lower section remains substantial after the braid reaches the crown. Keep the inverted braid neat and secure the transition point carefully so the ponytail appears to emerge naturally from the structure. For a more dramatic Halloween effect, gently widen the braid’s outer edges while keeping the twisted tail smooth. This hairstyle works especially well for fantasy warrior costumes or dramatic editorial looks. It also keeps the hair away from the face while allowing the full length to remain visible.
17. Double-Arc Back Weave
The double-arc back weave creates two curved bands across the back of the head, with loose lengths hanging beneath them. Take a section from above each ear and guide both sections toward the center, crossing them to form the first arc. Repeat with two lower sections, positioning the second crossing just beneath the first. Secure the intersections with discreet pins, then tuck the ends under the opposite sides so the arcs look continuous. Leave the rest of the hair loose, allowing the curves to sit against a smooth or softly waved background.
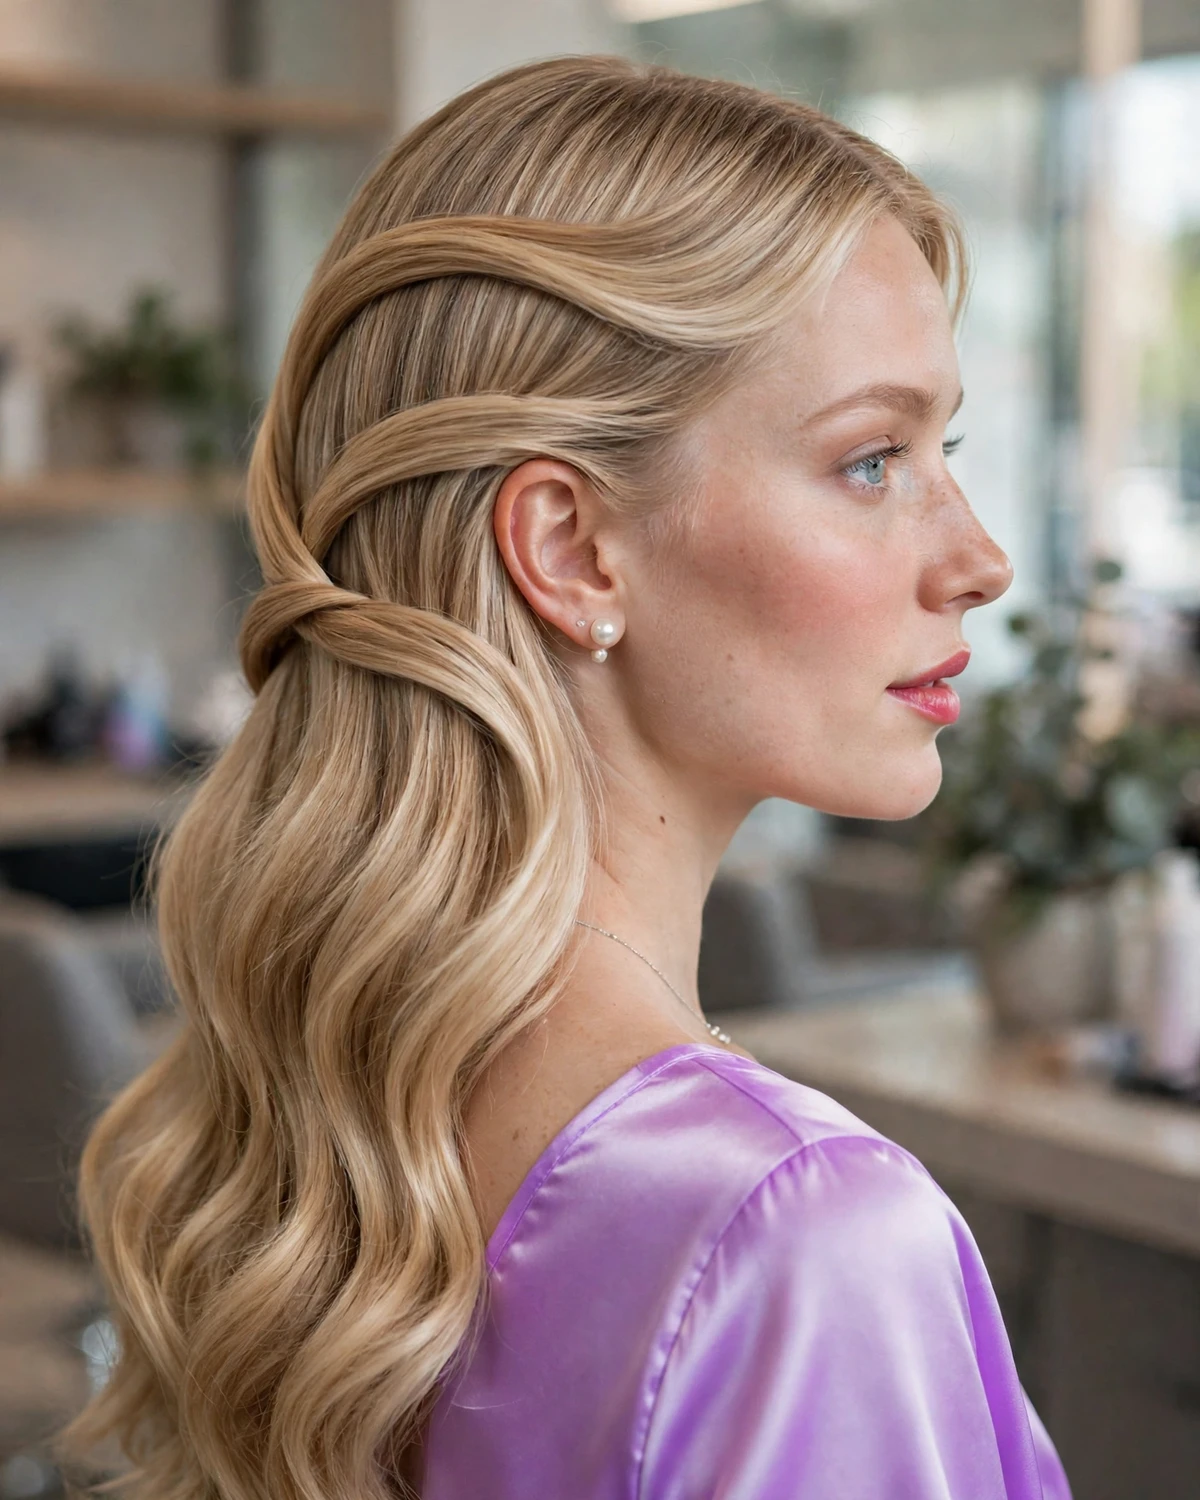
This hairstyle has a clean, sculptural quality because its visual interest comes from two broad curves rather than many small braids. Long hair makes it easier to create smooth arcs without exposing the ends, while medium lengths can work with smaller sections. Keep the tension even and check the design from behind before adding any accessories. A little shine product can help the arcs look polished, but avoid making the hair so slippery that the pins lose their grip. The double-arc structure works well for a gothic queen, dark fairy, or futuristic Halloween look and provides a distinctive back view without a full updo.
18. Multi-Twist Cascade Ponytail
The multi-twist cascade ponytail creates a layered structure that gradually opens into a long, flowing tail. Gather the upper hair into a ponytail and divide a section from each side. Twist the two sections toward the center and cross them over the ponytail base, securing them beneath it. Repeat with additional side sections lower down, allowing each pair to cross at a slightly different level. The result is a sequence of overlapping twists that frames the ponytail before the remaining length falls freely.

This technique makes a ponytail feel more elaborate without turning it into a tightly woven braid. The crossings should remain visible and evenly distributed, but the lower twists can be looser to create a cascading effect. It works best on long hair because each twist needs enough length to cross the center and tuck underneath. For fine hair, use smaller sections and add gentle texture before styling. A dark metallic cuff at the base can provide a subtle Halloween accent, although the wrapped pattern is distinctive enough without it. The hairstyle looks particularly beautiful from behind, where the layered crossings form a decorative framework around the tail.
19. Side-Swept Braided Harness
The side-swept braided harness creates a series of braids that frame the head and connect across the back like a delicate harness made entirely from hair. Begin with a deep side part and create a narrow braid along the heavier side, following the hairline toward the back. On the opposite side, create two smaller braids at different heights. Bring the braids across the back and connect them with hidden pins, arranging them into overlapping diagonal lines. Leave the lower hair long and loose so the harness sits clearly above it.

The result is detailed from several angles because the braids cross the head rather than following one straight path. It works particularly well on long hair, where the loose lengths create contrast against the structured upper section. Keep the braids slim enough to overlap without creating too much bulk, and conceal their ends beneath neighboring sections. For Halloween, the design can feel gothic or fantasy-inspired depending on the outfit and finish. A few small pins may be used at the intersections, but avoid adding too many charms that obscure the crossing pattern. The hairstyle is ideal for anyone who wants an elaborate back view with a softer front.
20. Long Twisted Cascade with a Sculptural Finish
The long twisted cascade brings together multiple diagonal twists and a distinctive finish at the ends. Start at the crown with two narrow sections and twist them together, adding small pieces as you move toward the back. Create a second twist beneath the first, allowing the two structures to cross once before continuing downward. Repeat until the twists form a layered pattern across the back of the head. Gather the remaining lengths into a loose low ponytail, then separate the ends into three or four sections and fold them into broad loops secured discreetly with pins.

The upper portion gives the hairstyle a woven, cascading appearance, while the sculptural ends add an unexpected final shape. This is particularly effective on long hair because the twists can extend well below the crown before transitioning into the looped finish. Keep the loops broad and slightly uneven so they look artistic rather than like a conventional bow. If your hair is thick, create fewer, fuller loops; finer hair may look better with several smaller shapes. Use lightweight pins and flexible hold spray to keep the design secure. The hairstyle makes an excellent statement for Halloween because the details continue from the crown to the ends instead of relying on a single accessory.
Final Thoughts
Long hair makes it possible to create Halloween hairstyles that feel elaborate, sculptural, and genuinely different from everyday looks. Braided frameworks, wrapped ponytails, diagonal twists, linked structures, and cascading patterns all use length in distinctive ways. Rather than adding multiple accessories to a familiar hairstyle, choose one or two techniques that create a strong silhouette and allow the hair itself to provide the drama. For more elegant ideas, try our dark feminine Halloween hairstyles.
Before styling, consider the weight of your hair and the amount of time you have available. Intricate back-view designs are easier to build with a few sectioning clips, small elastics, a tail comb, and pins that match your hair color. Practice complicated crossings beforehand, and check the hairstyle from the back and sides to ensure the details remain visible. If your hair is layered or fine, use smaller sections and secure the ends carefully; if it is thick, build the design in stages to keep it comfortable. The best statement hairstyle is one that feels secure enough to enjoy the evening while showcasing the length, texture, and creativity that make long hair so versatile. For more ideas, explore our unique Halloween hairstyles and cute Halloween hairstyles, or browse the full fall hairstyles roundup. For costume ideas, see our Halloween hairstyles for pirate costumes.