Unique Pumpkin Patch Hairstyles You Rarely See: 18 Creative Fall Looks

Unique pumpkin patch hairstyles are the perfect opportunity to try a look that feels a little more artistic than the usual loose waves, simple braids, and everyday ponytails. With autumn leaves, rustic farm settings, oversized sweaters, and warm seasonal colors creating a beautiful backdrop, an unusual hairstyle can become the standout detail in your fall photos. The secret is choosing a design with an interesting silhouette, unexpected sectioning, or a distinctive woven pattern that looks creative without being impossible to wear.
These unique pumpkin patch hairstyles explore techniques that go beyond conventional styling. Think infinity-inspired braiding, sculptural twists, interlaced sections, asymmetrical arrangements, and dimensional shapes that look intriguing from the front and back. Some designs work best on long hair, while others can be adapted for medium lengths or naturally curly textures. Whether you want an editorial-inspired look for photographs or a wearable hairstyle for a day outdoors, these 18 creative ideas offer fresh inspiration for making your autumn style feel individual. For more classic options, see our pumpkin patch hairstyles.
1. The Infinity Loop Braid
The infinity loop braid creates a distinctive woven pattern by passing sections of hair around one another in a repeated figure-eight movement. Begin with two sections of similar thickness and cross them in alternating directions, wrapping each section around the other to create the recognizable infinity shape. Continue down the length, keeping the loops consistent enough to hold their form without pulling the hair too tightly. This technique works best on long hair because extra length allows the repeated pattern to remain visible. A little texture spray can help the sections grip, especially if the hair is naturally smooth.
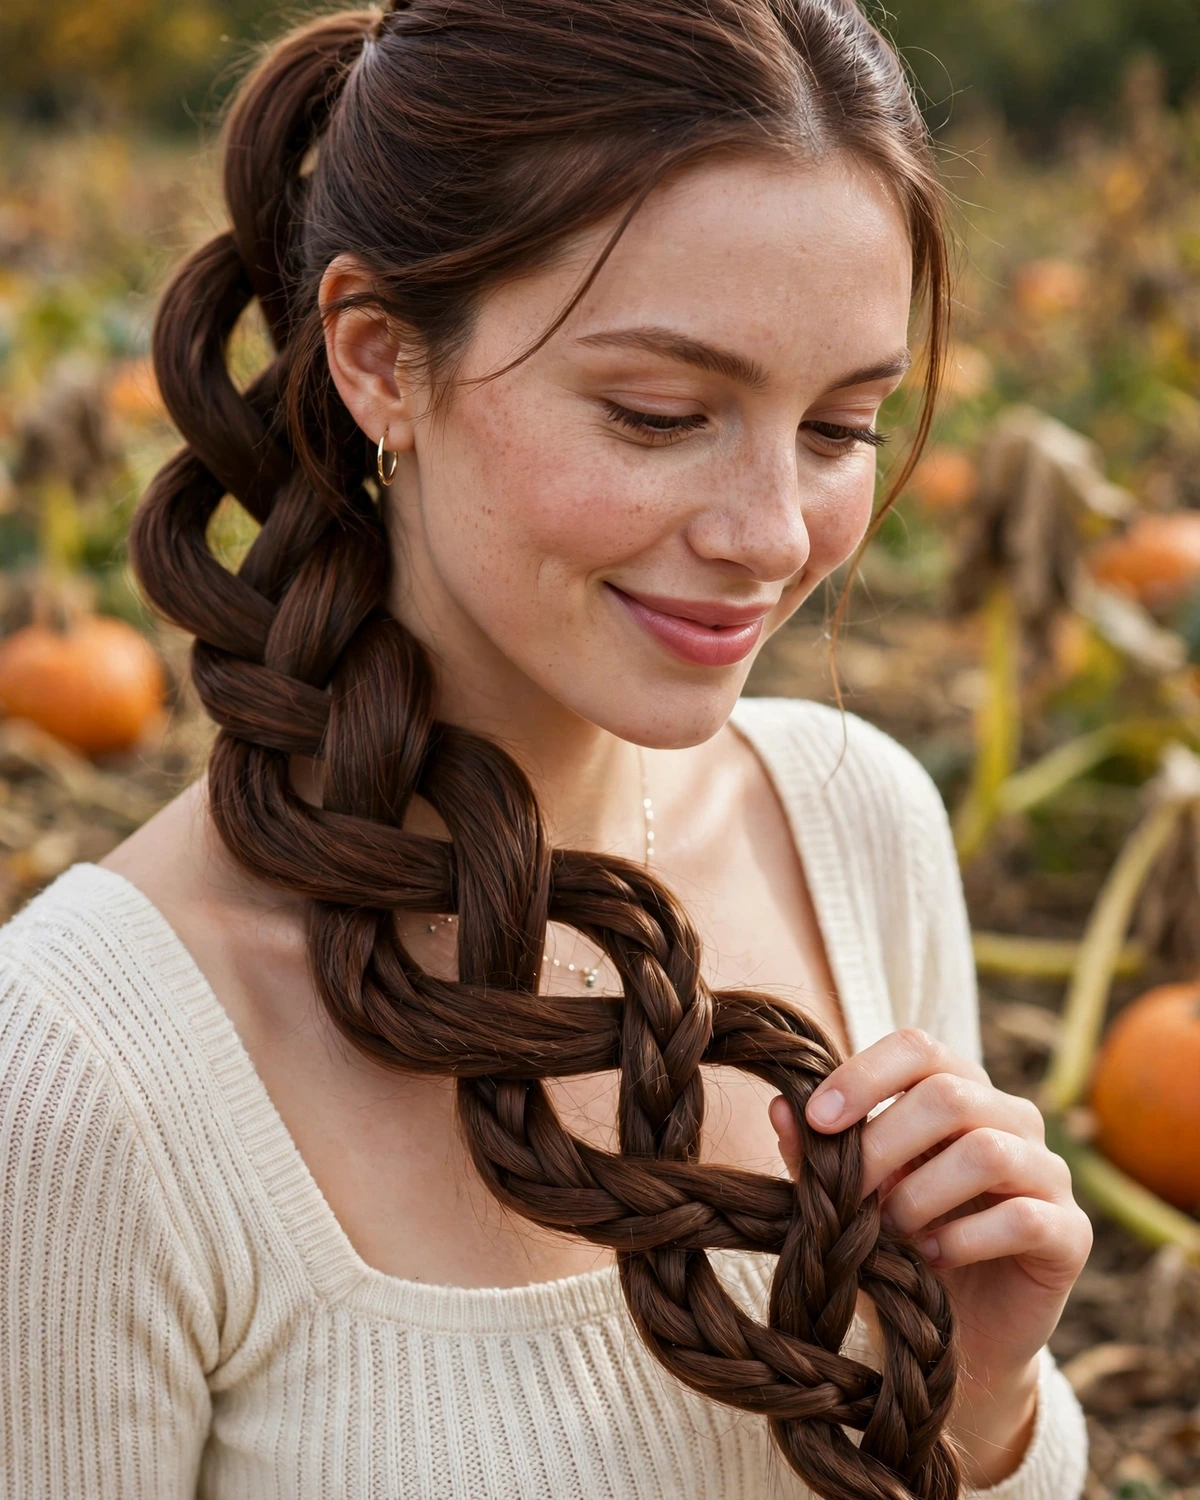
For a pumpkin patch outing, position the braid over one shoulder or let it fall down the back so its unusual construction becomes the focal point. A close-up photograph against a cream sweater or rust-colored knit will help the pattern stand out. Keep the rest of the look understated, using minimal accessories so the woven detail does not become visually crowded. Secure the end with a small elastic that matches your hair color, then gently adjust any uneven loops with your fingertips. The finished braid feels intricate and artistic while remaining practical enough for an outdoor afternoon.
2. Sculptural Double-Ribbon Twist
This hairstyle creates the appearance of two soft ribbons of hair wrapping around each other without using actual ribbon accessories. Separate two broad sections from the upper sides of the head and twist each one individually, keeping the sections smooth enough to show their shape. Bring them toward the back and wrap them around one another in a loose, sculptural formation. Secure the structure with hidden pins, then allow the remaining hair to fall naturally beneath it. The result should look dimensional, with the twists creating visible curves rather than lying flat against the head.
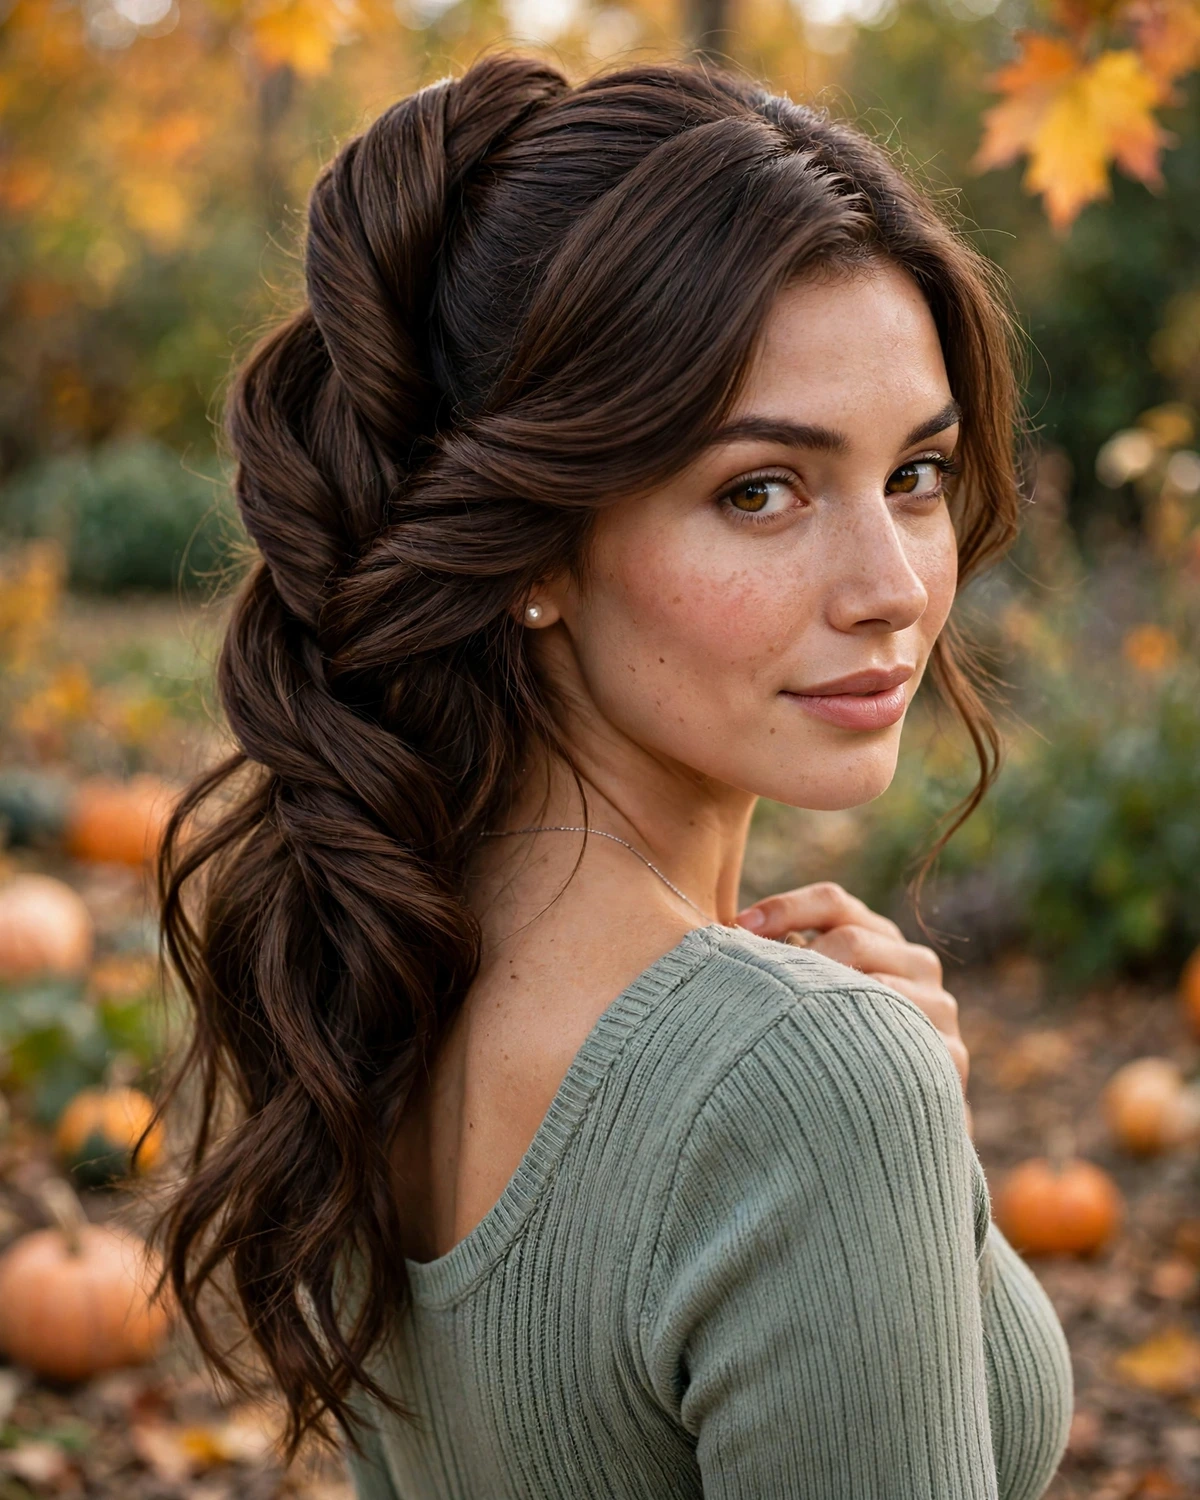
The double-ribbon twist is especially photogenic from a rear three-quarter angle, where the overlapping sections reveal their sculptural form. It works well on medium-long and long hair, particularly when the lengths have a little natural movement. Pair it with a simple knit dress or a structured autumn top so the hairstyle remains the main attraction. Avoid pulling the twists too tightly or making both sides perfectly identical; a slight difference in their curves creates a more artistic finish. A flexible-hold spray can preserve the shape while keeping the hair soft enough to move comfortably.
3. The Woven Diamond Back
The woven diamond back uses small sections of hair to create a geometric pattern across the upper back of the head. Start by dividing the crown into four sections, then cross the first pair diagonally and secure them near the center. Bring another pair from slightly lower down, crossing them in the opposite direction so the lines create a diamond-shaped opening. Continue with additional sections only if the hair length and thickness allow the pattern to remain clear. Small elastics or discreet pins help hold the intersections, while loose lengths beneath the design soften the overall appearance.

This hairstyle is made for back-view photographs because the geometric pattern is difficult to appreciate from the front alone. It works best on medium-long or long hair with enough length to create several crossings. Choose a plain sweater or a top with a clean shoulder line to avoid distracting from the design. Before leaving home, check each intersection from behind and make sure the sections lie neatly without creating uncomfortable tension. The pattern does not need to be perfectly symmetrical; slight variation can make the design feel more handmade and creative while still looking deliberate in autumn pictures.
4. The Asymmetric Sculpted Coil
The asymmetric sculpted coil transforms one side of the hair into a dimensional feature while leaving the opposite side relatively simple. Take a broad section from one temple, twist it backward, and gradually coil the remaining length into a flat spiral near the back of the head. Secure the coil with pins hidden beneath its outer edge. Leave the rest of the hair open, either naturally straight or softly textured, so the contrast between the sculpted section and the loose lengths becomes clear. This design works particularly well on medium and long hair, although shorter lengths can create a smaller coil.

The unusual placement gives the hairstyle a contemporary, editorial feel without requiring a full updo. For photographs, turn the sculpted side toward the camera and angle your shoulders slightly away so the coil remains visible. A chocolate-brown top, muted olive knit, or cream sweater provides a calm background for the hair detail. Use pins that match your hair color and avoid winding the coil too tightly, as a little softness helps it blend into the overall hairstyle. The finished look is striking from the side and still comfortable enough for a relaxed pumpkin patch visit.
5. The Ladder-Woven Ponytail
The ladder-woven ponytail creates a series of connected sections along the length rather than using a conventional braid. Begin with a low or mid-height ponytail and divide off two small outer sections near the base. Cross them over the central length, then secure them underneath with a small elastic. Repeat farther down, incorporating fresh sections to create several horizontal connections along the ponytail. The result resembles a loose ladder, with open spaces between the woven points. It is best suited to long hair because the structure needs enough length to show multiple connected levels.
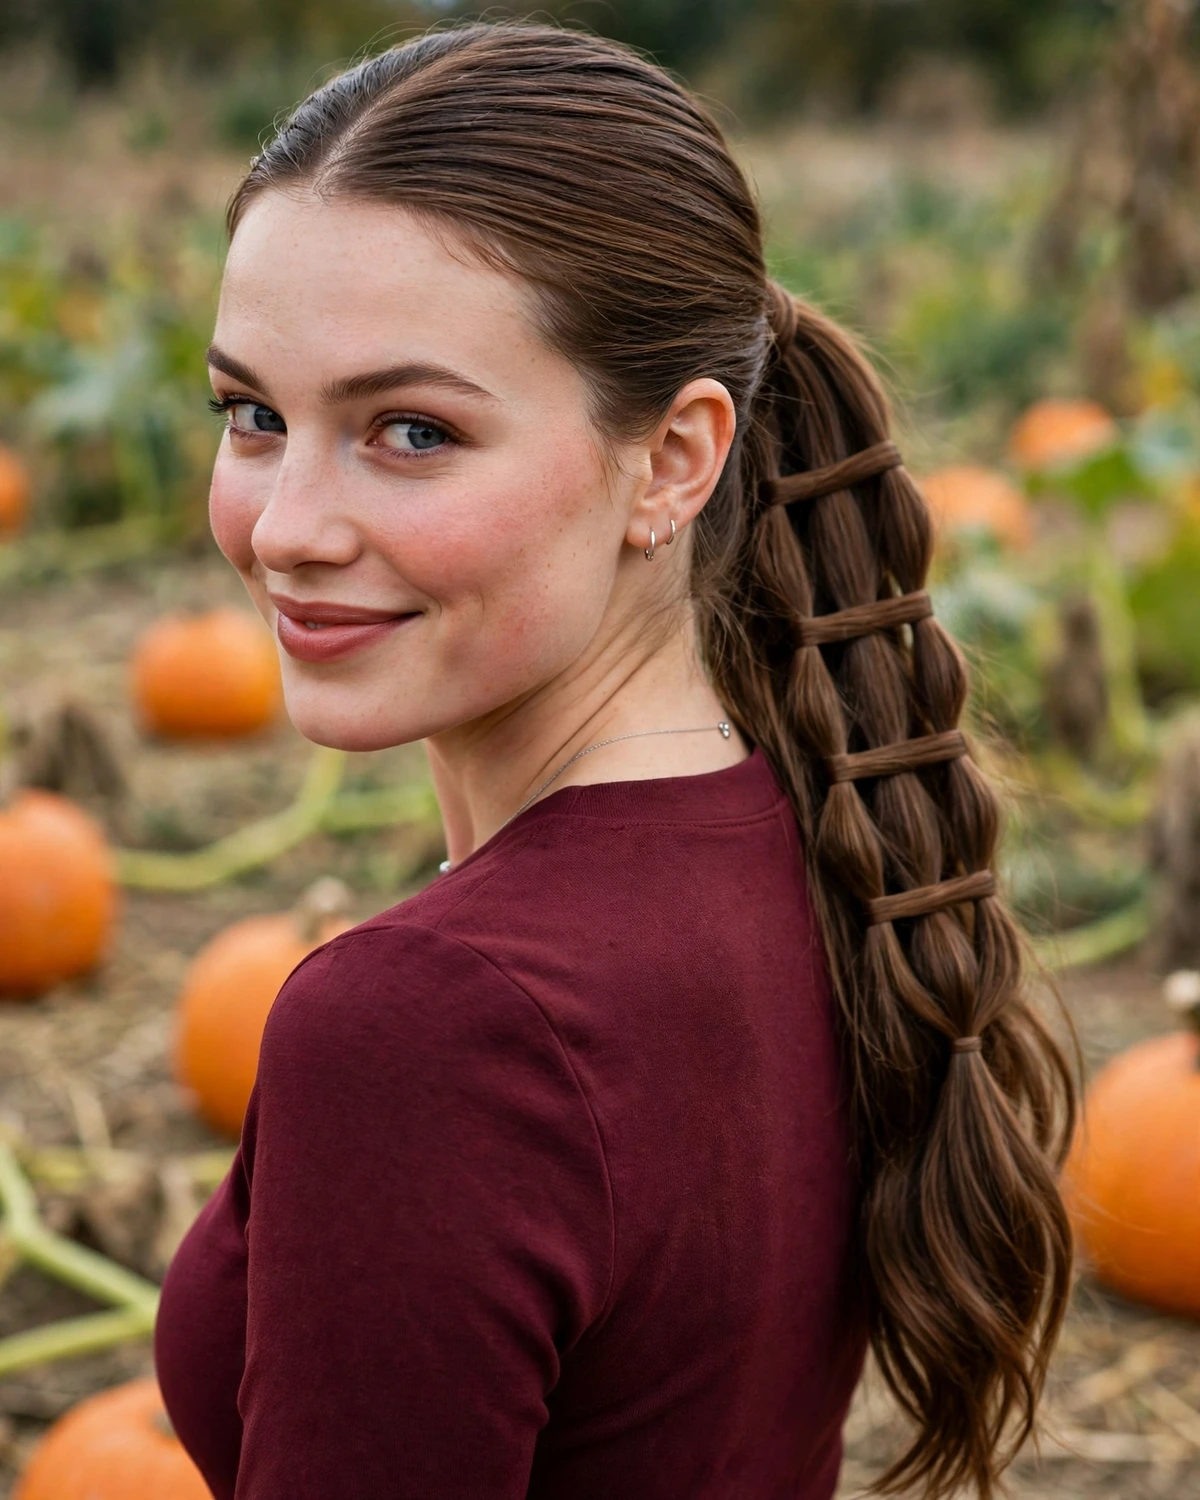
For a creative fall photo, drape the ponytail over one shoulder or let it hang down the back against a contrasting outfit. The ladder pattern becomes more visible when the hair has some natural texture, so apply a small amount of styling cream before starting if the sections slip easily. Keep each connection secure but avoid compressing the entire ponytail into a stiff shape. This hairstyle is especially useful when you want a design that looks elaborate but uses straightforward techniques. A simple outfit and a close back photograph will show off the unexpected construction beautifully.
6. The Floating Twist Architecture
Floating twist architecture creates the illusion of curved sections resting above the hair instead of being tightly attached to the scalp. Separate several medium-sized sections across the crown, twist each one loosely, and secure the ends underneath nearby sections so the twists appear to overlap. Keep the arrangement open, allowing small gaps between the curved pieces. The design works best when the twists have enough body to maintain their shape, so medium-thick hair or lightly textured hair can be especially suitable. Longer lengths offer more flexibility for creating a layered, dimensional arrangement.
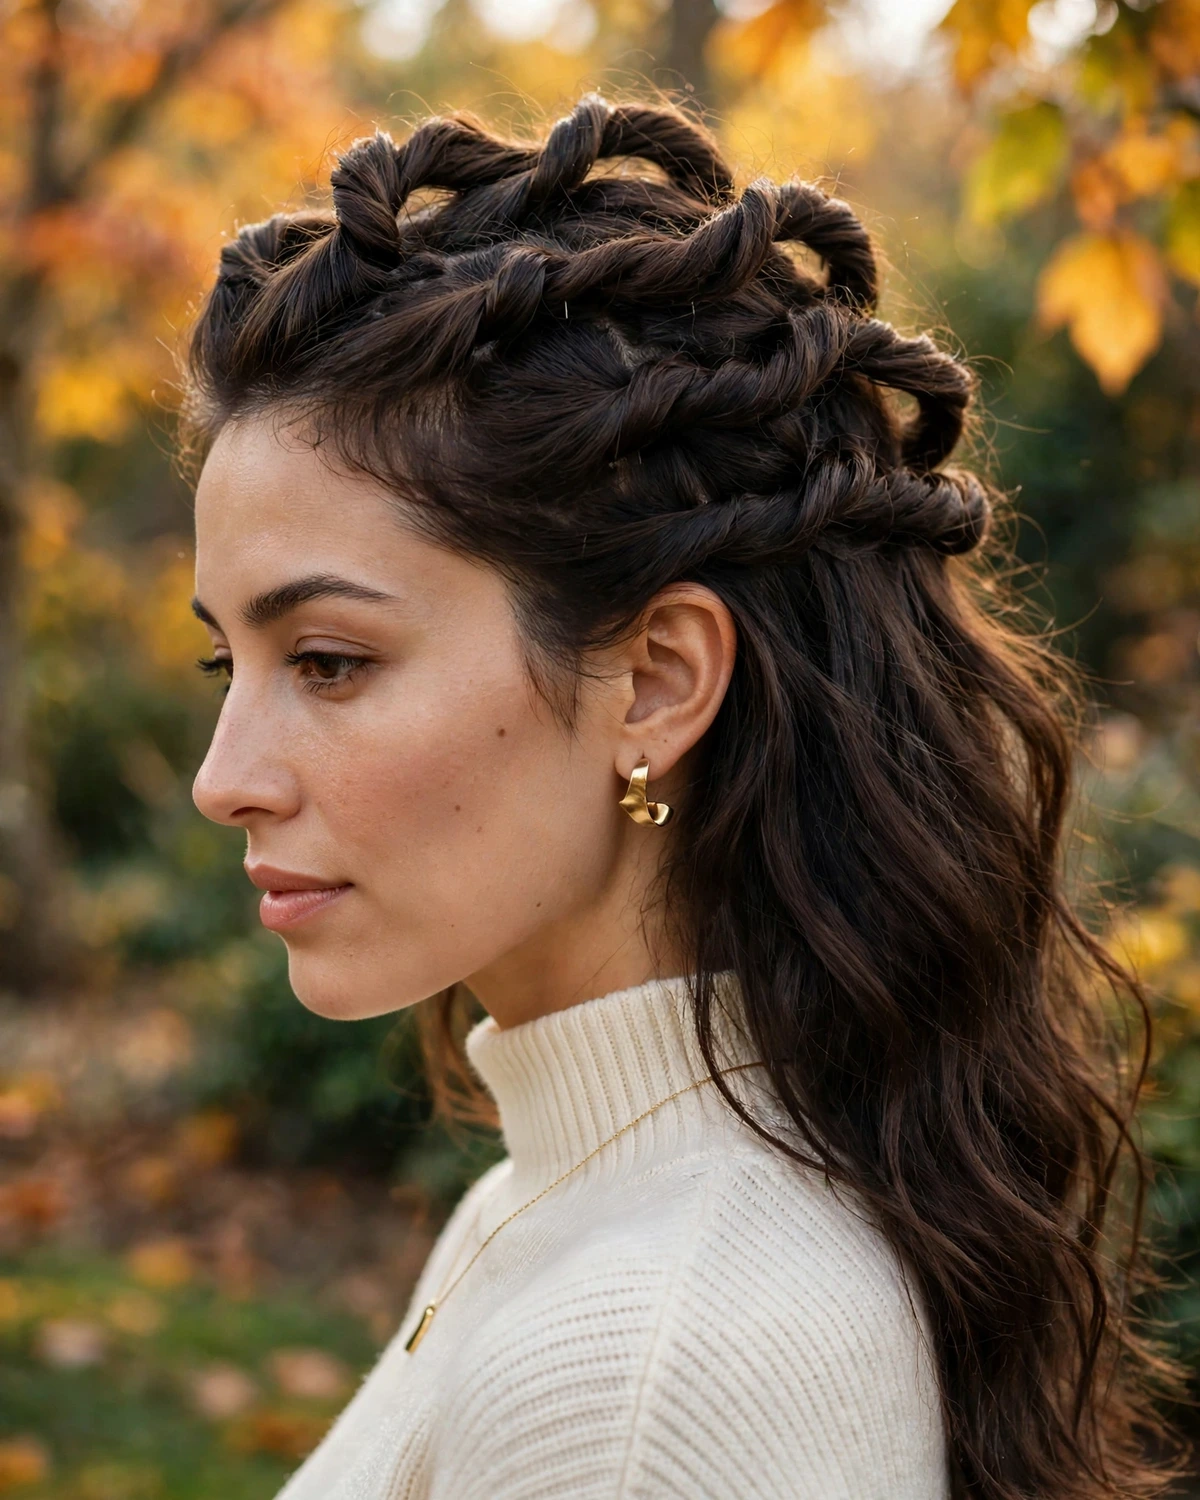
This look is ideal for someone who wants a hairstyle with an artistic silhouette rather than a traditional braid or bun. Photograph it from behind and slightly above to show the different levels of the twists. A smooth knit top or a minimal autumn dress will keep attention on the hair. Use several discreet pins at the points where the twists overlap, checking that none are visible from the camera angle. The structure should feel secure but not overly rigid; gently loosening the edges creates a softer finish that fits the relaxed mood of an outdoor seasonal photoshoot.
7. The Spiral-Interlace Side Braid
The spiral-interlace side braid combines a diagonal braid with small sections that wrap around its outer edge. Begin with a loose side braid, keeping the central structure relatively simple. As you work downward, take a thin strand from one side and wrap it around the braid before incorporating it into the next section. Repeat at irregular intervals so the wrapping creates a subtle spiral effect instead of a perfectly uniform pattern. The technique adds dimension to a familiar shape and works particularly well on long hair with enough length to make the wrapped details visible.
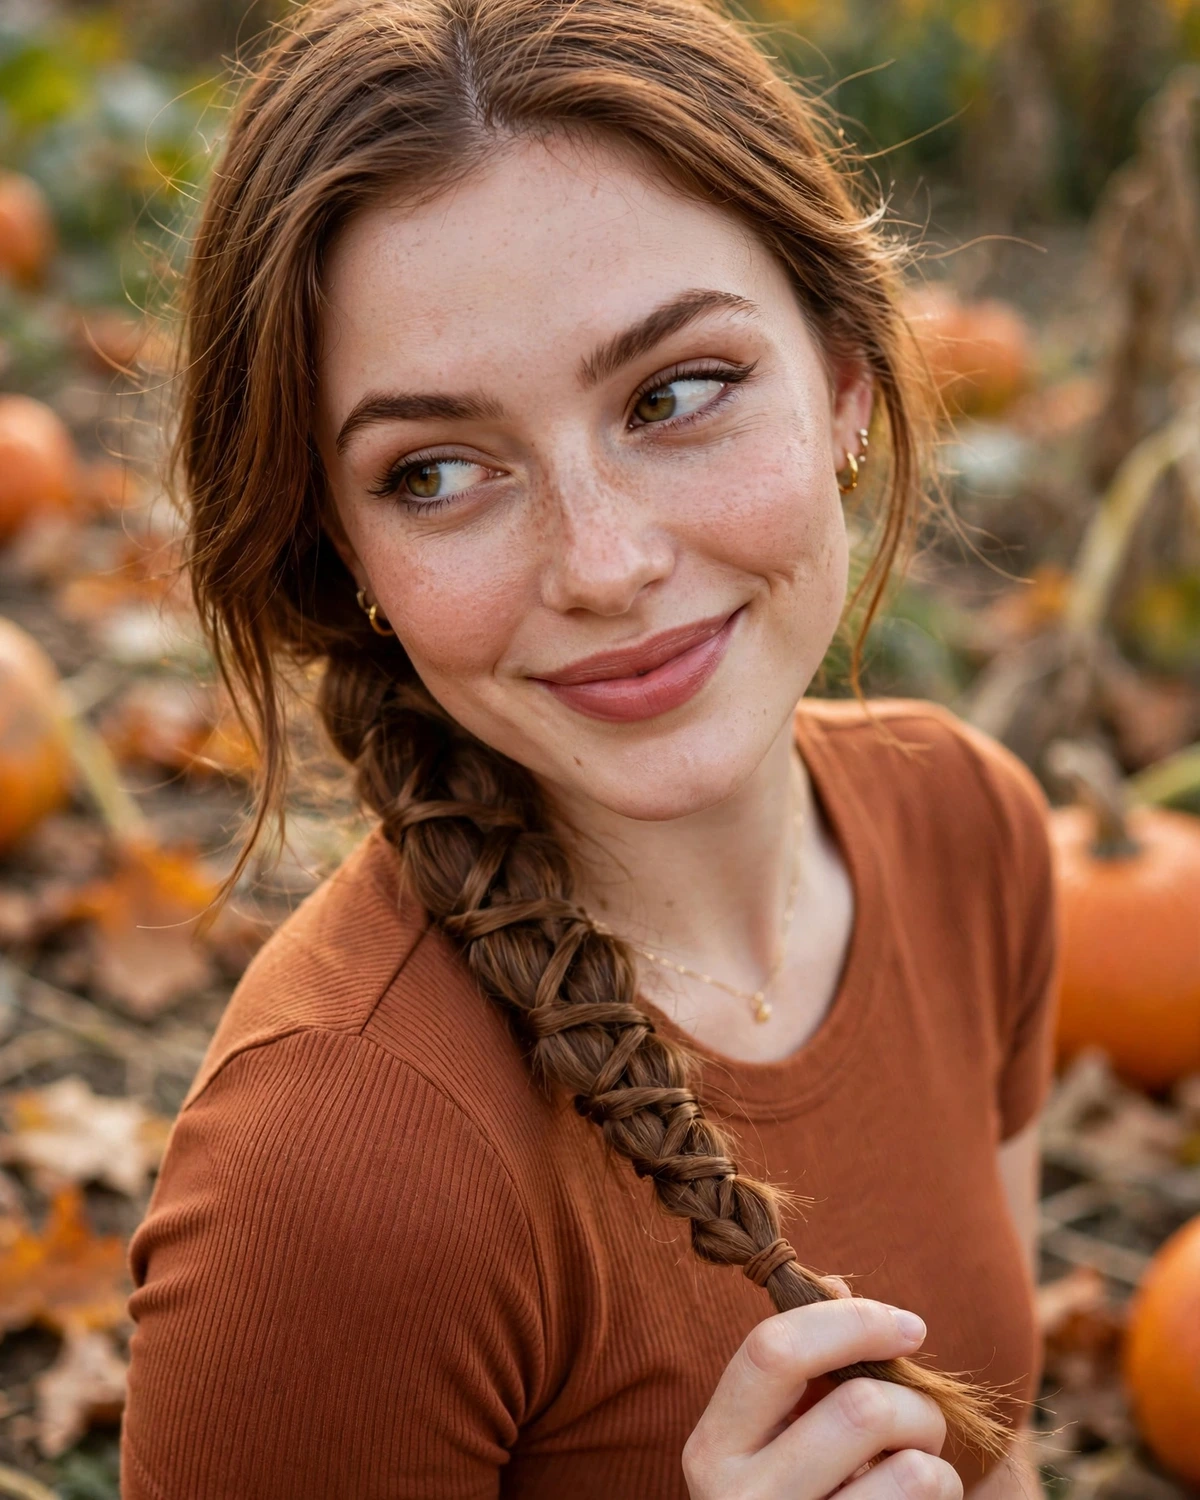
For pumpkin patch photographs, place the braid over one shoulder and capture a close-up that shows both the central weave and the spiral accents. This hairstyle pairs well with a cozy sweater, a textured cardigan, or a simple autumn blouse. If your hair has layers, keep the wrapped strands narrow so they remain secure instead of slipping free. Use a light styling product for grip and secure the end with a small elastic. The braid feels more intricate than an everyday plait while still being wearable, making it a useful choice for anyone who wants an uncommon hairstyle without an elaborate updo.
8. The Curved Crossbar Crown
The curved crossbar crown uses several horizontal sections that intersect with a curved central detail. Create a small twist or braid along one side of the crown, then bring a narrow section from the opposite side across it. Secure the crossing discreetly and repeat with another section placed slightly lower. The resulting arrangement creates a layered, crossbar effect rather than a traditional circular crown braid. Keep the sections narrow enough to show their direction, and allow the rest of the hair to remain loose. Medium-long hair is particularly suitable, although shorter hair can support a smaller version with fewer crossings.

The curved design looks especially interesting from the back because the sections create lines that follow the natural shape of the head. It pairs well with simple autumn outfits and understated accessories. For a photograph, turn your head slightly to reveal the crown’s curve and let the loose lengths fall naturally over the shoulders. Avoid pulling the sections too tightly, which can make the arrangement look more formal than intended. A flexible spray and a few hidden pins should be enough to preserve the main structure while allowing the hair to retain its soft, creative finish.
9. The Braided Rosette Coil
The braided rosette coil creates a flower-like shape using the hair itself, without needing a floral clip. Make a small braid from a section near the back of the head, then gently loosen one edge to create a wider, softer surface. Coil the braid around its starting point, keeping the widened edge facing outward so the layers form a rosette. Secure the coil with pins underneath and leave the remaining hair loose or gathered softly around it. The size of the rosette depends on the thickness and length of the braid, so a compact version works well for medium hair while longer hair can support a more dimensional shape.

This hairstyle brings an unexpected artistic detail to autumn photographs. Place the rosette slightly off-center at the back rather than directly in the middle, giving the arrangement a more modern silhouette. A simple sweater or dress with a clean neckline helps the shape remain visible. If the braid is too tight, the coil can look like a small knot rather than a layered rosette, so gently widen the braid before wrapping it. Use enough pins to secure the base without piercing the visible surface. The result feels creative and romantic while remaining distinct from ordinary floral accessories.
10. The Split-Path Twist Design
The split-path twist design features two twists that travel along different routes before meeting at the back. Take one section from the upper temple and direct it diagonally toward the center back. Take a second section from slightly lower down and guide it along a more horizontal path. Twist both sections loosely, then cross them at a chosen point and secure them underneath the surrounding hair. The different directions create a sense of movement and give the hairstyle a deliberately asymmetric appearance. The remaining lengths can be worn straight, softly wavy, or naturally textured.
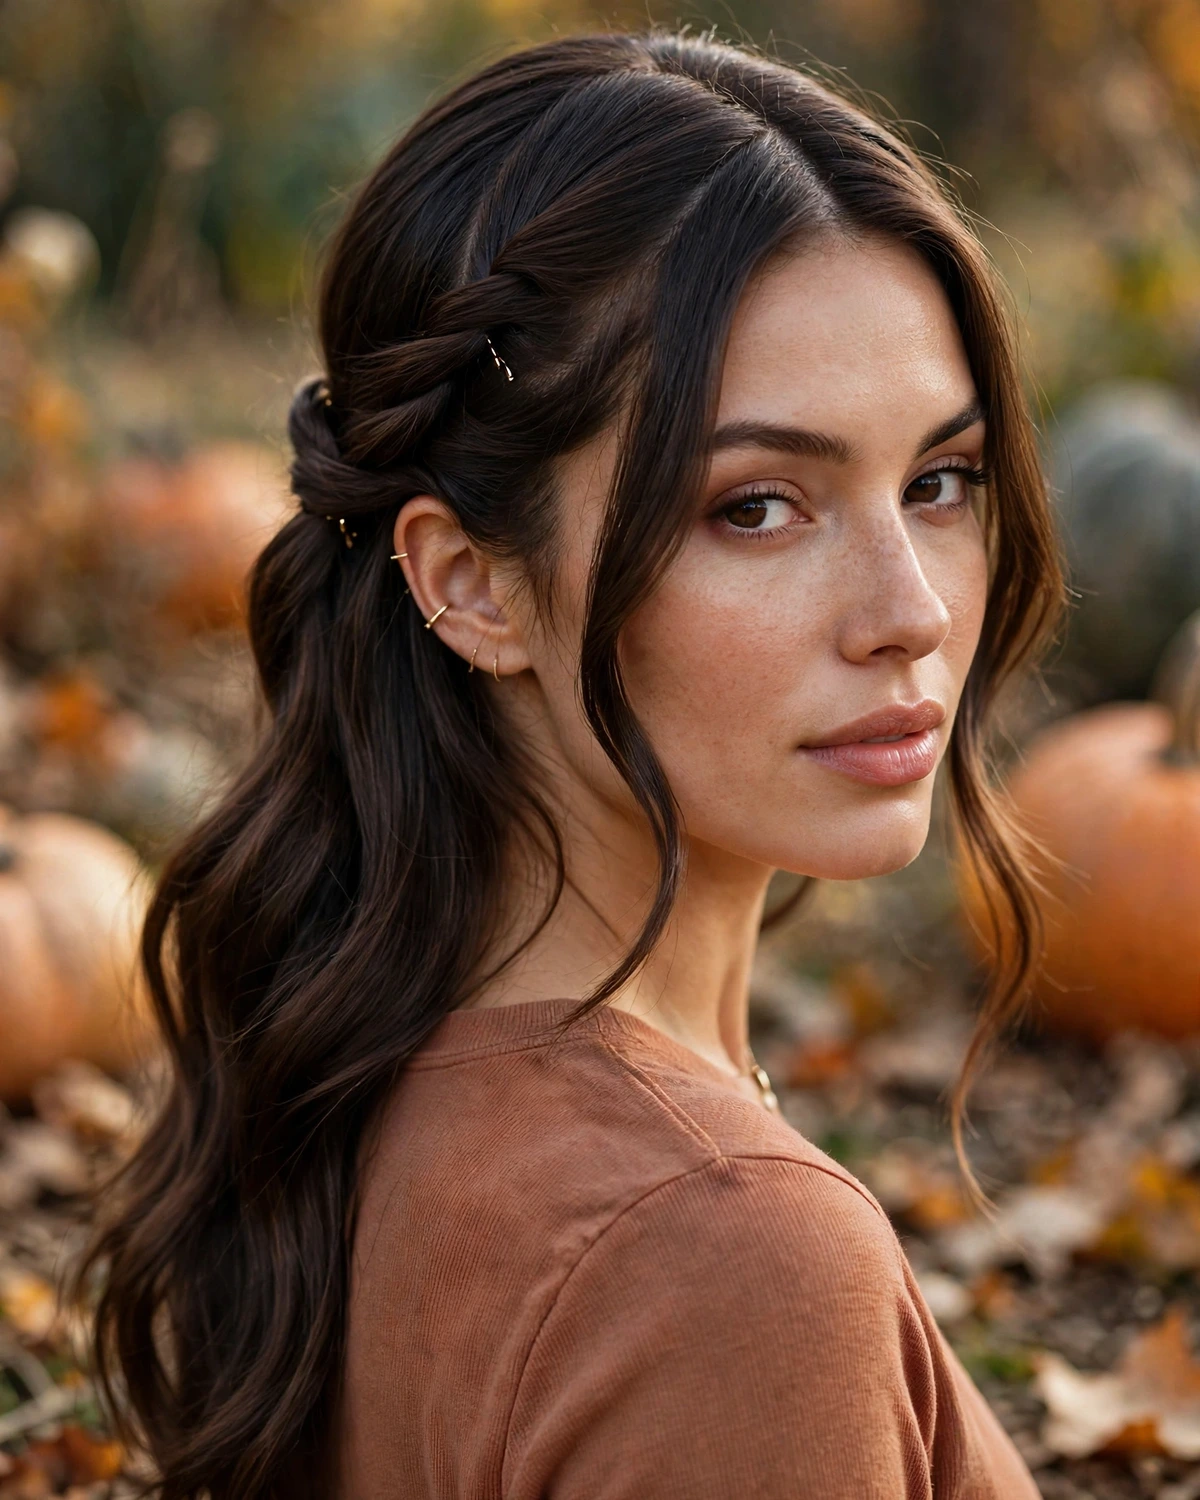
This design works especially well for medium-long hair and is ideal when you want a hairstyle that looks interesting from multiple angles. A side portrait shows the separate pathways, while a back photograph reveals the point where they meet. Wear a plain autumn top or a knit dress that does not compete with the twists. If your hair is very fine, avoid taking sections that are too large, as they may flatten the crown. A small amount of texture product can help each twist retain definition. The final style feels architectural but still soft enough for a casual pumpkin patch outing.
11. The Hidden Infinity Accent
The hidden infinity accent uses a small infinity-style weave as a detail within a larger, loose hairstyle. Separate two narrow strands from one side of the head and loop them around each other in a repeated figure-eight pattern for a short distance. Secure the woven section underneath a layer of hair so the design appears partly concealed. Leave the remaining lengths open, allowing only a portion of the infinity pattern to show when the hair shifts. This is a useful option for medium-length hair because the accent does not require a long, full braid.

The partly hidden design creates a subtle surprise in photographs rather than dominating the whole hairstyle. It works especially well when the hair is swept over one shoulder or when a three-quarter angle reveals the woven section near the side. Keep the outfit simple so the small detail can be appreciated in a close-up. Secure the end with a discreet pin and check that the weave does not unravel when you move your head. This hairstyle is ideal for someone who prefers unusual details that feel understated rather than a dramatic, all-over design.
12. The Sculpted Loop Chignon
The sculpted loop chignon forms a low arrangement of overlapping loops rather than a conventional round bun. Gather the hair loosely at the nape and divide it into three sections. Fold the first section into a loop and pin it in place, then position the second loop beside it and tuck the third section beneath the others. Allow the shapes to overlap naturally so the finished chignon has a dimensional, almost woven appearance. This technique works best on medium-long and long hair, while shorter hair may need fewer loops to create a secure shape.

The chignon looks especially attractive from the side and back, making it a good choice for photographs where the hairstyle should complement a polished autumn outfit. A fitted knit dress or a simple top with a visible neckline will balance the low shape. Use pins that match your hair color and place them underneath the loops rather than across their visible surface. If you want a softer bohemian finish, leave a few delicate strands around the temples. The hairstyle offers a more unusual alternative to a standard low bun while remaining practical for outdoor events.
13. The Offset Woven Halo
The offset woven halo creates a partial crown using interlaced sections that sit higher on one side than the other. Start near one temple and take two narrow sections, crossing them loosely while incorporating small pieces from the upper side of the head. Continue the weave only partway around the crown, then secure the end behind the opposite ear or beneath the loose hair. The design should follow a gentle diagonal path rather than forming a complete, even circle. It works particularly well on long hair, but medium-length hair can achieve a shorter, more compact version.

This hairstyle is visually interesting because the woven halo changes shape depending on the camera angle. A three-quarter portrait highlights the raised side, while a rear view shows how the weave blends into the loose lengths. Choose an outfit in a solid seasonal shade, such as muted green, warm cream, or deep brown. Gently loosen the outer edge of the weave for a fuller appearance, but keep the incorporated sections secure. This creates a soft, artistic crown without relying on flowers, ribbons, or other decorative accessories.
14. The Triple-Ridge Twist Back
The triple-ridge twist back uses three parallel twists to create a layered pattern across the upper back of the head. Take three narrow horizontal sections from the crown and twist each one independently, keeping the direction consistent so the ridges appear to run alongside one another. Secure the ends near the center back, then position the twists close enough to create a connected arrangement without flattening their shape. Leave the lower lengths loose. This style works best on medium-long or long hair, particularly when the sections have enough thickness to create visible ridges.
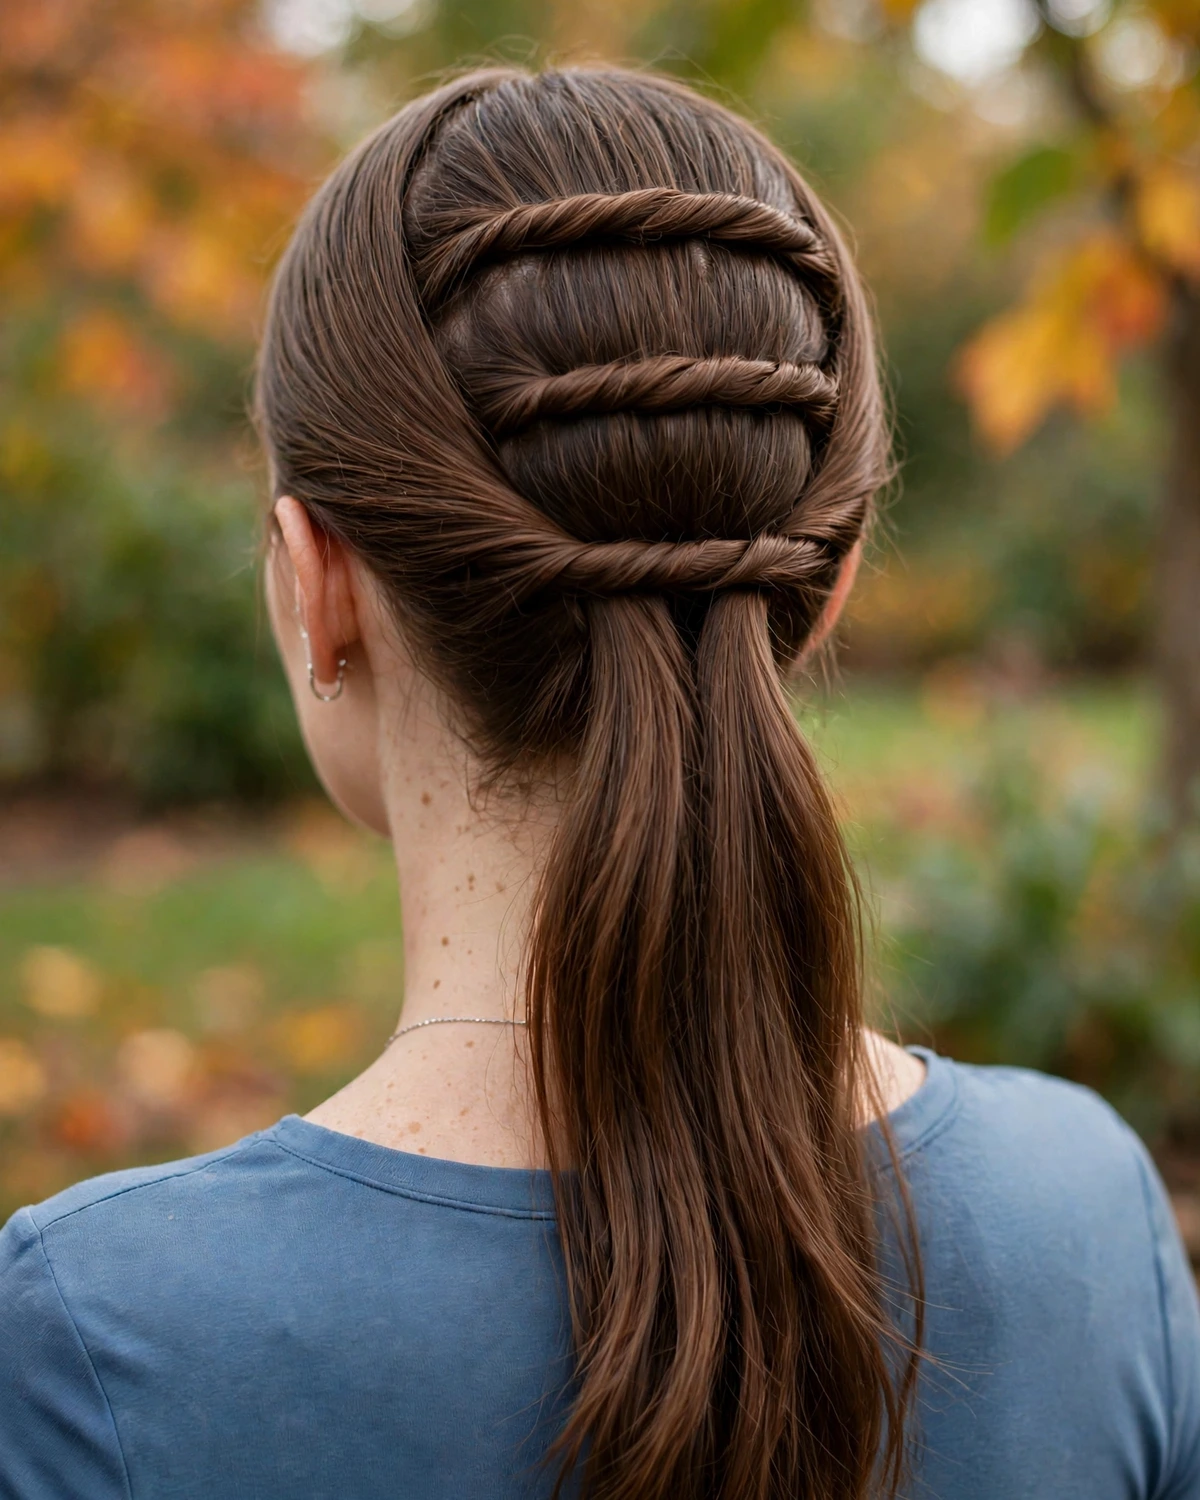
For the best photograph, ask someone to capture the hairstyle from directly behind with the head held naturally upright. The parallel twists create a distinctive pattern that is easy to miss from the front. A simple top with a smooth back or understated knitwear will provide a clean backdrop. If your hair is slippery, apply a small amount of texturizing product before twisting and use discreet pins at each endpoint. Avoid twisting the sections so tightly that they become thin cords; a little fullness gives the design its sculptural character and keeps it from looking too rigid.
15. The Curly Interwoven Side Sculpture
This hairstyle is designed for naturally curly hair, using small sections to create a sculptural side arrangement while preserving the rest of the curl pattern. Begin with defined, moisturized curls and choose one side of the head for the detail. Separate two or three small curl groups near the temple, gently twist them together, and pin them in an overlapping pattern above the ear. Keep the curls loose enough to maintain their natural shape rather than stretching them flat. Leave the remaining hair full and rounded, allowing the sculpted section to contrast with the open curls.
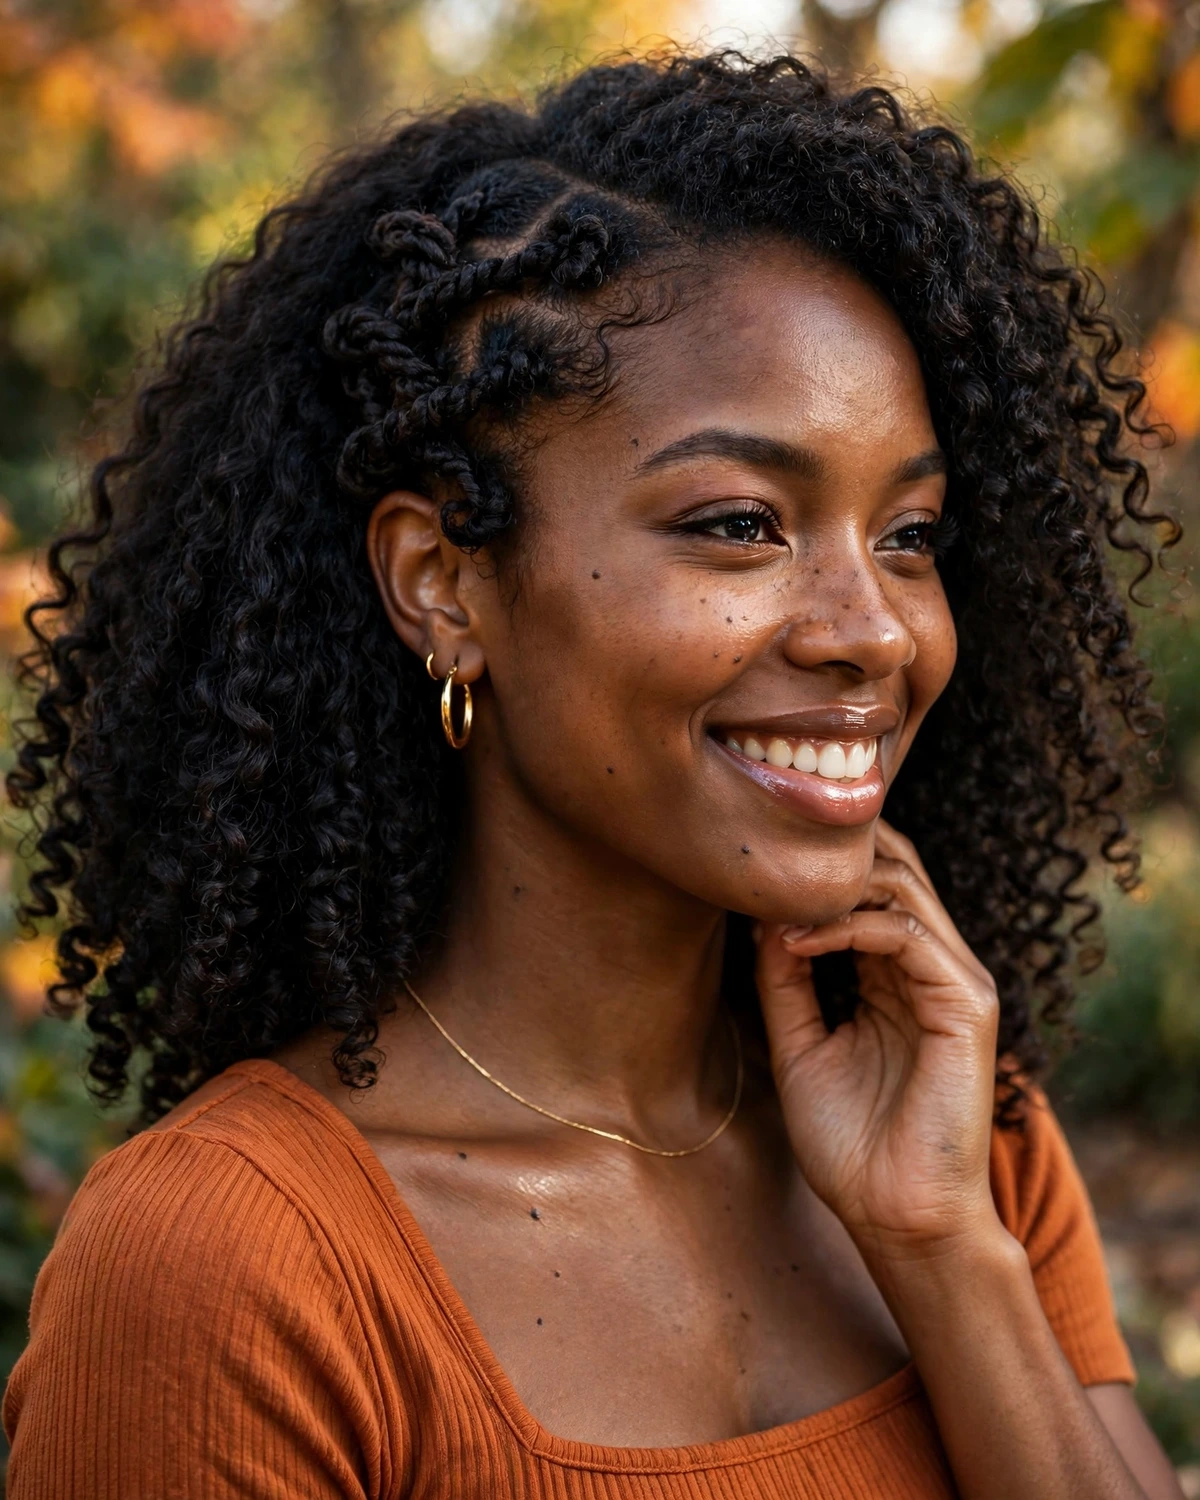
The style is particularly effective in close-up photographs because it shows both the natural texture and the unusual arrangement. Pair it with a simple autumn sweater so the curls remain the main feature. Use pins designed for your hair density and avoid forcing the curl groups into shapes that feel uncomfortable. If a few curls shift during the day, reshape them individually with your fingers instead of brushing through the entire hairstyle. The result celebrates natural texture while adding a creative detail that feels distinctive and wearable.
16. The Reverse-Woven Ponytail Base
The reverse-woven ponytail base creates an unusual focal point at the back of a ponytail. Begin by gathering the hair into a low or mid-height ponytail, leaving two small sections free near the base. Cross the first section over the elastic and secure it underneath, then bring the second section across from the opposite direction. Repeat the crossings once more if the length allows, creating a woven casing around the base rather than a simple wrapped strand. Keep the ponytail itself loose and textured so the woven base remains the main detail.
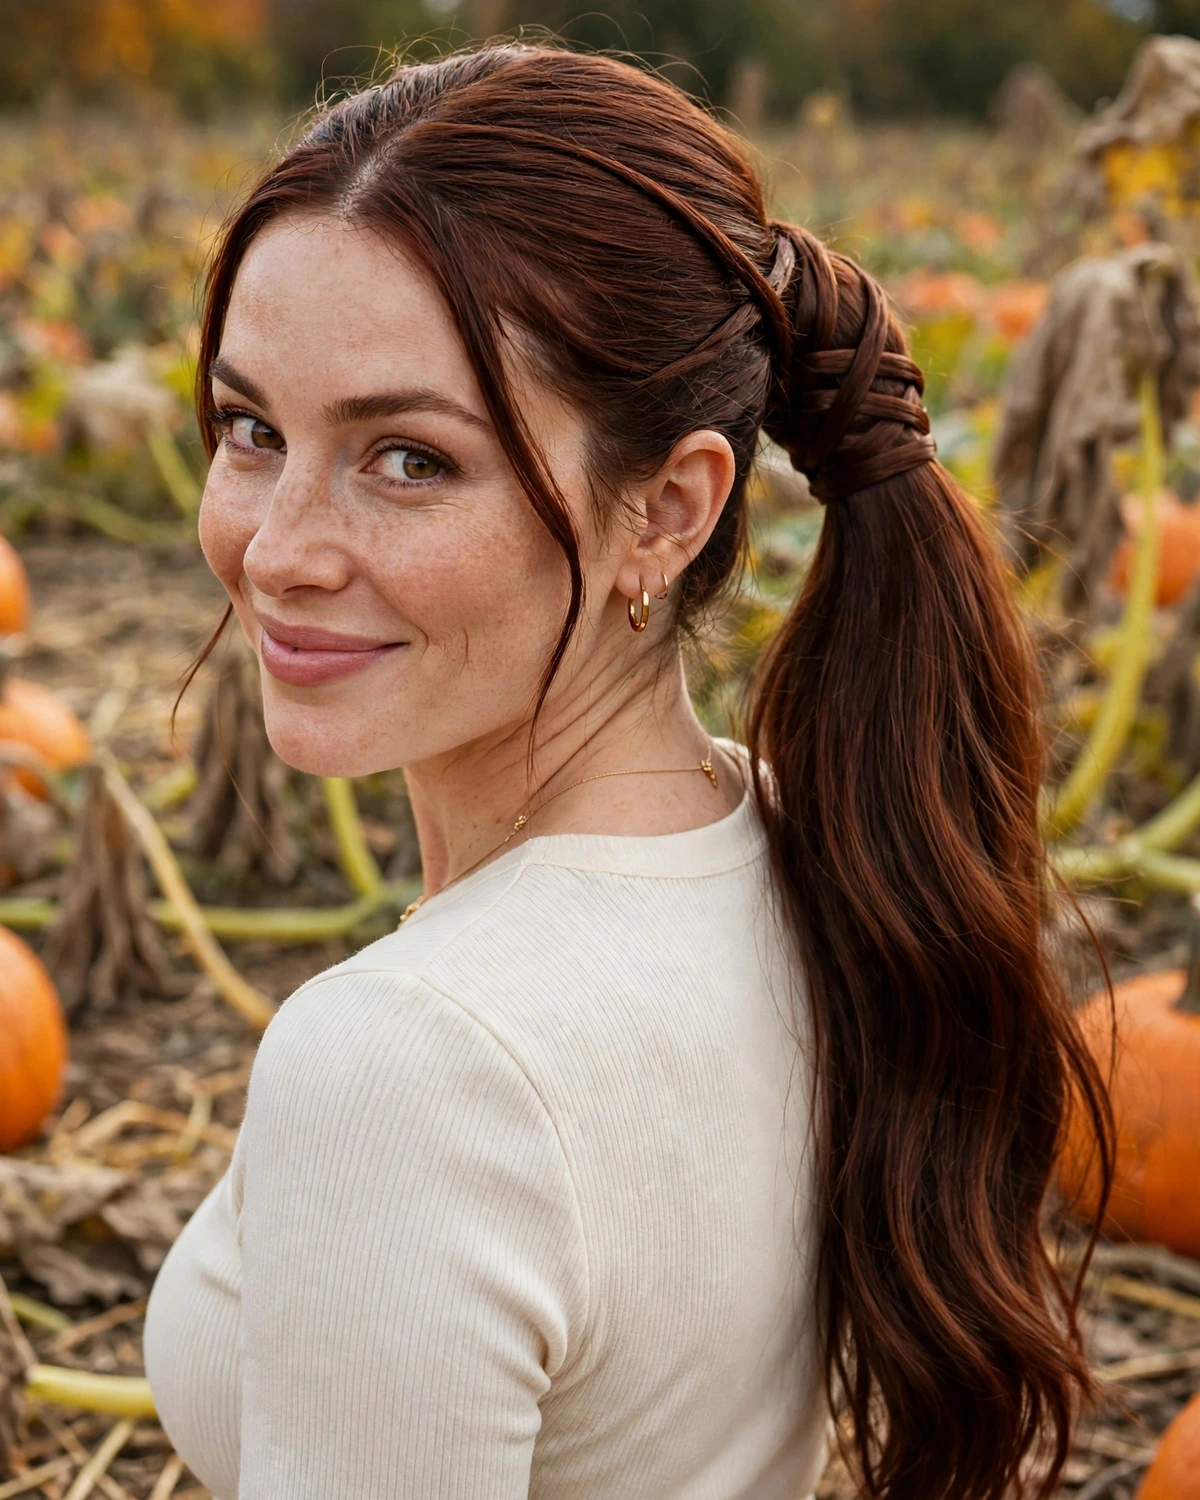
This look works well for long hair and can be styled with natural waves or broad bends through the length. For photographs, turn slightly away from the camera so the wrapped base and the ponytail are visible together. A textured knit or a simple autumn dress complements the hairstyle without competing with its construction. Use hidden pins to secure each crossing, and make sure the ponytail feels comfortable before heading outdoors. This design is a small but effective way to make a familiar hairstyle look more inventive without adding extra accessories.
17. The Sculptural Side Fan
The sculptural side fan creates a fan-shaped arrangement from several sections near one temple. Take three or four narrow sections and direct them backward at slightly different angles, securing their ends close together behind the ear. Gently spread the visible sections so they form a soft fan rather than a flat cluster. Leave the rest of the hair loose, allowing natural texture to soften the transition between the structured side and the open lengths. This hairstyle works particularly well on medium and long hair, though short hair with longer temple sections can support a smaller fan.
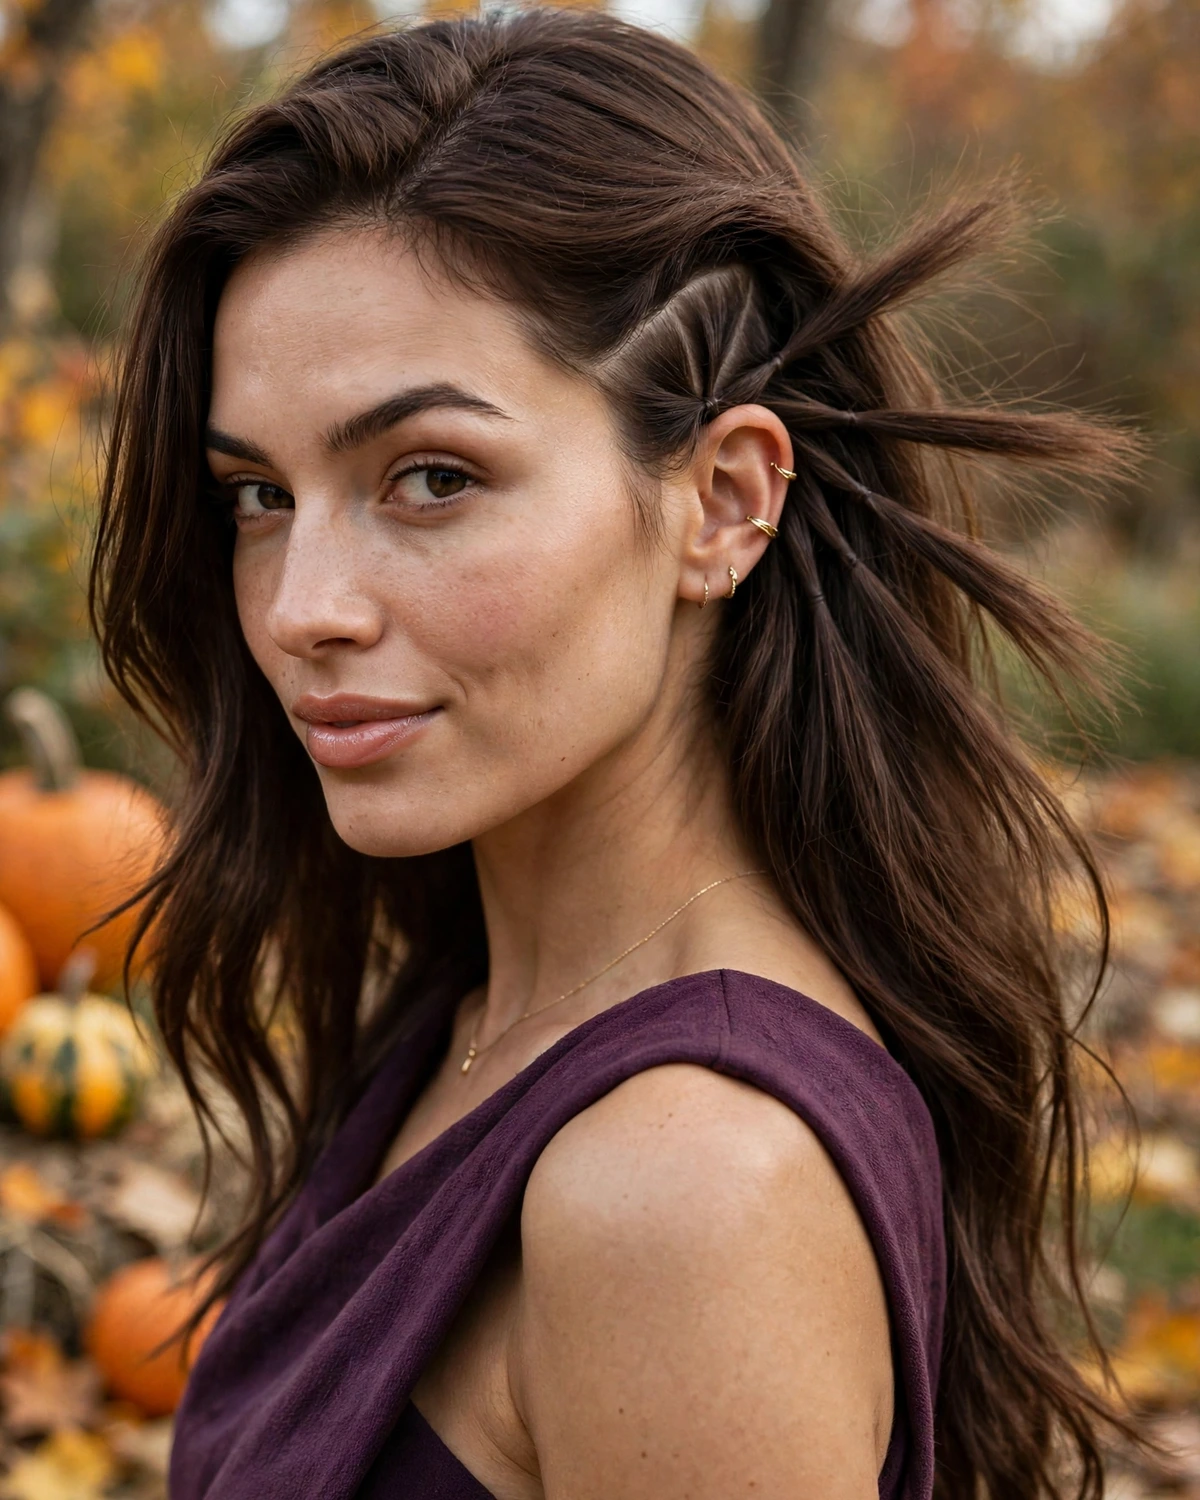
The fan shape looks best from a side or three-quarter angle, where the individual sections can be seen spreading backward. It is a strong choice for autumn photos because it creates a clear silhouette without needing an elaborate updo. Pair it with a simple sweater, a structured top, or a dress in a warm seasonal color. Use small pins that match your hair color and avoid pulling the sections too tightly, as the fan should look dimensional rather than flattened. A light finishing spray helps preserve the shape while leaving the loose lengths soft and movable.
18. The Interlocking Loop Cascade
The interlocking loop cascade combines several loops that connect down the upper back of the head, creating a design that looks almost woven into itself. Begin with two sections from the upper sides and create a loose loop at the center back. Bring a new pair of sections from below through the first loop, then secure them into a second loop. Repeat once more if the hair length allows, allowing the design to gradually narrow as it moves downward. Leave the remaining hair loose so the cascade has a soft finish beneath the connected sections.
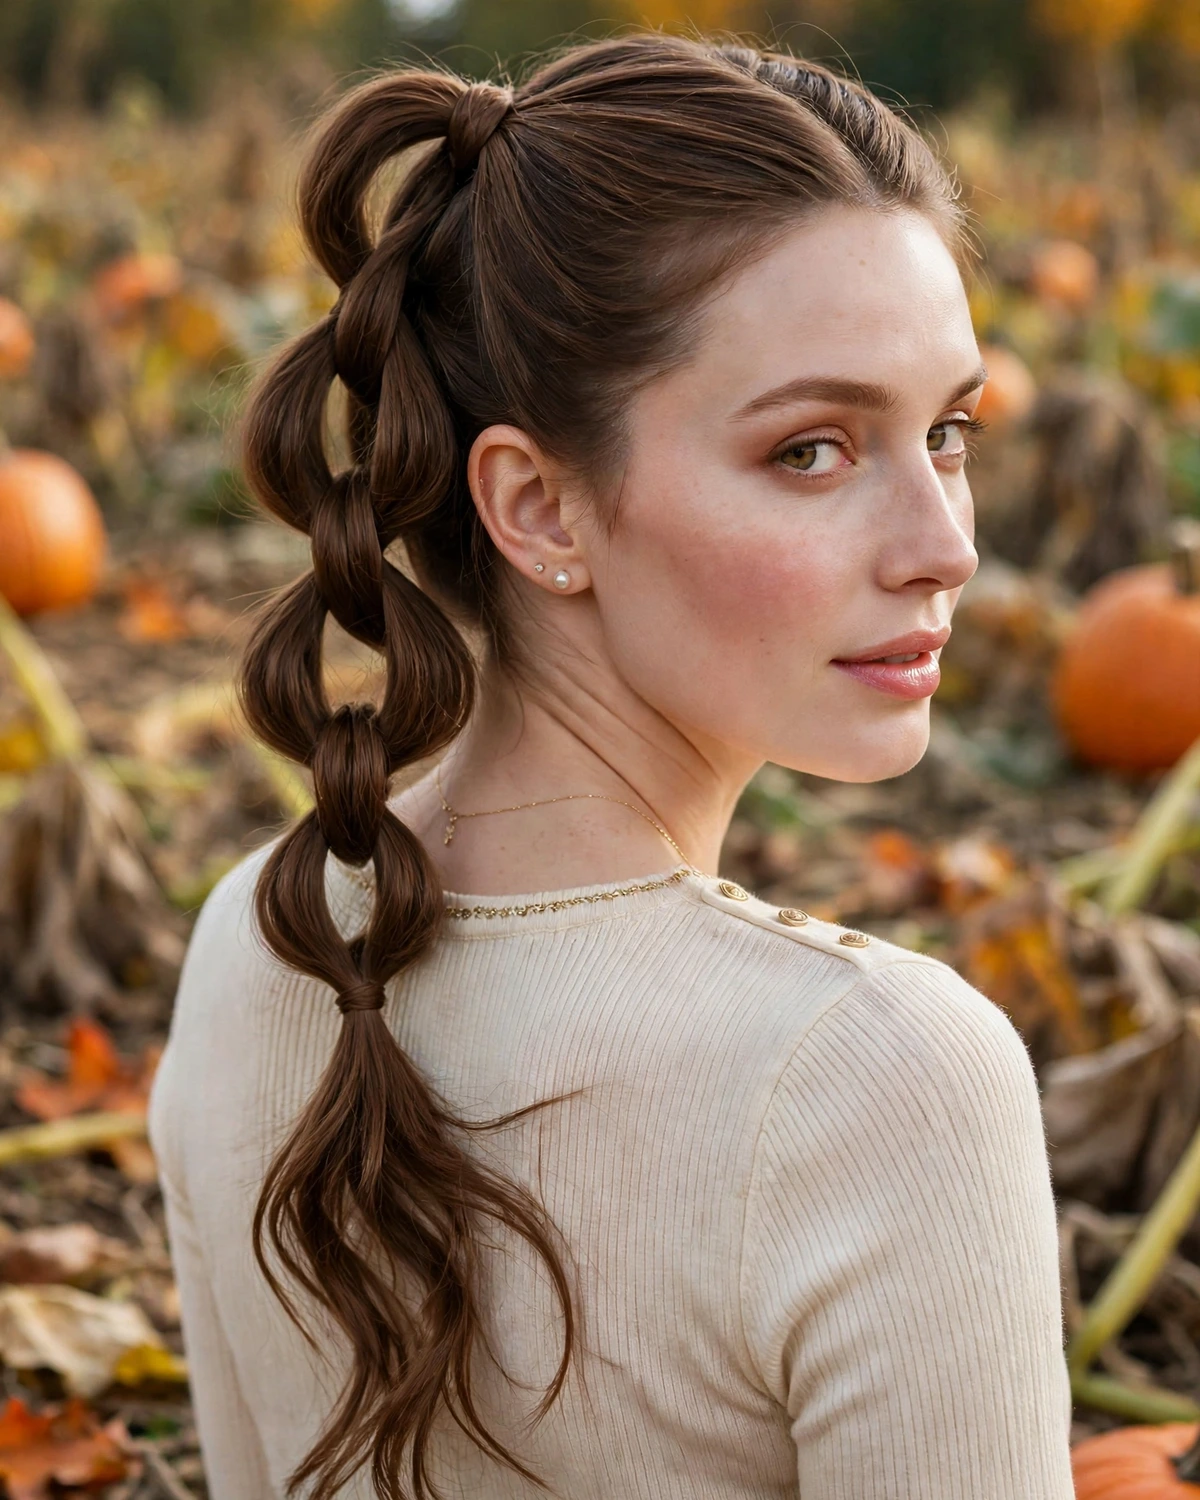
This is one of the most distinctive options for back-view pumpkin patch photographs because the connected loops create a clear pattern without covering the full length of the hair. It works best on medium-long and long hair with enough grip to hold the sections in place. Choose a plain top or sweater that contrasts with your hair color, and photograph the style from slightly above shoulder level. Secure each loop carefully with small elastics or hidden pins, then adjust the shape gently with your fingertips. The result feels artistic and intricate while retaining the relaxed mood of a fall outing.
Final Thoughts
Unique pumpkin patch hairstyles are a chance to experiment with hair as a creative detail rather than relying on familiar seasonal accessories. Infinity loop braids, woven diamond patterns, sculptural coils, interlocking cascades, and unusual twist arrangements can make an autumn look feel individual and memorable. For more romantic or free-spirited shapes, try our aesthetic pumpkin patch hairstyles and boho pumpkin patch hairstyles.
Choose a design that suits your hair length, texture, and comfort level. Some styles are intricate enough to become the main feature of your photos, while others introduce just one unexpected detail to an otherwise relaxed look. With secure sectioning, a little texture, and thoughtful camera angles, these creative fall hairstyles can help you achieve an original, photo-ready appearance that feels far from ordinary. For more ideas, explore our pumpkin patch hairstyles for Gen Z and classy pumpkin patch hairstyles, or browse the full fall hairstyles roundup.