Pumpkin Patch Hairstyles for Picture-Perfect Fall Photos: 20 Aesthetic Looks

Pumpkin patch hairstyles for fall photos are the perfect excuse to experiment with looks that photograph beautifully and feel special enough for an autumn outing. Between golden leaves, rustic wooden fences, pumpkin displays, cozy sweaters, and warm afternoon sunlight, the right hairstyle can turn a simple outdoor photo into a memorable fall moment. The best looks are not necessarily the most complicated ones; they are the styles that create beautiful shapes, flattering movement, and interesting details from every angle.
These pumpkin patch hairstyles are designed around photogenic volume, graceful back views, soft texture, creative sections, and modern styling techniques. You will find options for long, medium, short, straight, wavy, and naturally curly hair, with ideas that complement different outfits and photo poses. Whether you are planning a casual pumpkin-picking day, a cozy autumn photoshoot, or a stylish social media post, these aesthetic looks offer fresh inspiration without relying on the same predictable hairstyle combinations. For more outing ideas, see our pumpkin patch hairstyles.
1. Cascading Ribbonless Waterfall Waves
Waterfall waves create a dreamy appearance through flowing lengths, delicate curves, and a softly lifted crown. Instead of adding ribbons or decorative bows, the beauty of this hairstyle comes entirely from the way the hair falls in overlapping waves. Create loose bends through the mid-lengths, leaving the ends slightly relaxed rather than tightly curled. Lift the roots gently for natural fullness, then sweep one small section behind an ear to reveal the face without disturbing the overall movement. This style works especially well with medium-long and long hair.
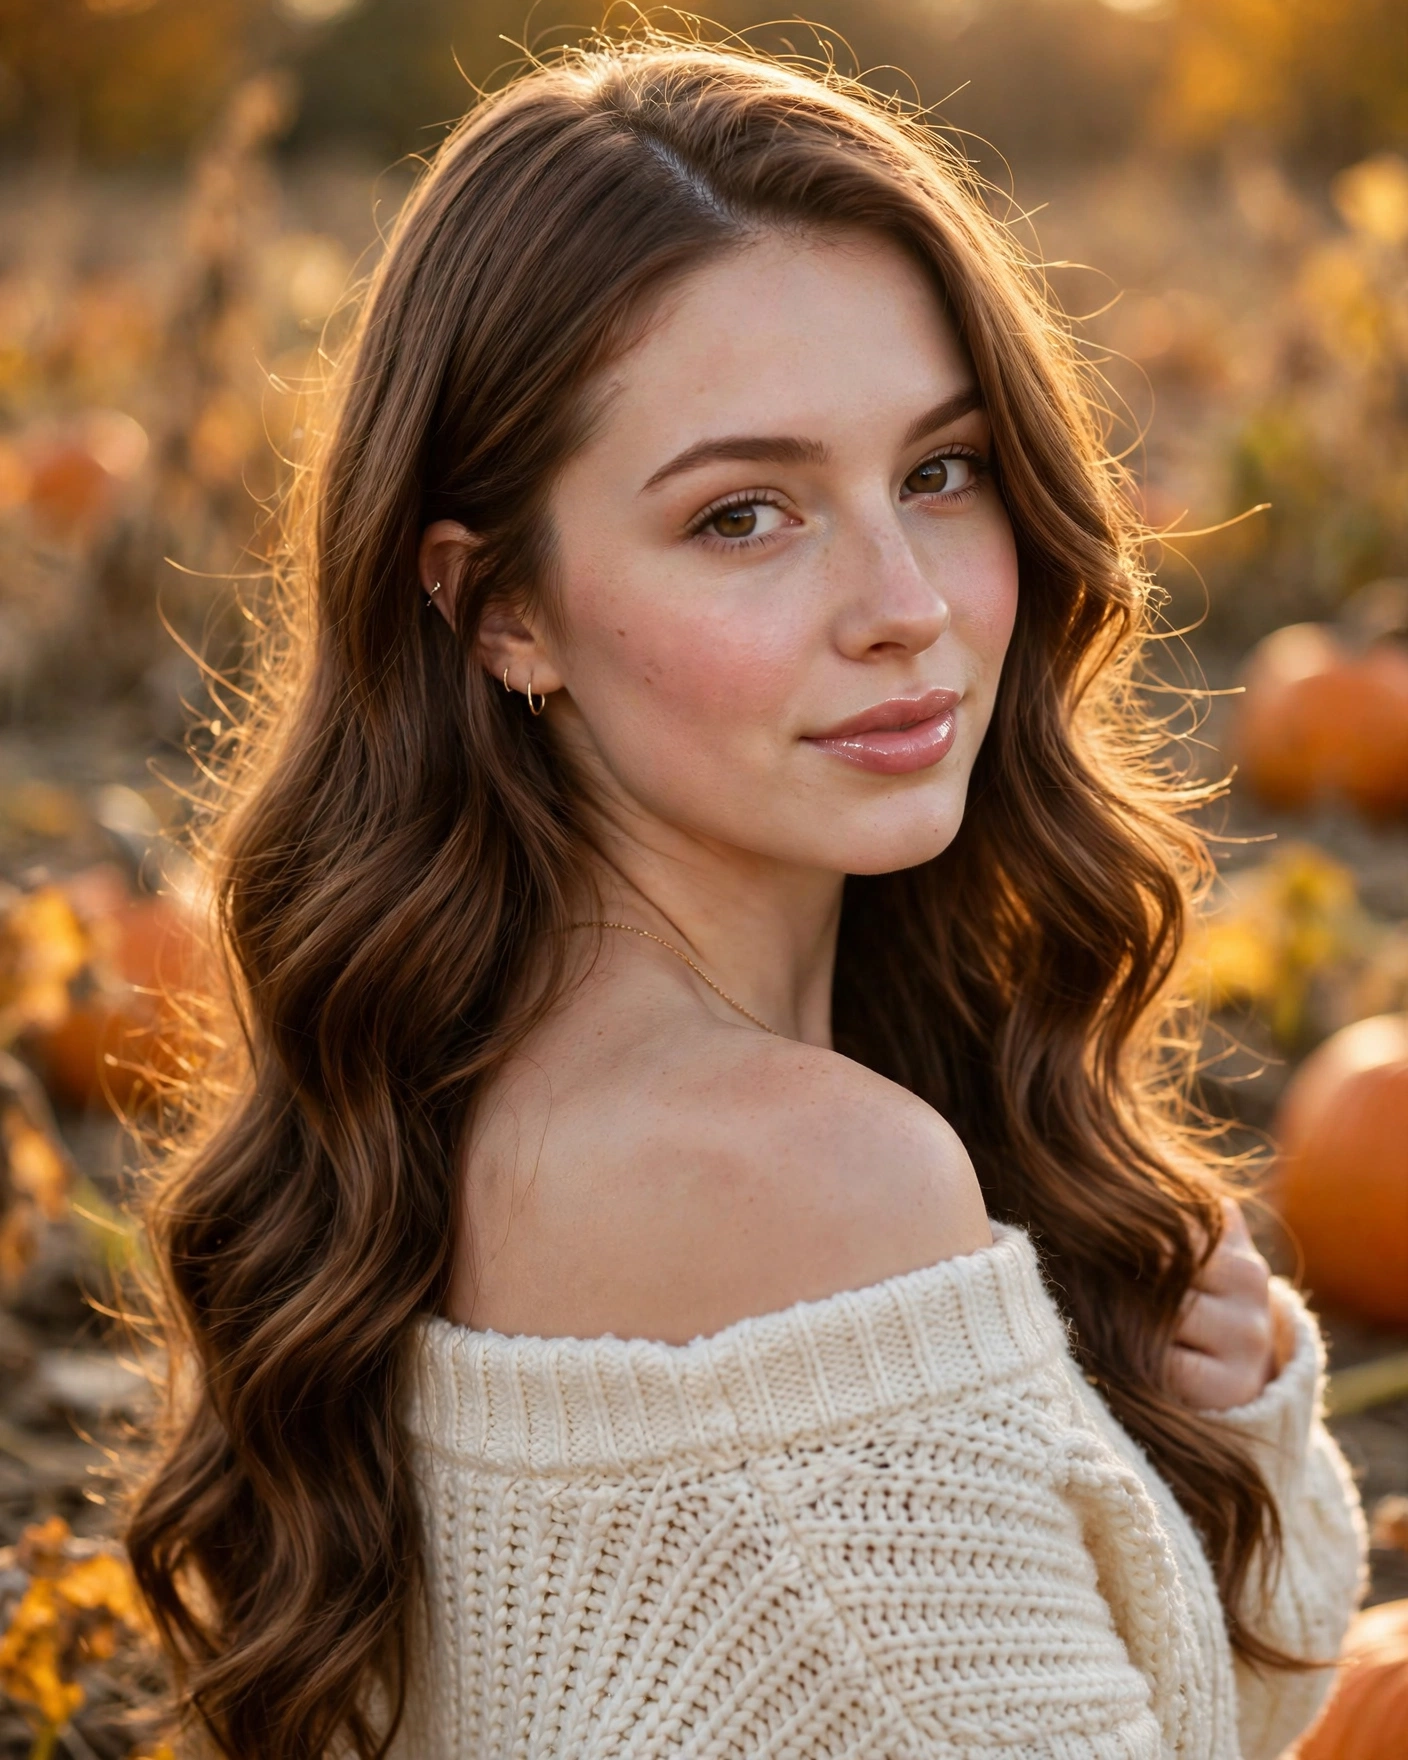
For photographs, turn your shoulders slightly away from the camera and look back over one shoulder so the waves become the main feature of the image. The overlapping curves catch autumn sunlight beautifully, especially against a background of orange pumpkins or golden trees. Pair the hairstyle with a cream knit top, a chocolate-brown dress, or a simple rust-colored sweater. A lightweight flexible-hold spray can help preserve the waves while keeping them soft enough to move naturally in outdoor pictures.
2. Sculpted Diagonal Crown Sweep
A diagonal crown sweep gives the hair an elegant, editorial shape without requiring a formal updo. Start with a deep side part and brush the upper section diagonally across the crown, securing it discreetly near the back of the head. Allow the remaining hair to fall in smooth, loose lengths with subtle bends near the ends. The diagonal direction creates visual interest and helps the hairstyle look intentional from the front, side, and three-quarter angles. It is especially flattering on straight or softly wavy hair that holds a smooth finish.

This look is ideal for close-up pumpkin patch portraits because the swept section creates a clear shape around the forehead while the lengths add movement behind the shoulders. Photograph it from a three-quarter angle with your chin turned slightly toward the light. A fitted turtleneck, structured cardigan, or minimalist autumn dress complements the clean silhouette. Keep accessories subtle, perhaps using a small hidden pin that matches the hair color. The result feels polished and contemporary without competing with the natural colors of the setting.
3. The Hidden-Twist Back Cascade
The hidden-twist back cascade is designed to look particularly beautiful from behind. Take two medium sections from either side of the head, twist them inward, and join them at the back with discreet pins beneath the upper layer of hair. The twists should remain visible enough to create a delicate woven effect, while the rest of the hair falls freely down the back. Add soft bends to the lengths rather than uniform curls, creating a natural mixture of texture and movement. This technique works well for long hair and shoulder-length styles with enough length to secure the sections.
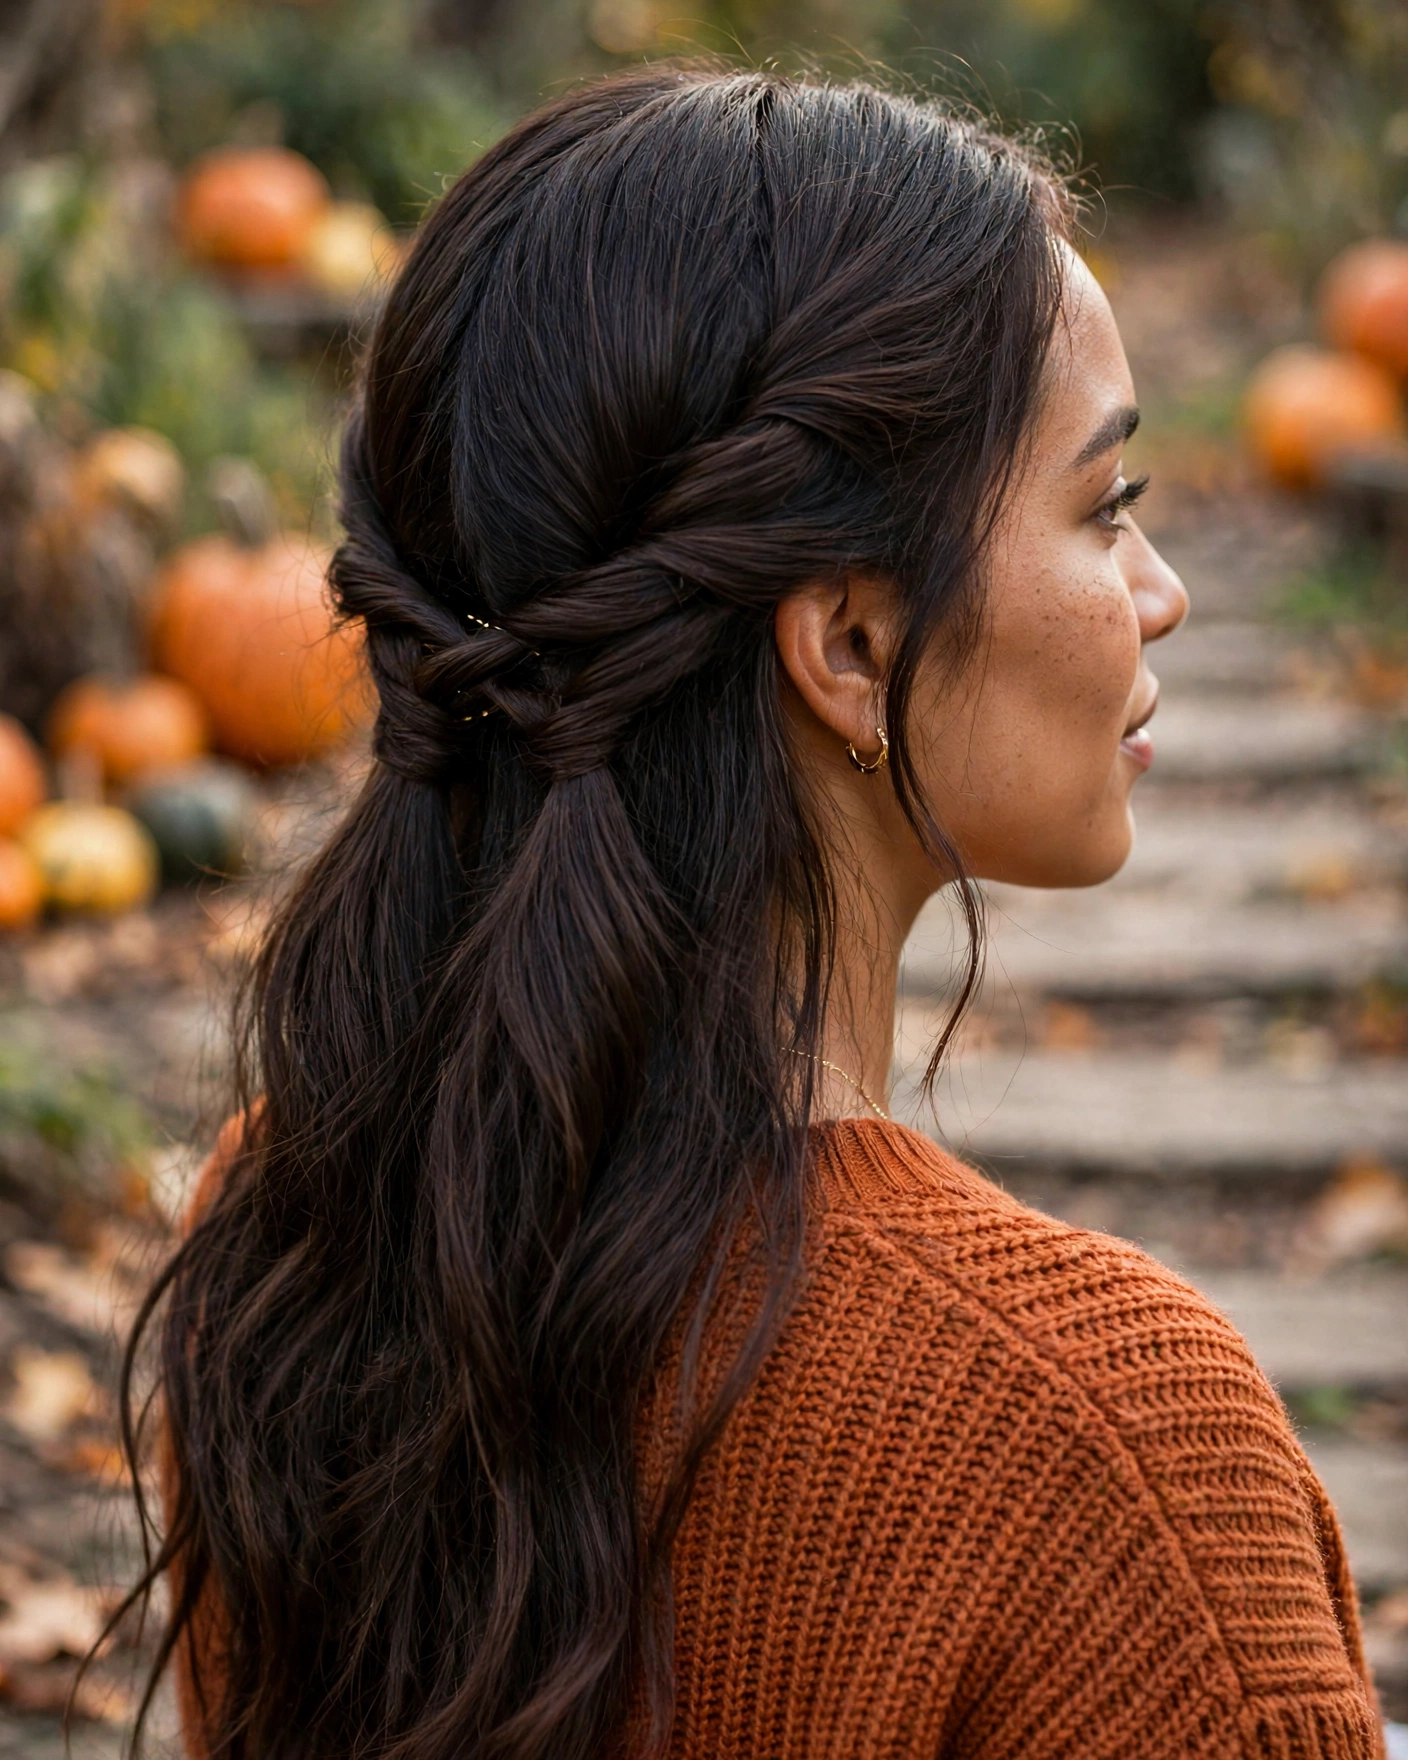
For the most attractive photograph, ask someone to capture the hairstyle from behind while you look toward a pumpkin display or walk along a rustic path. A second image can show the twist detail in a closer crop. Because the design is created from the hair itself, it feels understated and romantic without needing decorative accessories. Wear a textured knit sweater or a dress with an interesting neckline, and keep the shoulders relaxed so the hair falls naturally. A few loose pieces around the temples can soften the look without making it appear unfinished.
4. Airy Crown Volume with Feathered Ends
This hairstyle focuses on height at the crown and lightness through the ends, creating a silhouette that photographs beautifully without appearing overly styled. Use a round brush or a blow-dry brush to lift the roots gently, then direct the lengths away from the face. Shape the ends into soft, feathered curves instead of strong inward flips or identical ringlets. The contrast between a fuller crown and airy ends makes the hairstyle appear dimensional, especially when photographed in natural light. It works particularly well for medium-length hair and layered cuts.

For pumpkin patch photos, stand near a sunlit wooden fence or an open field where the background has some distance behind you. The lifted roots create definition around the head, while the feathered ends add motion when you turn or walk. This hairstyle pairs nicely with a fitted long-sleeve top, a ribbed sweater, or a tailored autumn coat. Avoid excessive hairspray that makes the ends stiff. A light volumizing product at the roots and a small amount of smoothing cream through the ends will help maintain the soft, airy finish.
5. The Asymmetric Loose-Knot Half-Up
The asymmetric loose-knot half-up offers a fresh alternative to a conventional centered half-up hairstyle. Instead of gathering equal sections from both sides, take a slightly larger section from one side and a smaller section from the other, bringing them together just off-center at the back. Loop the joined hair into a relaxed knot and secure it with pins hidden underneath. Keep the remaining lengths loose, with gentle movement through the ends. The uneven placement creates a modern shape that looks designed rather than overly symmetrical.
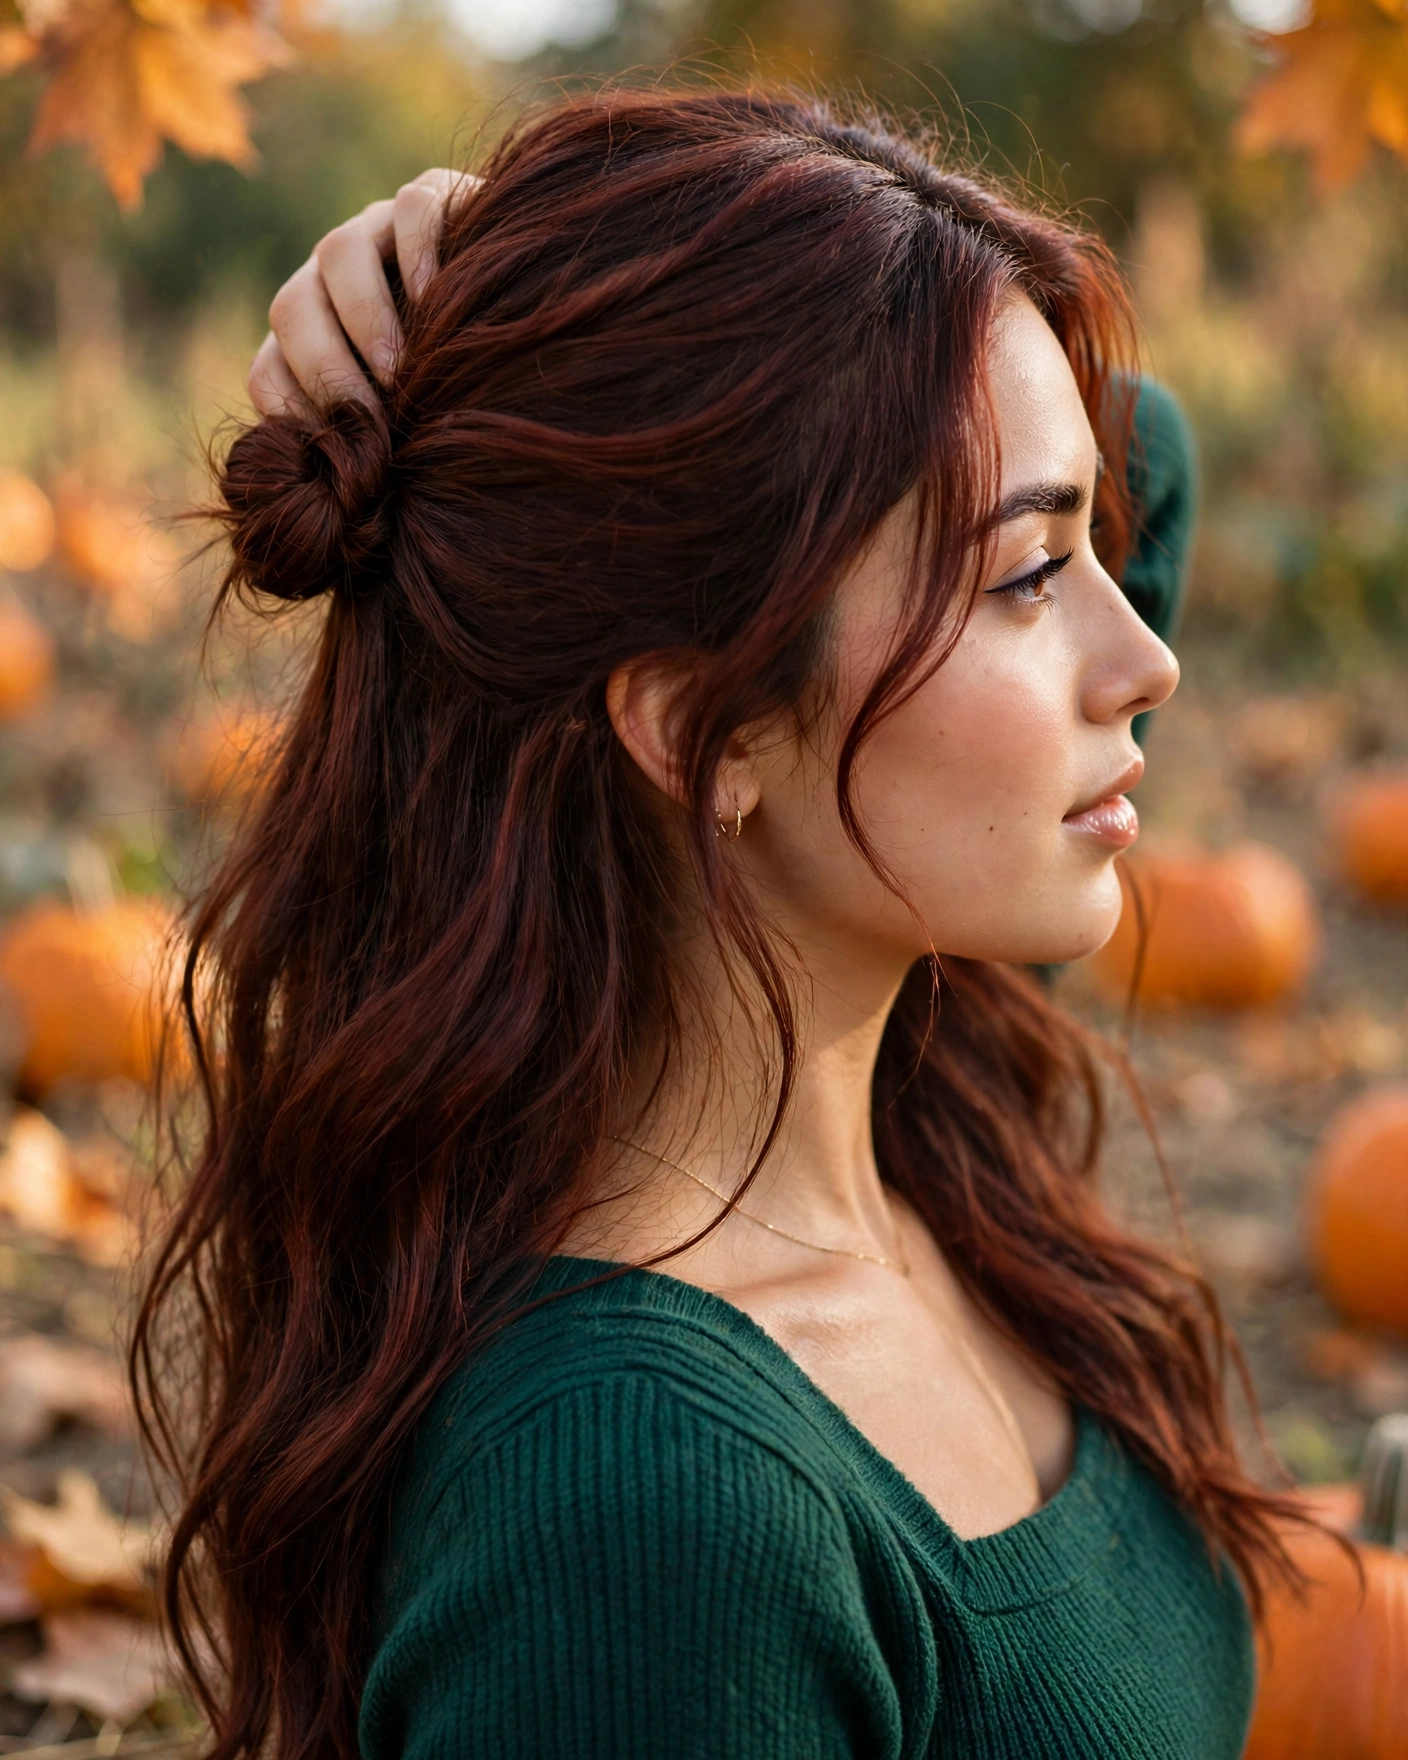
This hairstyle is especially photogenic in three-quarter portraits because the off-center knot adds interest when viewed from the side and back. Let a few natural face-framing pieces remain around the temples, but avoid making the front too busy. The look suits soft waves, straight hair with curved ends, and naturally textured lengths. Pair it with a deep green knit, a burgundy top, or a warm neutral dress. When taking pictures, turn your head slightly toward the knot to reveal its shape, then take a second photograph from behind to show how the loose lengths flow beneath it.
6. Glossy Curved Ends with a Deep Side Part
A deep side part paired with glossy, curved ends creates a classic fall-photo hairstyle with a contemporary finish. Part the hair deeply to one side, smooth the roots, and use a round brush or large styling tool to create a gentle curve through the final few inches. Keep the mid-lengths relatively smooth so the ends become the main styling detail. This look is particularly effective on bobs, lobs, and medium-length hair because the curved finish gives the outline a deliberate shape. It also works on long hair when the ends are healthy and evenly shaped.

Photograph this style from the side with the hair resting over one shoulder, allowing the curved ends to form a clean outline against your outfit. The glossy finish reflects soft daylight, making it suitable for close-up portraits near pumpkin stacks or a barn wall. A simple fitted sweater or a square-neck autumn dress will complement the smooth silhouette. To avoid a flat appearance, create a little lift at the roots on the heavier side of the part. Finish with a lightweight shine serum applied sparingly through the ends rather than directly onto the scalp.
7. The Sculptural Side-Roll Detail
A sculptural side roll introduces an interesting shape without turning the entire hairstyle into an updo. Take a section from the front on one side, gently roll it backward, and secure it above or behind the ear with pins placed underneath the hair. The roll should look softly dimensional rather than tightly wound, with enough definition to remain visible in photographs. Leave the rest of the hair loose and lightly textured. This style works with medium and long lengths, while shorter hair can use a smaller, more compact roll that follows the shape of the head.
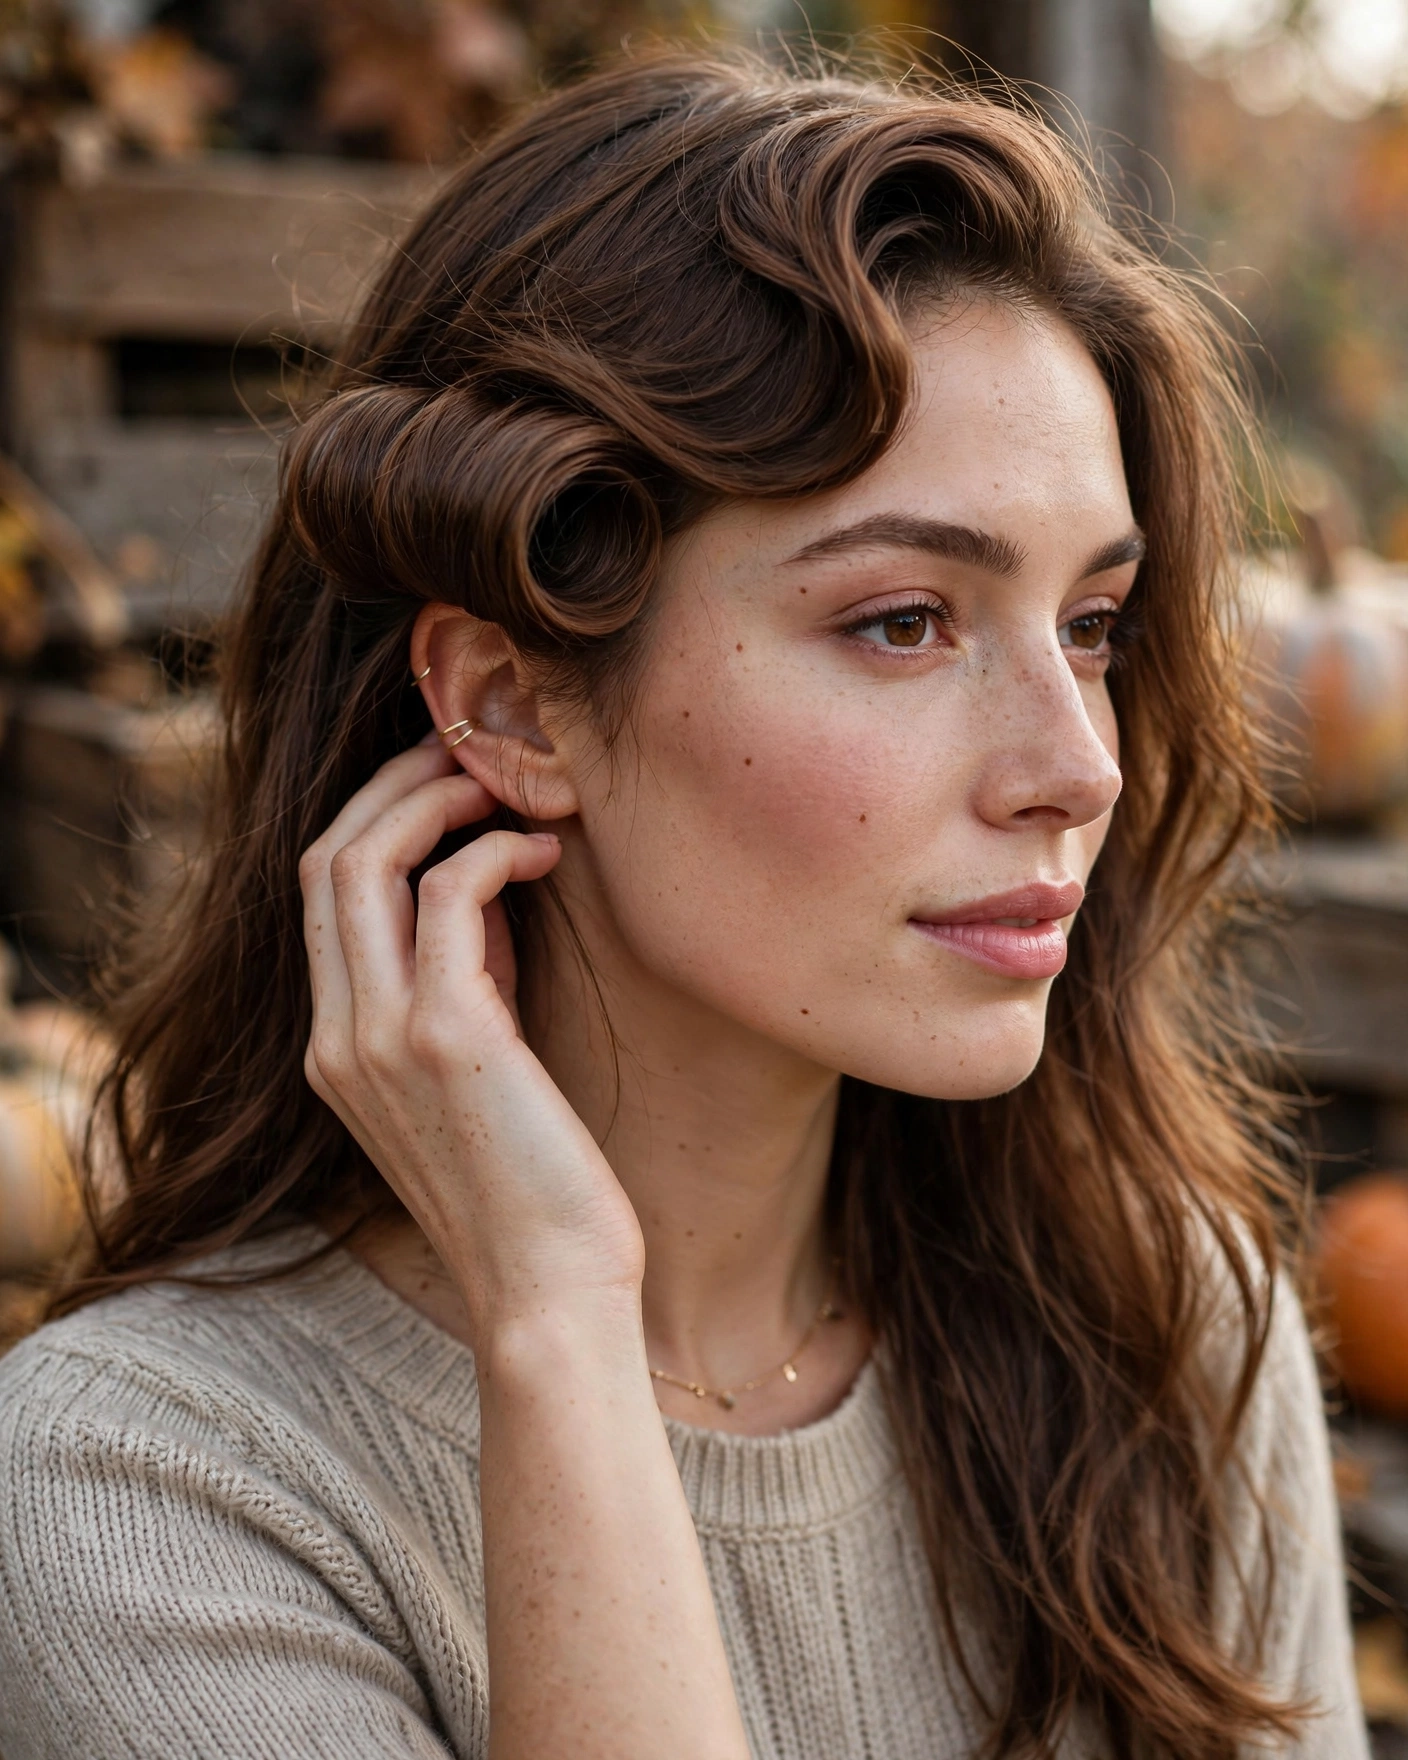
The hairstyle is particularly effective for portraits where the face is turned slightly away from the camera. The rolled detail creates a sculpted outline around the temple, while the loose lengths prevent the look from appearing too formal. Choose a background with a little texture, such as stacked wooden crates or a rustic fence, but avoid busy details directly behind the head. A knit dress or a simple autumn blouse will keep the overall look balanced. For a close-up photograph, position the rolled side toward the light so its curves remain visible rather than disappearing into shadow.
8. Natural Curl Halo with Defined Edges
For naturally curly hair, a defined curl halo celebrates the hair’s own texture while creating a beautifully rounded shape around the head. Begin with well-moisturized curls and use a styling cream or gel suited to your texture to encourage definition. Allow the curls to dry completely before separating only the sections that need extra fullness. The goal is not to force every curl into the same pattern, but to create an intentional outline with natural variation. Keep the edges softly shaped, avoiding excessive brushing that can create unwanted frizz or disrupt the curl pattern.
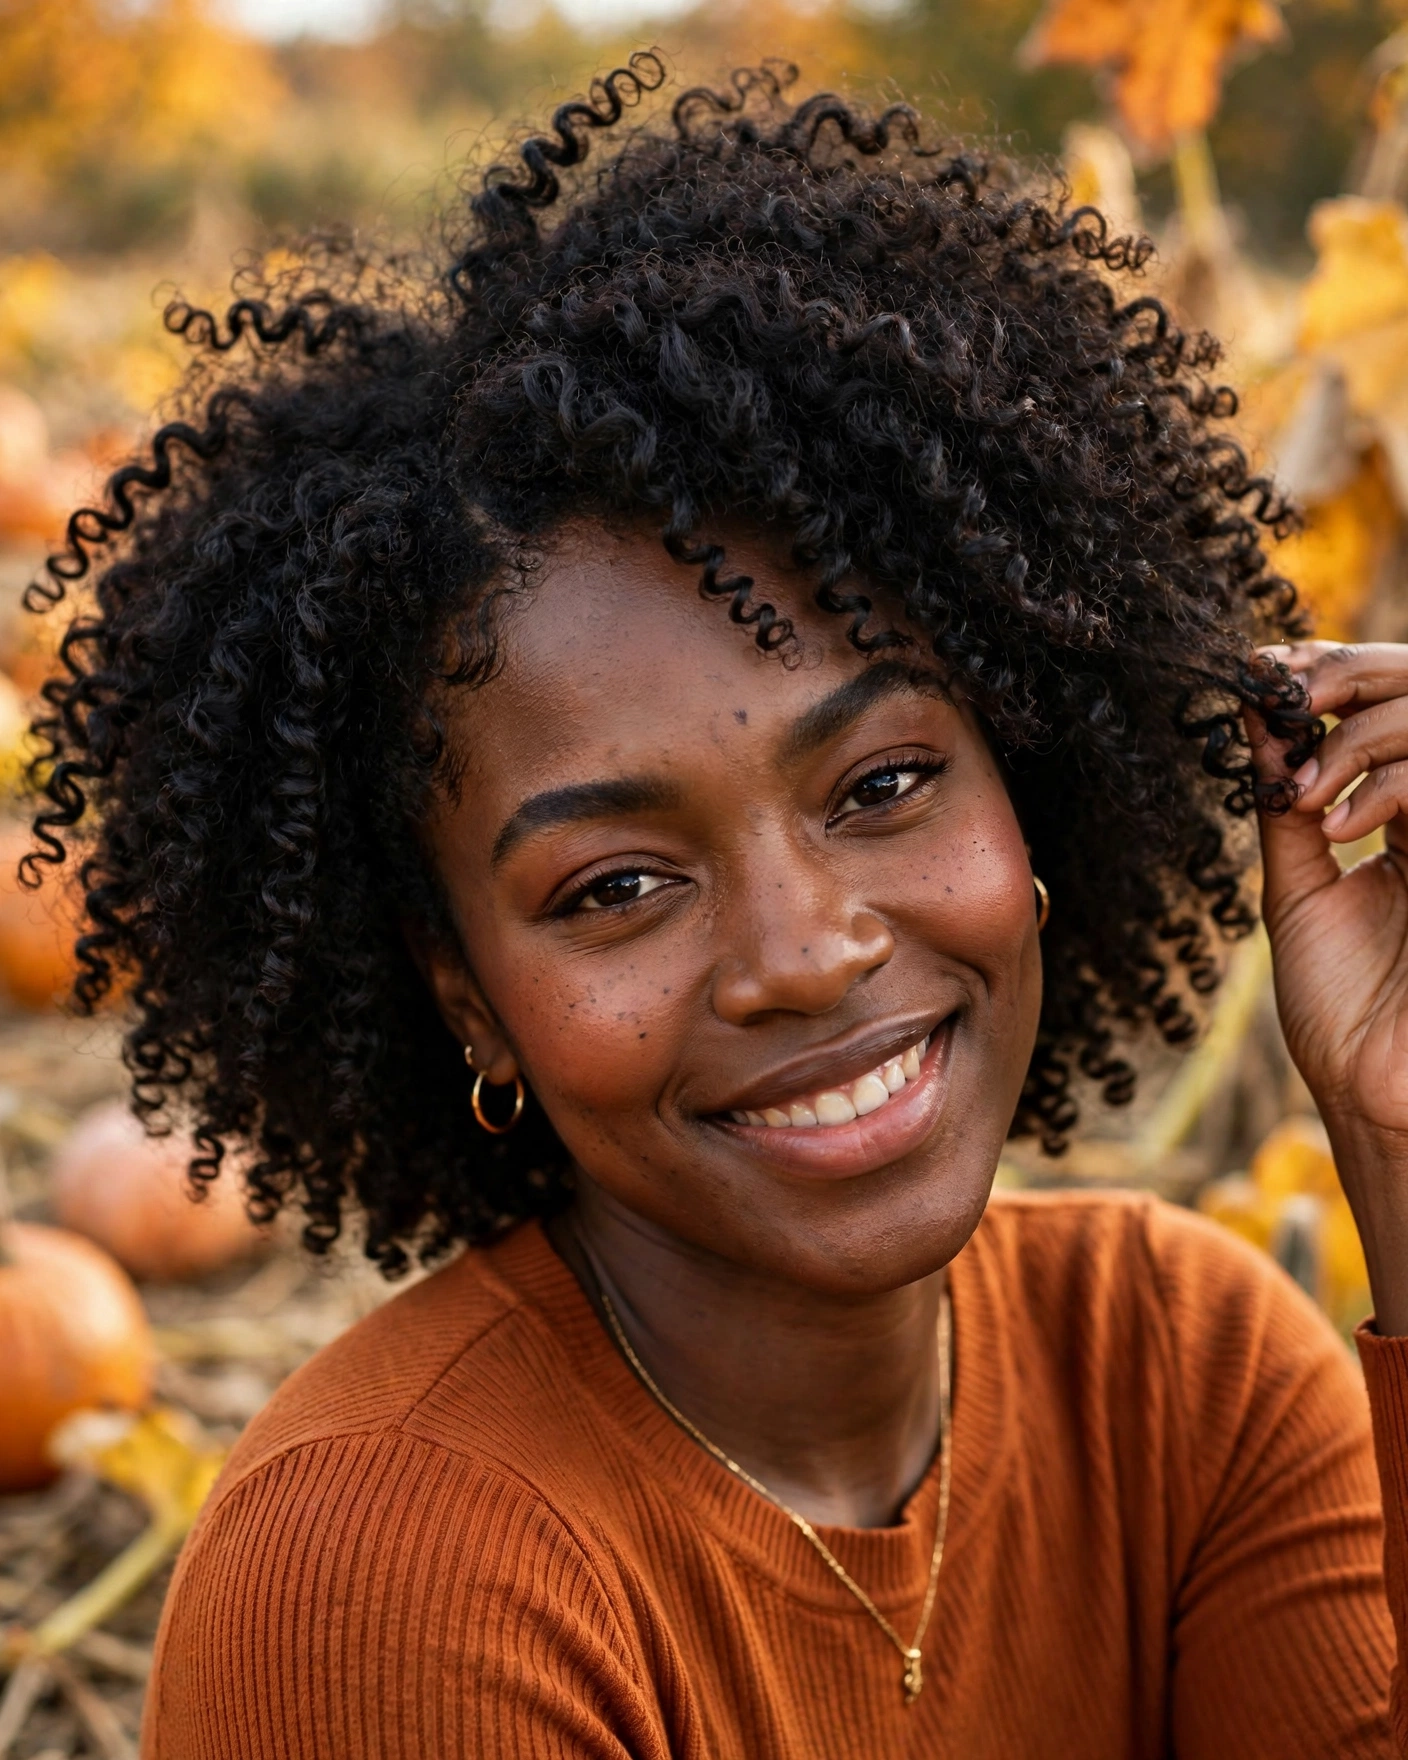
This hairstyle photographs beautifully against open autumn backgrounds because the rounded silhouette creates contrast with the irregular shapes of pumpkins, leaves, and tree branches. Take a front-facing portrait first, then capture a side view to show the curl definition and natural volume. A simple ribbed top or a rich autumn-colored sweater allows the texture to remain the main feature. If the weather is breezy, carry a little curl-refreshing product and gently reshape individual curls rather than brushing the entire head. The finished look feels confident, dimensional, and authentic.
9. The Double-Direction Twist Back
The double-direction twist back creates a distinctive back view through two twists that travel in opposite visual directions. Take a section from each side of the head, twist one backward and the other slightly downward, then bring them together near the center back. Secure the meeting point with discreet pins and allow the remaining hair to fall in its natural shape. Unlike a conventional half-up twist, this design emphasizes directional movement, making the finished style look more intricate from behind. It is most suitable for medium-long and long hair.

For a picture-perfect result, take a close back photograph before moving into a wider portrait. The crossed directions of the twists become easier to appreciate when the hair is shown clearly against a contrasting sweater. A muted orange, ivory, or forest-green outfit can complement the seasonal palette without distracting from the design. Keep the twists comfortably secure rather than pulling them tightly against the scalp. If a few shorter pieces escape, smooth them gently with a small amount of styling cream. The hairstyle should look artfully arranged, not rigid or overworked.
10. Soft Shag Texture with a Lifted Front
A soft shag-inspired finish brings relaxed texture and a little rock-inspired character to pumpkin patch photographs. Work with the natural layers of the haircut, encouraging separation through the mid-lengths and ends while keeping the crown lightly lifted. Use a diffuser for waves or a styling brush for straighter hair, depending on the texture you want to emphasize. Sweep the front pieces slightly away from the face so the eyes remain visible. The key is to create airy movement rather than excessive teasing, which can make the hair look stiff or tangled in close-up images.

This hairstyle suits casual outdoor pictures, especially when paired with denim, a chunky cardigan, or a relaxed autumn shirt. Capture a candid walking photograph to show how the layers move, followed by a closer portrait that reveals the lifted front and textured ends. It works especially well for medium-length hair and layered bobs, although longer hair can also carry the same soft, piecey finish. A small amount of texture spray can help separate the layers, but concentrate it through the lengths instead of coating the roots. The result feels youthful, relaxed, and intentionally undone.
11. The Low Sculpted Pony with a Wrapped Curve
A low ponytail can become a striking photo hairstyle when the base is shaped carefully and the length has a soft, deliberate curve. Gather the hair at the nape, keeping the crown smooth but not painfully tight. Take a small section from the ponytail and wrap it around the elastic, securing the end underneath. Then create a broad curve through the ponytail using a large styling tool or a round brush. Keep the curve loose enough to look natural, with the ends following the direction of the hair rather than forming a stiff hook.

This hairstyle is excellent for photographs that show both the face and the back of the head. A side portrait highlights the clean nape, while a rear three-quarter view reveals the wrapped base and curved length. It works with straight or softly wavy hair and complements high-neck knitwear, a tailored vest, or a cozy long-sleeve dress. If you plan to walk around the patch, secure the elastic firmly and carry a spare pin for the wrapped section. A little smoothing product can control flyaways while preserving enough natural movement for candid photographs.
12. The Curved-Part Short-Hair Sweep
Short hair can look just as distinctive in autumn pictures when the parting and direction of the front sections are treated as the main design feature. Create a gently curved side part, then direct the longer front section diagonally across the forehead and sweep it toward the temple. Use a small brush to create lift at the roots and a subtle bend through the ends. This technique works especially well on pixie cuts, short crops, and compact bobs with enough length at the front. It does not depend on clips or accessories to look complete.

For photographs, turn your head slightly to one side so the curved part and the shape around the temple become visible. A close crop near a pumpkin display will show the styling detail, while a wider image can demonstrate how the short cut complements the outfit. Try a textured knit, a mock-neck top, or a simple autumn dress with a strong neckline. Use a small amount of lightweight styling paste to define the front section without making it look wet. Because the hairstyle is compact, even a few carefully placed curves can make the final image feel polished and modern.
13. The Loose Loop-Through Back Design
The loose loop-through back design creates the appearance of a woven hairstyle without requiring a complex braid. Separate two small sections near the back of the head and secure them together loosely. Make a small opening above the elastic, pass the joined section through it, and gently loosen the resulting loop. Repeat with a lower pair of sections if the hair is long enough, leaving the rest of the length free. The design forms soft, rounded shapes that sit against the hair rather than projecting outward. It works best on medium-long or long hair with enough texture to hold the loops.
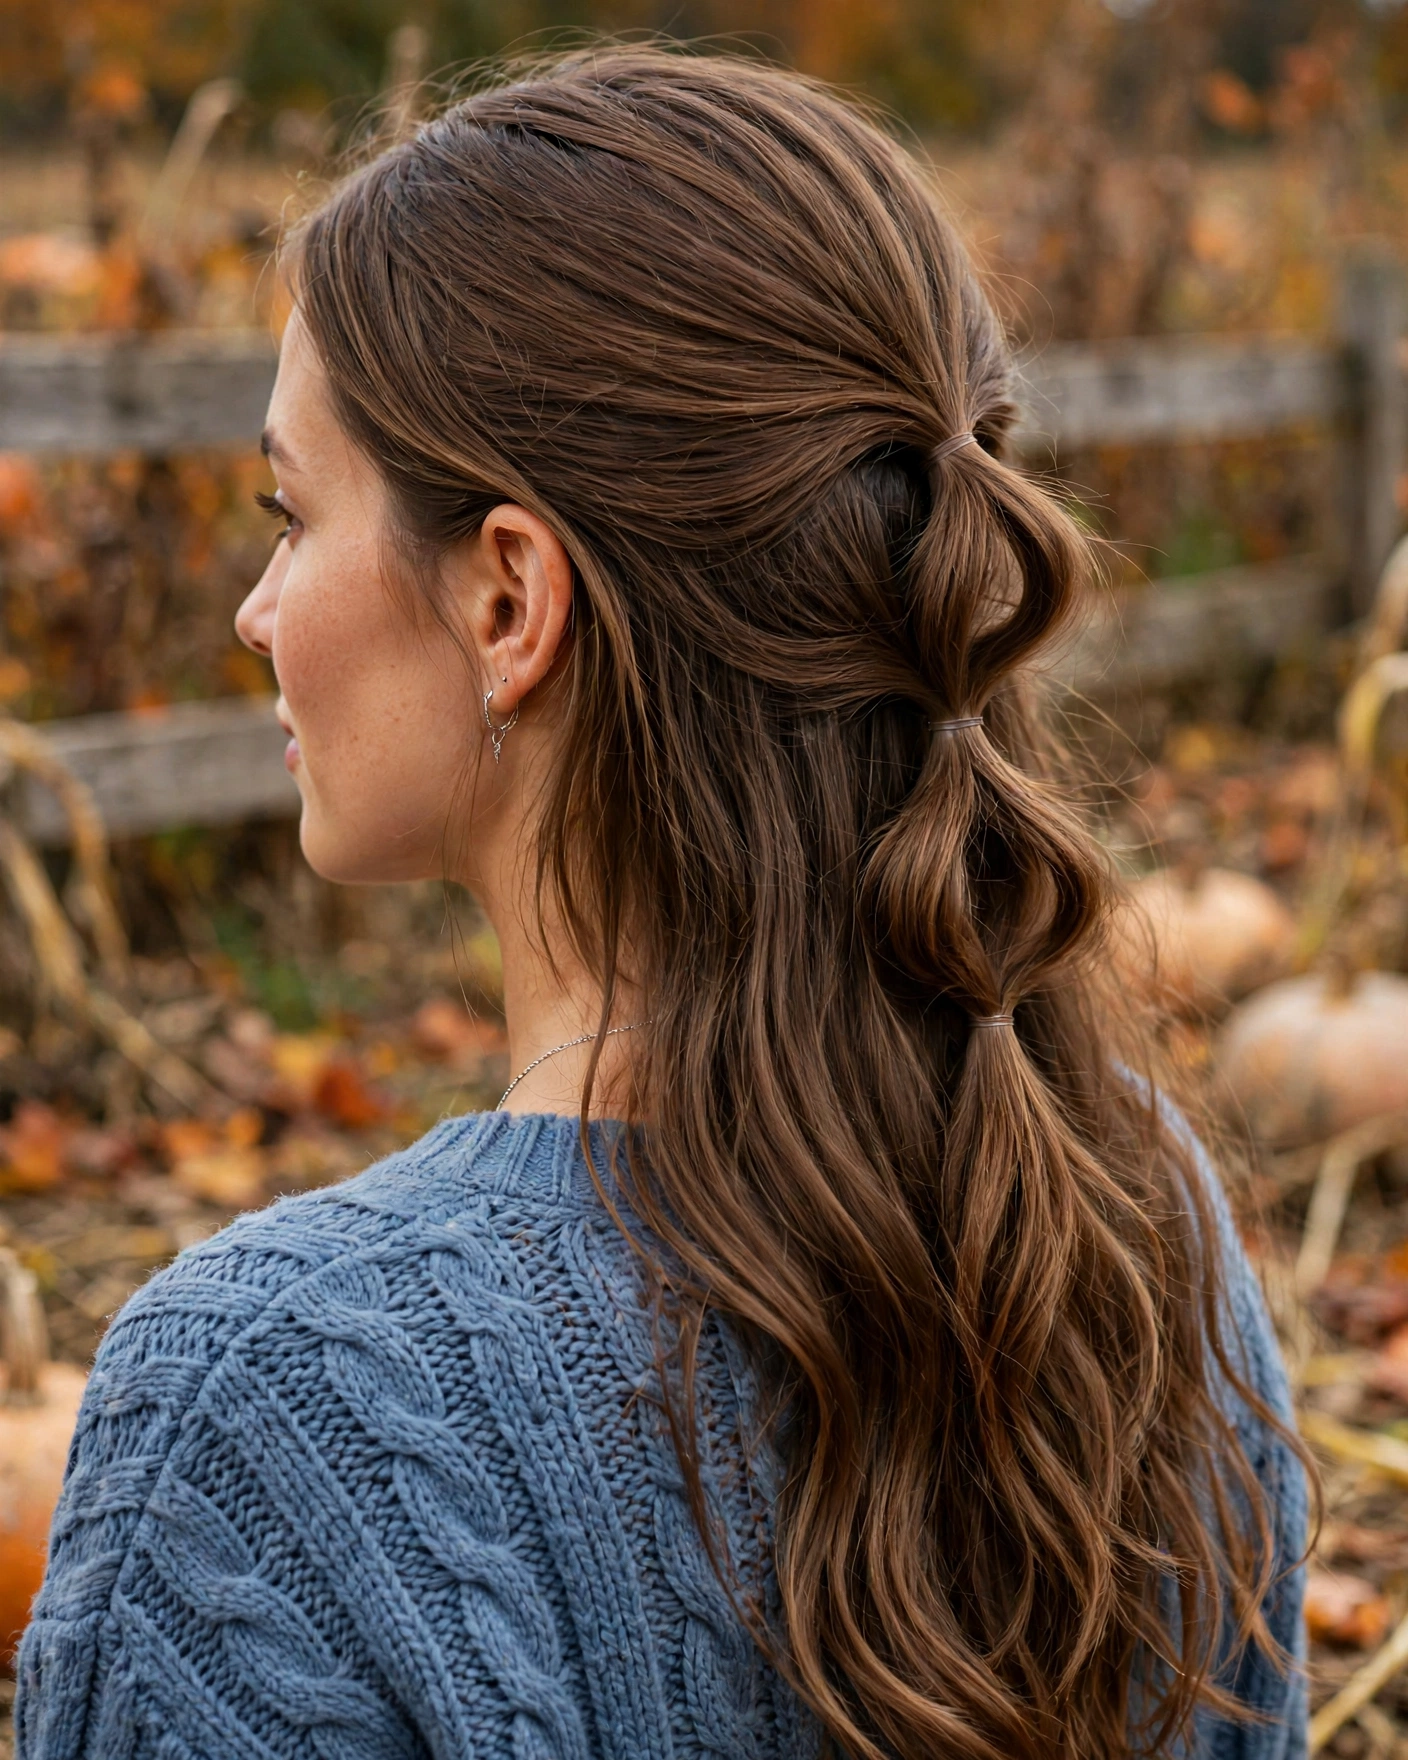
The most flattering photograph is taken from behind at a slight angle, with the head turned just enough to show the side profile. This angle reveals the layered loops while preserving the flow of the loose lengths. If your hair is very silky, add a little texture spray before creating the sections so the loops hold their shape. Choose a sweater with a simple back or shoulder line to avoid visual clutter. This hairstyle is ideal when you want something more distinctive than a basic half-up style but still want most of your hair to remain down.
14. Romantic Side-Swept Lengths with a Tucked Temple
This hairstyle uses a subtle tuck to create an open, romantic frame around the face. Part the hair slightly off-center, sweep one temple section behind the ear, and secure it discreetly if needed. Allow the remaining hair to travel diagonally over the opposite shoulder, with soft bends through the lengths. The difference between the tucked side and the fuller side creates a pleasing asymmetry that reads clearly in photographs. It is particularly suitable for medium and long hair, although a longer bob can achieve a similar effect with a softer, smaller sweep.

For pumpkin patch portraits, stand at a slight angle rather than facing the camera directly. The tucked temple reveals the cheekbone and ear, while the opposite side creates a flowing frame around the face. This look works beautifully with a delicate knit dress, a warm-toned blouse, or a structured sweater. If you want a back-view photograph too, gently move the fuller section behind the shoulder so the natural hair texture remains visible. Keep the tuck smooth but not overly tight, allowing a few wispy hairs to soften the outline in the outdoor light.
15. The Textured Crown Knot with Open Lengths
The textured crown knot gives the upper part of the hair a distinctive focal point while keeping the lengths loose. Gather a moderate section from the crown, twist it into a compact, relaxed knot, and secure it with pins beneath the base. Avoid making the knot too large or perfectly circular; a little natural texture helps it blend with the rest of the hairstyle. Leave the side sections soft and allow the lower lengths to fall freely. This style is particularly suitable for medium-long hair and long hair with enough density to support a small crown shape.

The hairstyle looks attractive in photographs taken from slightly above shoulder level, especially when you turn your head so the knot is visible behind the crown. A second image from behind can show how the loose hair flows beneath the secured section. Pair it with a cozy sweater or a simple dress, keeping the neckline uncluttered so the hair remains the focal point. If the knot slips easily, add a few crossed pins underneath rather than tightening the entire hairstyle. The contrast between the compact knot and the flowing lengths gives the look its photogenic character.
16. The Long-Length Diagonal Braid Trail
For long hair, a diagonal braid trail creates an eye-catching line across the back instead of placing a braid straight down the center. Begin near one temple or upper side section and work diagonally toward the opposite side of the back, incorporating small pieces as you move. Continue the braid only as far as the hair allows, then secure it discreetly and leave the remaining lengths loose or gently waved. The diagonal direction makes the hairstyle appear more intricate from behind and adds structure without covering the entire length with braiding.
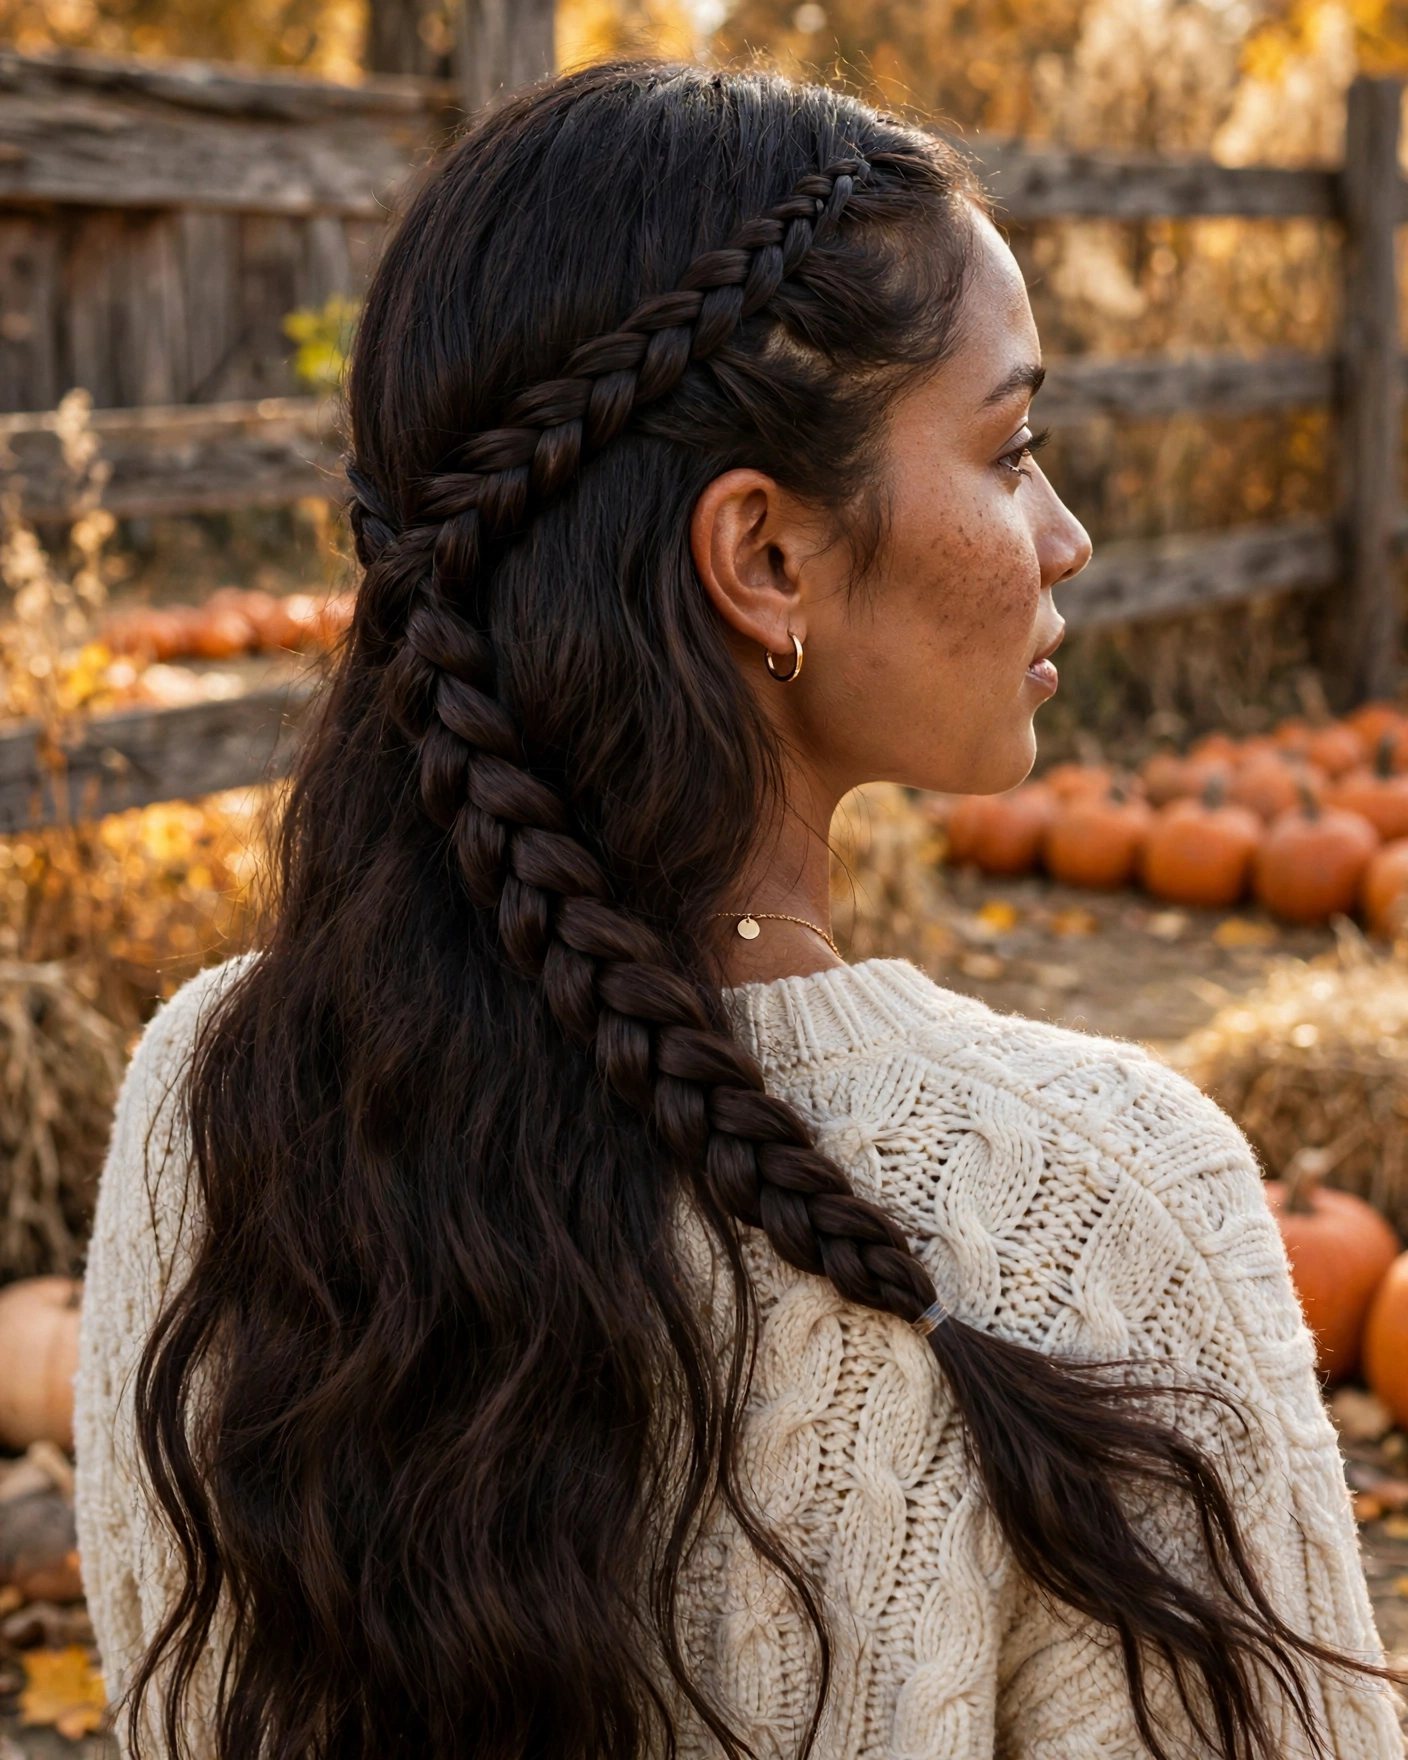
This look is particularly effective for back-facing pumpkin patch photos, especially when the background includes a wooden fence, rustic barn, or rows of pumpkins. Ask the photographer to keep the braid visible against your hair and outfit rather than letting it disappear into a dark background. A cream sweater, rust knit, or soft brown top can create enough contrast to show the braid’s shape. Keep the woven sections relaxed so the design feels romantic instead of severe. A light hold product helps control loose pieces while preserving the natural texture of the unbraided lengths.
17. The Soft Flip-Under Bob with Crown Lift
A softly flipped-under bob offers a neat silhouette that looks charming in both close-up and full-head photographs. Begin by lifting the roots slightly and directing the ends inward with a round brush or styling tool. The curve should be gentle rather than tightly rolled, following the shape of the jaw or neckline. Add a small amount of texture at the crown so the top does not look too flat against the rounded ends. This approach works on classic bobs, longer chin-length cuts, and shorter lobs, making it useful for anyone who wants a defined hairstyle without elaborate styling.

Photograph the bob from a three-quarter angle so the curved outline is visible around the cheek and neck. A second side image can emphasize the smooth shape and lifted crown. This hairstyle pairs well with a collared shirt, a fine-knit sweater, or a structured dress because its compact silhouette complements clean clothing lines. If the weather is humid, use a light anti-frizz product before styling and finish with a flexible spray. The inward curve should remain soft enough to move when you turn your head, creating a natural, polished result rather than a stiff helmet-like shape.
18. The Naturally Wavy Side-Back Sweep
For hair that already has a natural wave, the side-back sweep enhances the texture instead of trying to transform it into uniform curls. Part the hair slightly to one side, then guide the smaller front section backward and secure it just behind the ear. Leave the remaining waves loose, encouraging their natural bends with a curl cream or lightweight texturizing product. The hairstyle should look deliberately shaped but not perfectly identical on both sides. It is a practical choice for medium and long hair, especially when the natural texture changes slightly throughout the day.
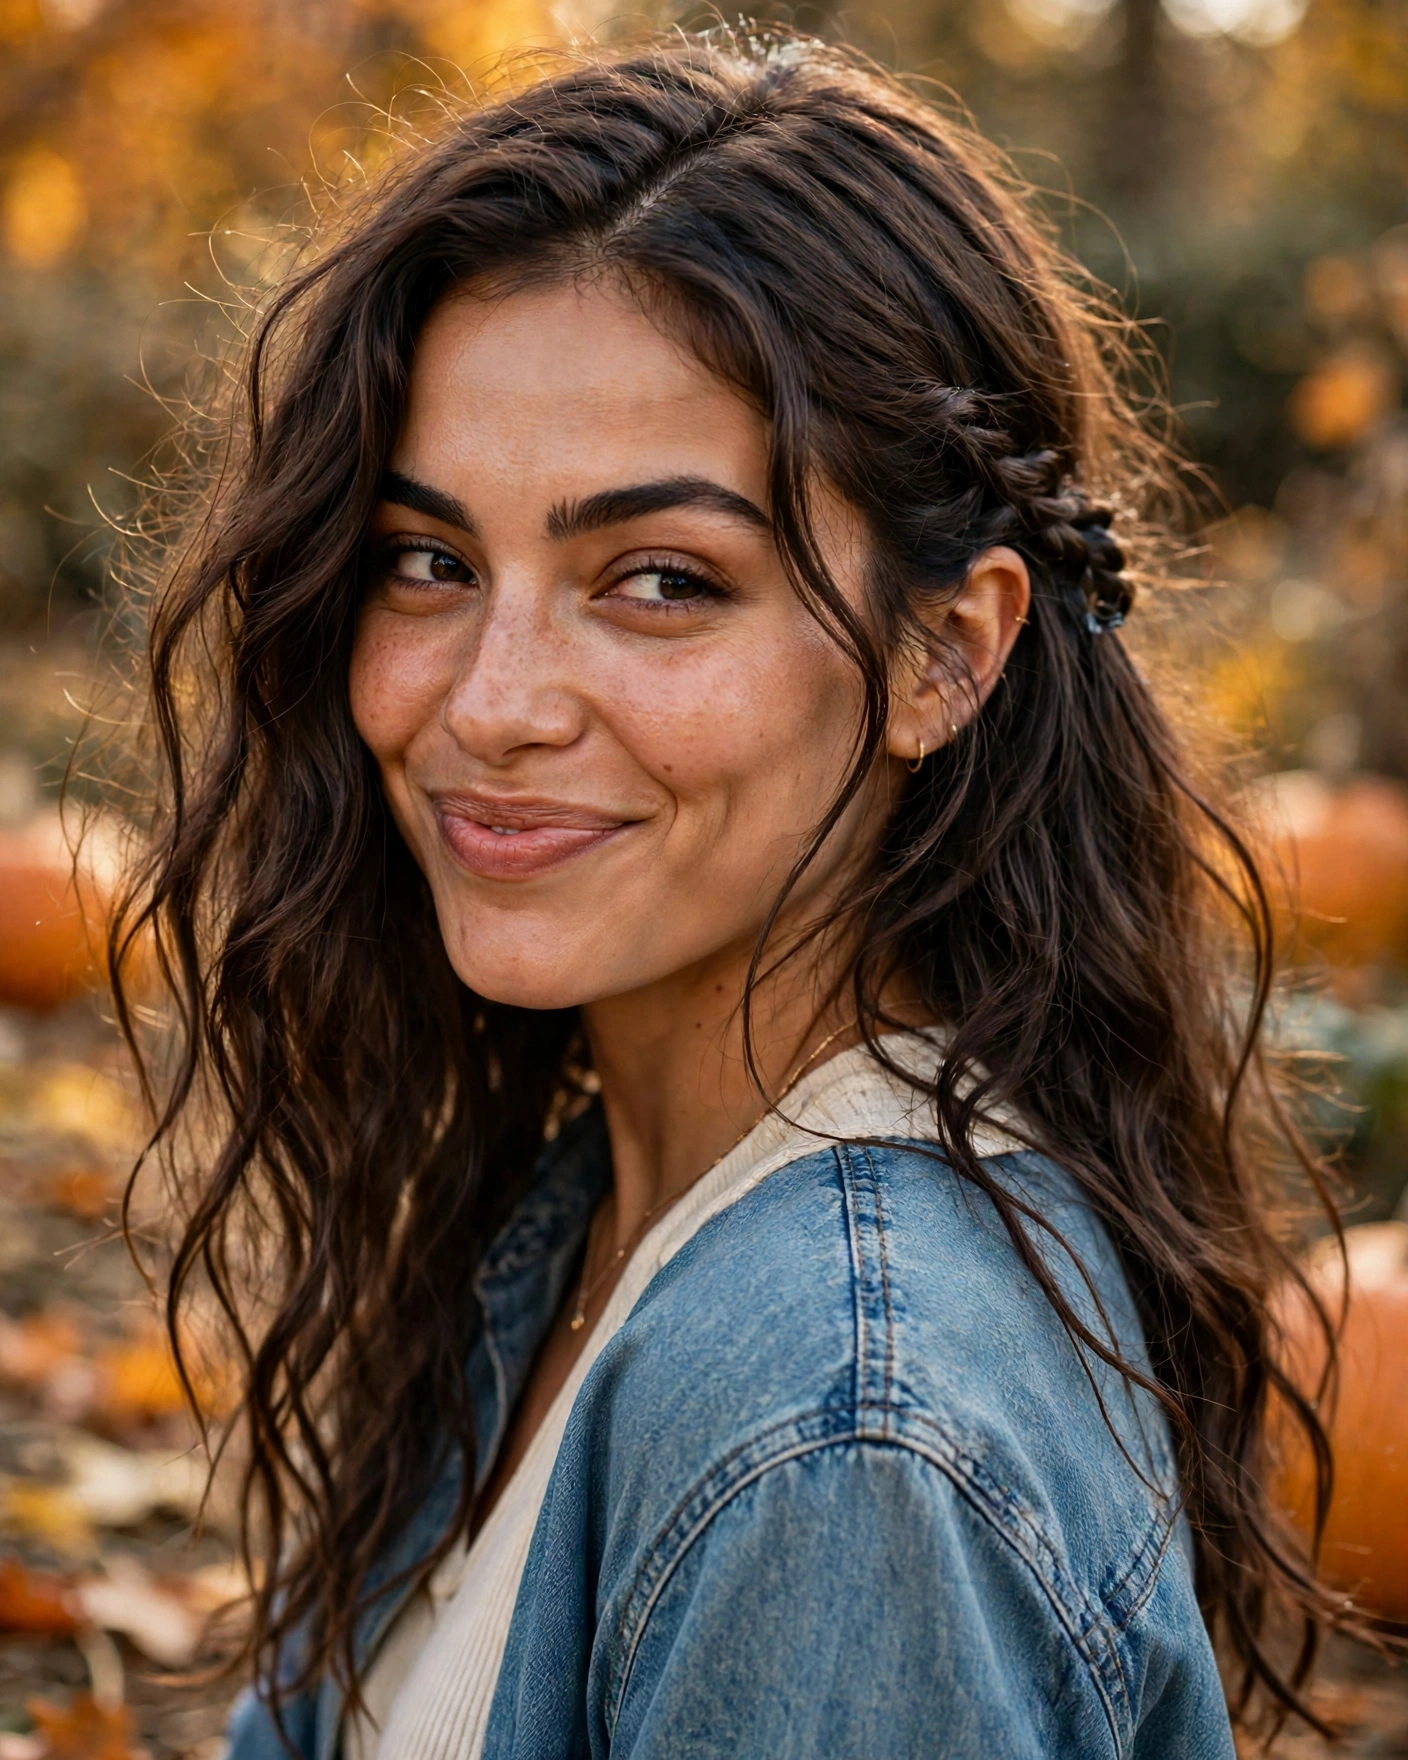
This look photographs beautifully when you are walking through the patch or looking back toward the camera. The secured side keeps the face visible, while the loose waves move naturally around the shoulders. Choose a background with warm foliage or soft greenery so the texture stands out. A relaxed cardigan, fitted autumn top, or simple denim shirt works well with the easy silhouette. Before taking pictures, reshape any flattened waves with your fingers instead of brushing them out. This small adjustment preserves definition and helps the hairstyle maintain its natural, effortless appearance.
19. The Back-Comb-Free Voluminous Pony
A voluminous ponytail does not need heavy teasing to look impressive in photographs. Gather the hair at a comfortable mid-to-high position, leaving enough natural lift at the crown to create a balanced silhouette. Secure the ponytail, then use your fingers to gently loosen the hair above the elastic. Shape the ponytail itself with broad bends or natural waves, concentrating volume through the middle rather than making the ends overly curled. This technique works well for medium-long and long hair and creates a fuller appearance without relying on excessive backcombing.

For a picture-perfect shot, turn your head slightly while keeping your shoulders angled away from the camera. This reveals the ponytail’s height, length, and movement in one frame. A side or rear three-quarter photograph is particularly effective when the ponytail rests against a contrasting sweater. If you have shorter layers around the face, allow a few to remain loose rather than forcing every strand into the elastic. Use a secure hair tie and flexible-hold spray if you plan to move around outdoors. The finished look feels energetic, modern, and suitable for candid autumn photos.
20. The Golden-Hour Silhouette Waves
Golden-hour silhouette waves are all about shaping the hair to work with the light. Create loose, elongated waves with a combination of broad bends and softer curves, leaving some sections more relaxed than others. Keep the crown smooth with gentle lift, and arrange the front pieces so they frame the face without covering the eyes. The hairstyle should have enough separation for individual waves to show against the background. It works particularly well on long and medium-long hair, but a longer bob can achieve a similar effect with wider, softer bends.

Photograph this look when the sunlight is low and warm, positioning yourself so the light catches the outer edge of your hair. The waves can appear almost luminous against a rustic fence, a pumpkin field, or autumn trees in the distance. Avoid standing directly in harsh midday sunlight, which can create strong shadows and reduce visible detail. A simple cream, caramel, or deep-brown outfit helps the hair remain the visual focus. Take a few photographs while gently turning your head or moving your shoulders so the waves shift naturally. The final images feel warm, cinematic, and unmistakably autumnal.
How to Make Your Pumpkin Patch Hairstyles Photograph Better
A beautiful hairstyle is only part of a successful outdoor photo. Lighting, camera angle, outfit contrast, and a few practical preparation steps can make the finished look appear much more intentional. For small details that show up well on camera, try our fall hairstyles with accessories.
- Choose the right light: Early morning and late-afternoon light often create softer shadows and warmer tones than harsh midday sunshine. If your hair is dark, avoid placing it directly against a very dark background when you want the styling details to stand out.
- Show the hairstyle from more than one angle: Take one front portrait, one three-quarter view, and one back or side view. Twists, knots, braids, and layered shapes can look completely different depending on the camera angle.
- Match the hairstyle to your outfit: Smooth hairstyles complement structured clothing, while textured waves and relaxed twists work well with chunky knits and casual autumn outfits. Leave enough contrast between your hair and neckline so the silhouette remains visible.
- Use products sparingly: Too much oil can make the hair appear flat in bright light, while excessive hairspray can create stiff-looking strands. Use lightweight products that support your natural texture and allow movement.
- Prepare for outdoor conditions: Wind can loosen delicate twists and flatten crown volume. Secure important sections with discreet pins, carry a small comb, and refresh individual pieces rather than rebuilding the entire hairstyle.
- Keep the background simple around the head: Pumpkin displays, rustic fences, and autumn leaves create beautiful settings, but avoid positioning branches or busy objects directly behind the hairstyle. A little visual space helps the hair stand out.
Final Thoughts
The best pumpkin patch hairstyles for picture-perfect fall photos combine beautiful shape with realistic, wearable styling. From diagonal twists and sculpted side rolls to natural curl halos, soft bobs, and golden-hour waves, each look offers a different way to make autumn photographs feel more personal and visually interesting.
Choose a hairstyle that complements your natural texture, the length of your hair, and the outfit you plan to wear. Most importantly, capture more than one angle: the front may show the face-framing details, while the back reveals the twists, braids, and flowing shapes that make a hairstyle memorable. With a little preparation and thoughtful use of natural light, your pumpkin patch photos can look polished, seasonal, and effortlessly aesthetic. For more ideas, explore our aesthetic pumpkin patch hairstyles and Gen Z fall hairstyles, or browse the full fall hairstyles roundup. For an elevated, photo-ready look, see our classy pumpkin patch hairstyles.