Unique Halloween Hairstyles: 21 Unexpected Looks You Rarely See
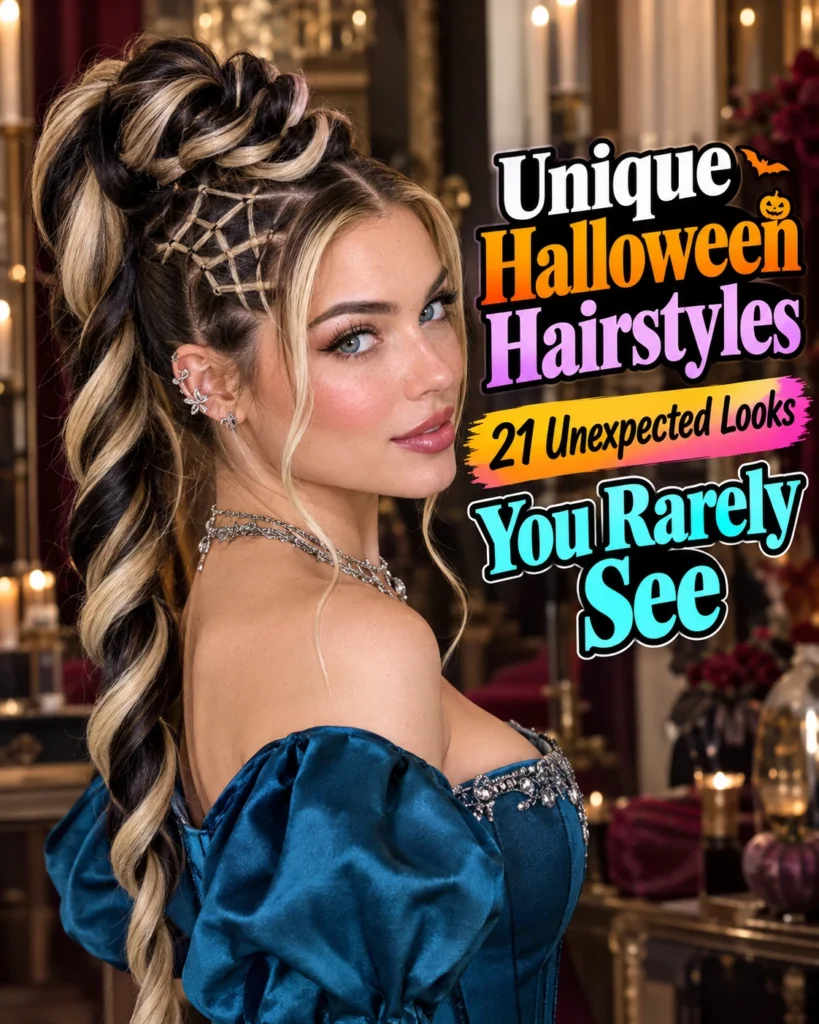
Unique Halloween hairstyles can be much more imaginative than familiar braids, ordinary space buns, or loose waves decorated with seasonal clips. The most memorable looks transform hair into something unexpected: delicate spiderweb structures, sculptural loops, twisted geometric crowns, floating-looking knots, and unusual patterns that feel almost architectural. Instead of relying entirely on costumes or colorful accessories, these hairstyles use shape, texture, and placement to create the drama.
The secret to making an unusual hairstyle look impressive is choosing one distinctive idea and building the design around it. A web-inspired braid should have a visible pattern, sculptural loops should hold their shape, and geometric sections should look intentional rather than messy. Some designs work best on long hair, while others can be adapted for shorter lengths, curls, or textured hair with pins, temporary extensions, and lightweight styling products. These 21 ideas offer creative directions for anyone who wants a Halloween hairstyle that feels artistic, unexpected, and different from the usual seasonal looks. For a softer take, see our Halloween hairstyles with bows.
1. Spiderweb Ladder Braid
The spiderweb ladder braid creates a delicate web-like structure down the back of the head rather than forming a conventional braid from top to bottom. Begin with a narrow French braid running vertically from the crown to the nape, leaving small side sections free as you work. Take the loose sections in pairs and connect them across the central braid with tiny elastics or discreet pins, creating horizontal bridges that resemble the spokes and connecting lines of a spiderweb. Keep the spacing consistent so the pattern remains recognizable, and leave the lower lengths loose or incorporate them into a slim finishing braid.

This hairstyle looks particularly striking on straight or softly waved hair because the web pattern remains easy to see. Dark hair gives the design a shadowy, dramatic quality, while lighter hair can show off the crossing sections more clearly in photographs. For an extra Halloween detail, place one tiny black spider accessory near the edge of the web, but let the hair construction remain the main feature. Use small elastics that blend with your hair color and secure the connecting sections gently to avoid pulling. The finished design feels intricate, unusual, and much more creative than simply adding a spider clip to an ordinary braid.
2. Twisted Web Crown
A twisted web crown forms an intricate pattern around the head, creating the impression of a spiderweb woven into a halo. Start with a center part and divide the hair into several narrow sections radiating outward from the crown. Twist each section away from the part, then connect neighboring twists with fine strands of hair or small, discreet elastics to create curved lines between them. Work around the crown in stages, allowing the pattern to develop gradually instead of trying to construct the entire web at once. The remaining lengths can be tucked into a low twist or left loose.
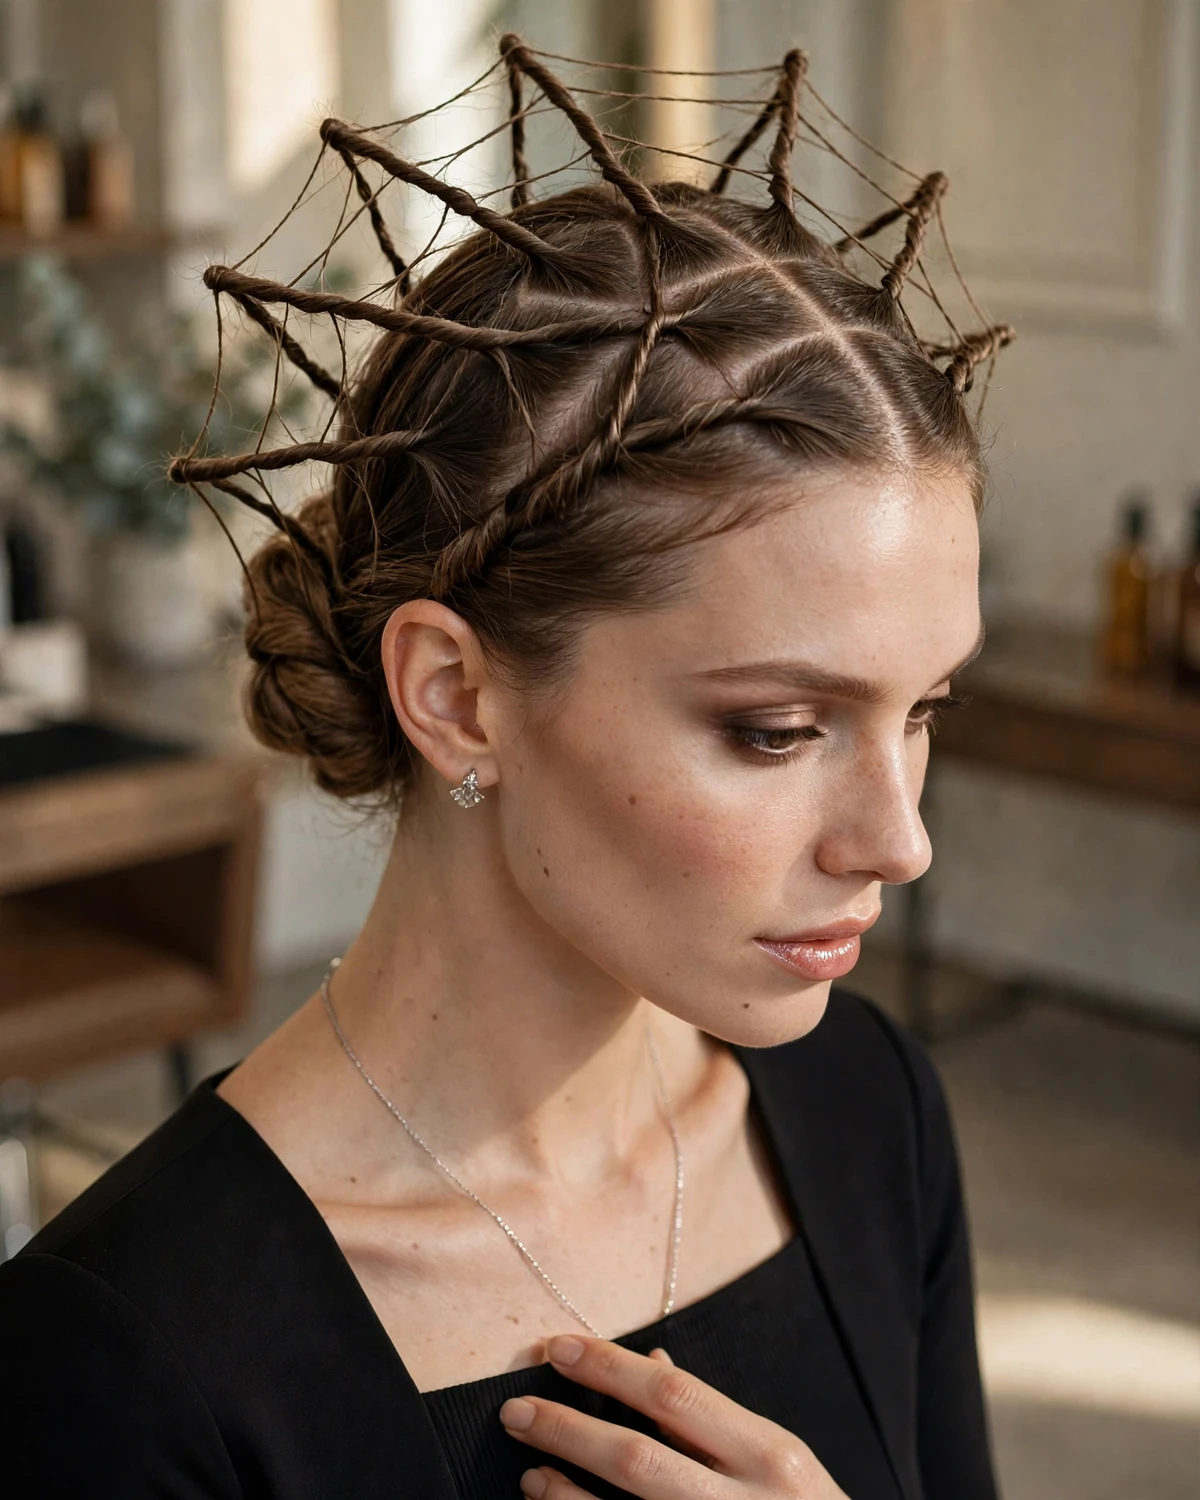
The key to this look is balancing the structure with enough softness to keep it wearable. Avoid making every section extremely tight; gentle tension helps the web look dimensional and prevents discomfort. The pattern works well on medium-to-long hair and can be adapted for curls by using larger sections and preserving the natural texture. A few tiny metallic pins can emphasize the intersections, but too many accessories may obscure the design. Viewed from above or behind, the twisted web crown creates a striking Halloween silhouette that looks almost like a handcrafted hair sculpture.
3. Sculptural Loop Halo
The sculptural loop halo transforms individual hair sections into raised loops arranged around the crown. Begin by creating a smooth base and dividing the upper hair into several equal sections. Fold each section back toward its root to form an elongated loop, then secure the base with crossed pins hidden beneath the hair. Arrange the loops in a circular formation, with their curved edges facing outward like petals or abstract wings. Leave the lower hair straight or softly curled so the sculptural crown remains the focal point.
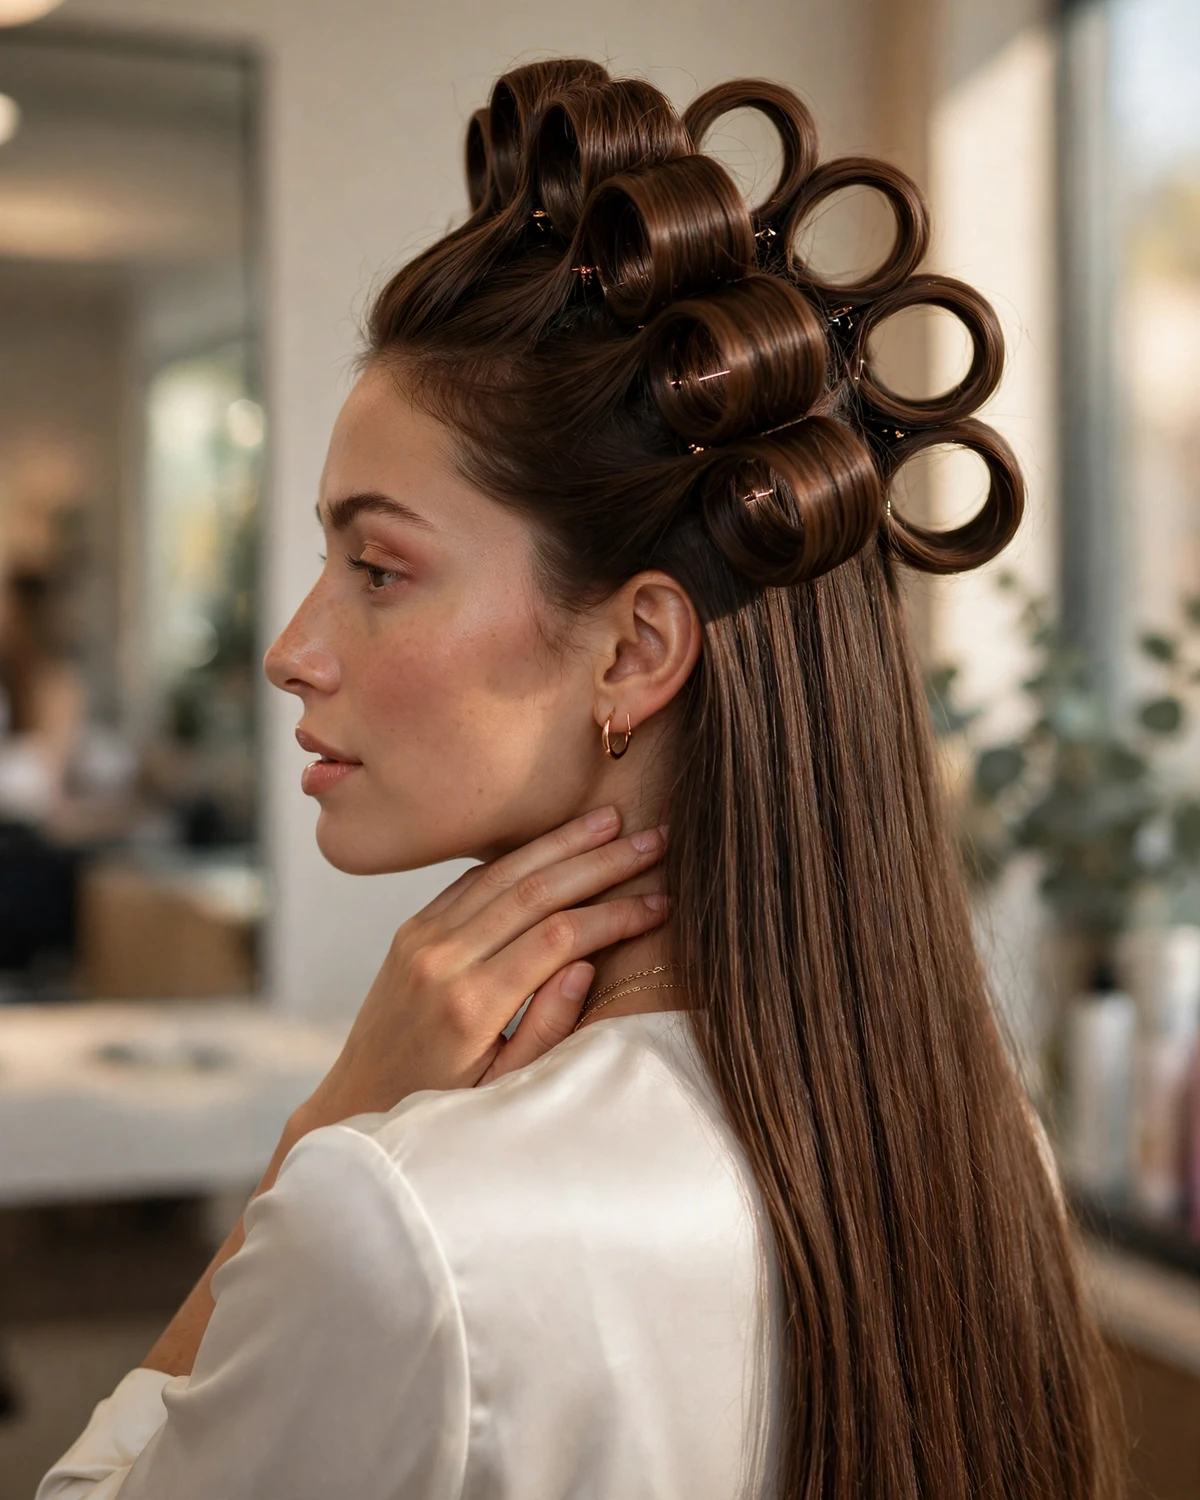
For the strongest effect, keep the loops similar in size but not so rigid that the hairstyle resembles a uniform costume prop. A flexible styling product can help maintain the shape, while lightweight padding hidden inside larger loops can add height to longer or finer hair. This design is most practical on medium-to-long hair, although smaller loops can create a scaled-down version on shorter lengths. It looks especially dramatic from a three-quarter angle, where the raised shapes create visible shadows. The result feels artistic and slightly otherworldly without needing a traditional bow, horn, or headpiece.
4. Geometric Crosshatch Crown
The geometric crosshatch crown uses clean sectioning to create a pattern of intersecting lines across the back of the head. Start by dividing the crown into a series of small squares or diamonds using a tail comb. Take thin sections from alternating corners and cross them over neighboring sections, securing each intersection with a small elastic or pin. Continue the pattern toward the back of the head, keeping the crossings visible and the partings neat. The lower lengths can be gathered into a low ponytail, braided together, or left free to contrast with the structured upper section.

This style is particularly effective when the pattern itself is the main attraction. Use elastics that match the hair so the crossings look like part of the design, or choose a few dark metallic cuffs if you want a more graphic finish. The crosshatch can be symmetrical for a precise, almost futuristic effect, or slightly diagonal for a more unusual composition. It takes patience to section the hair evenly, so working in front of two mirrors can make the process easier. The finished crown looks detailed from behind and gives a completely different impression from a traditional French or Dutch braid.
5. Floating Knot Architecture
Floating knot architecture creates the illusion that small knots sit above the hair rather than blending into a regular updo. Begin by dividing the upper hair into four to six sections and tying each pair into a loose, controlled knot. Pin the knots at slightly different heights along the back of the head, concealing their bases underneath neighboring sections. Keep the loops open enough to show their shape, but secure the ends carefully so the knots do not unravel. Leave a few narrow strands between the knots to create separation and emphasize the layered construction.
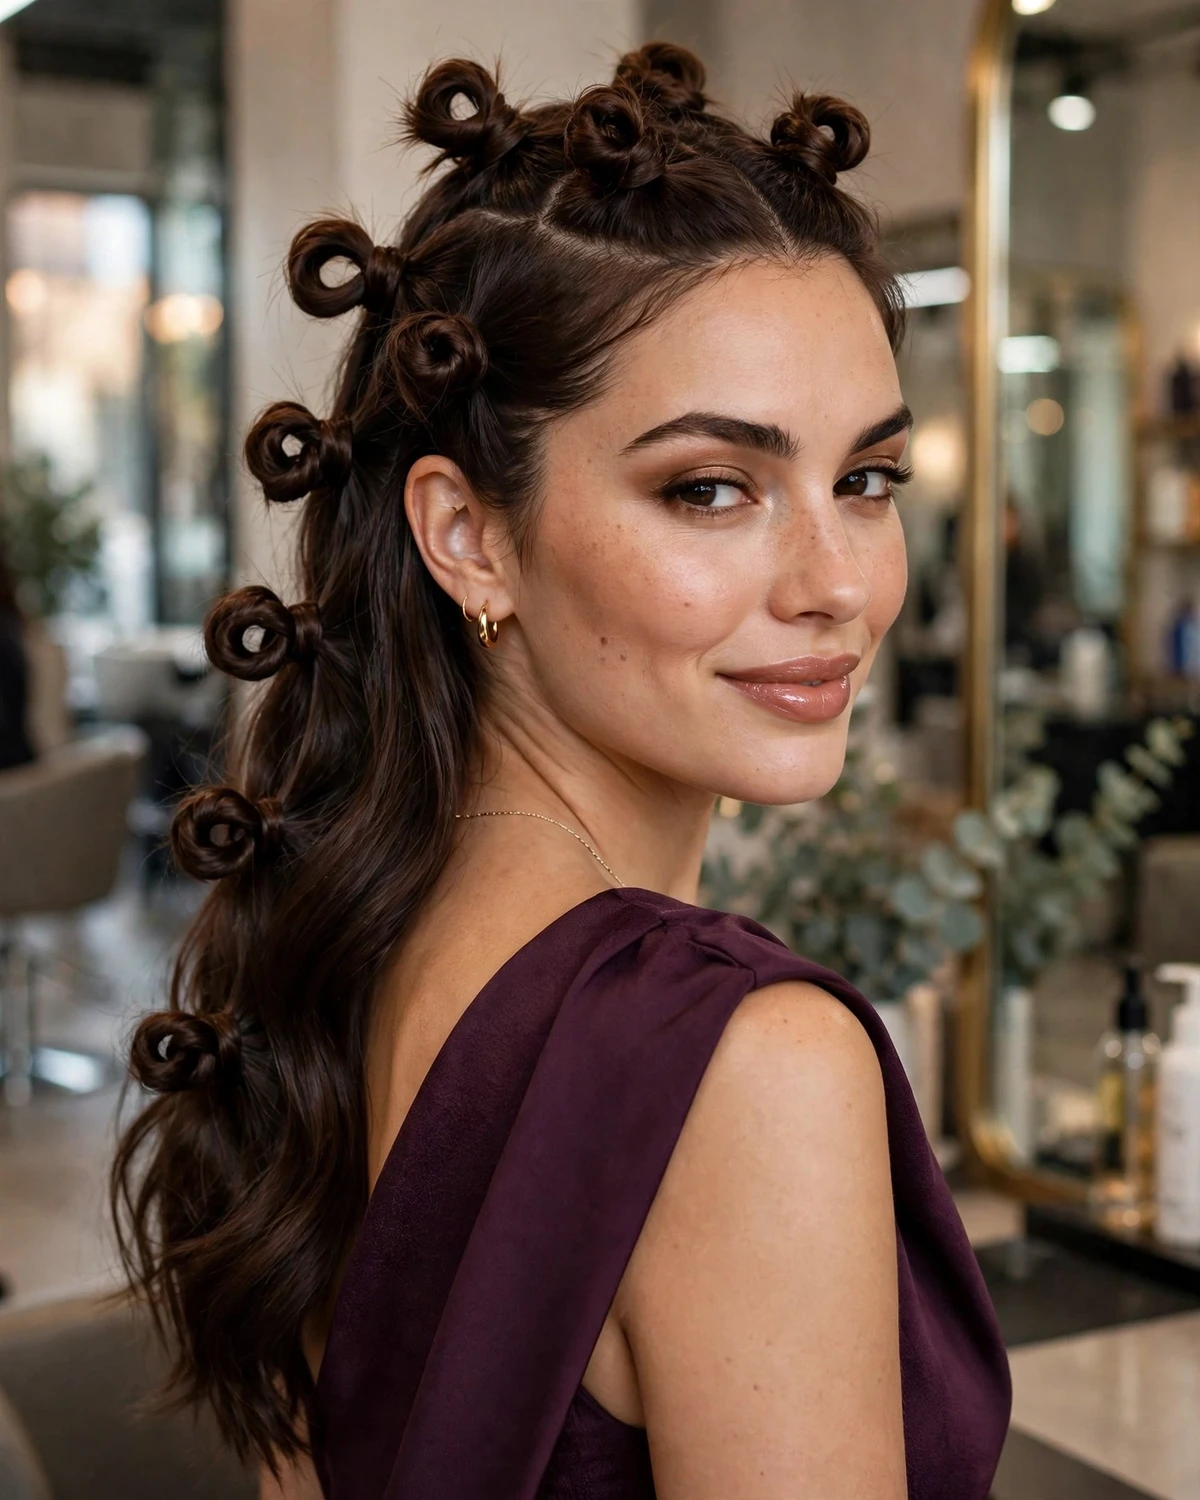
The unexpected quality comes from the placement: instead of building one large bun, you create a series of independent shapes that appear to hover across the hairstyle. This technique works best on medium-to-long hair with enough length to tie and fold each section securely. Fine hair may benefit from a little texturizing product, while thicker hair can form more substantial knots without padding. For Halloween, the design pairs well with sculptural makeup or a minimalist dark outfit because the hair already provides the visual drama. Keep accessories minimal so the unusual structure remains easy to see.
6. Spiral Cage Braid
The spiral cage braid combines a central braid with curved sections that wrap around it, producing a cage-like pattern with a twisting movement. Start with a narrow braid down the center of the head, leaving two wider sections free on either side. Twist one loose section around the central braid in a spiral, then secure it at intervals with discreet pins. Repeat on the opposite side, alternating the direction of the twists so they cross at selected points. The remaining ends can be incorporated into one long braid or gathered into a small tucked finish.

The design should look like a series of curved bands surrounding a central structure rather than a simple braid wrapped with a strand. Keep the twists loose enough to show their rounded shape and avoid placing every crossing at the same distance. This creates depth and makes the hairstyle appear more sculptural. The spiral cage is best suited to long hair, but temporary braided extensions can help create enough length for the wrapping sections. It looks impressive from the back and works particularly well for a dark fantasy, haunted-doll, or gothic costume. A few matte black pins can reinforce the mood without distracting from the construction.
7. Asymmetric Web Sweep
The asymmetric web sweep places a spiderweb-inspired design on only one side of the head, leaving the other side smooth and understated. Create a deep side part, then divide the smaller side into narrow sections that radiate from a point above the ear. Connect the sections with curved, crossing strands to create a half-web pattern, securing the intersections with tiny elastics or hidden pins. Sweep the remaining hair across the head into loose waves or a sleek side arrangement, allowing the contrast between the patterned and unpatterned sides to define the look.
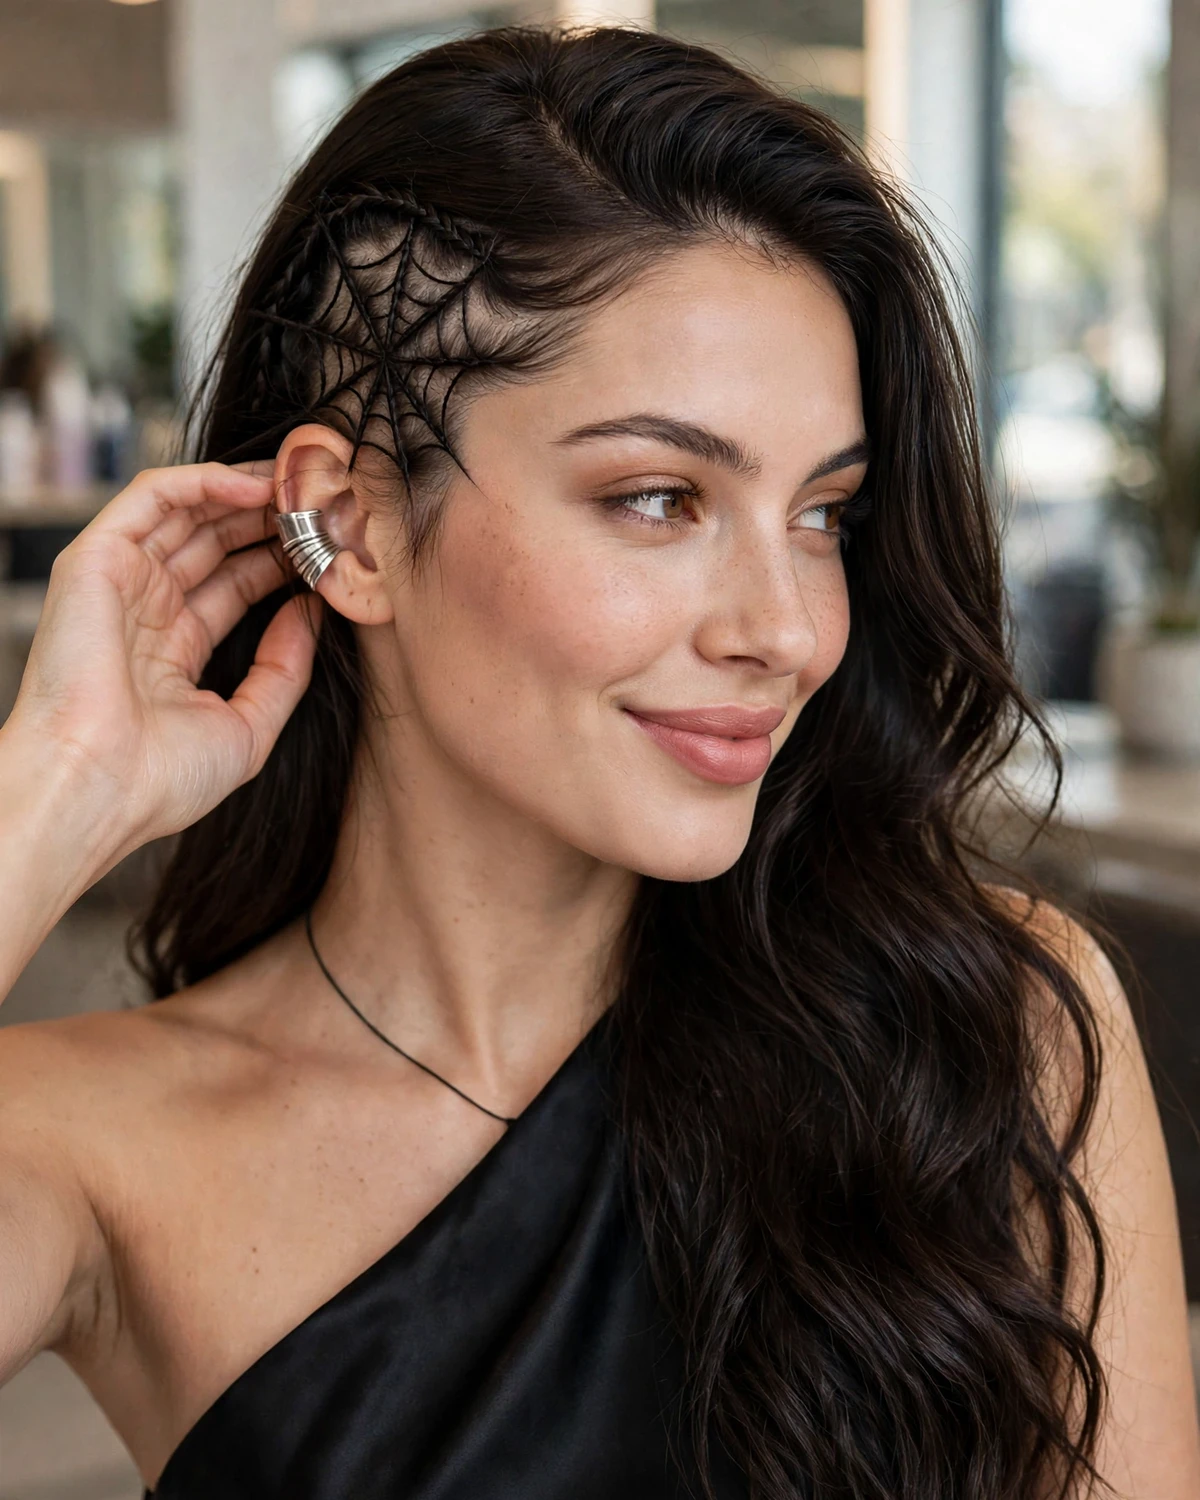
Asymmetry makes this style feel modern and editorial rather than like a full costume hairstyle. The web does not need to cover the entire side of the head; a small, carefully constructed section can be more striking than an oversized pattern. This approach works on medium-to-long hair and can also be adapted to shorter styles if the hair is long enough to create the connecting strands. For a clean result, use a fine comb to keep the partings defined and secure loose ends before styling the opposite side. The finished look pairs well with one visible ear cuff or a single statement earring.
8. Inverted Heart-Shaped Hair Loops
This hairstyle creates an abstract heart-like silhouette from two large, inverted loops positioned at the back of the head. Gather two sections from either side of the crown and guide them toward the center. Fold each section into a loop with the curved edge pointing outward and the narrow base meeting at the middle, then pin the bases together to form the central point. The shapes should suggest a heart without looking like a flat, cartoon outline. Leave the lower hair loose, or tuck it into a compact roll to give the design a cleaner background.

For Halloween, the effect can be romantic, eerie, or surreal depending on the finish. Smooth, glossy loops create a polished gothic look, while softly textured loops feel more dreamlike. The shape works best on longer hair because the sections need enough length to fold without exposing their ends. If the hair is fine, lightweight padding hidden inside the loops can help create fuller curves. Avoid using a large accessory at the center; the meeting point should be defined by the hair itself. This is an unusual alternative to a conventional heart braid and offers a distinctive shape for photographs.
9. Cobweb Fan Ponytail
The cobweb fan ponytail uses the base of a ponytail as the center of a radiating pattern. Secure a high or mid-height ponytail, then separate several thin strands from the upper part of its length. Spread the strands outward around the base and connect them with narrow cross-sections of hair, creating a small web-like fan that sits above the ponytail. Secure the pattern with tiny elastics or discreet pins, then leave the remaining ponytail long and loose. The design should look like a decorative fan growing from the base rather than a standard ponytail with wrapped sections.

This hairstyle is easiest to create on long, straight hair because the strands remain visible and the web pattern stays defined. If your hair is layered, work with slightly thicker strands and use a light styling cream to reduce flyaways. The fan can be centered for a symmetrical effect or positioned slightly to one side for a more experimental silhouette. Keep the connecting strands neat but not excessively tight, as the ponytail base should remain comfortable. A small spider charm can be added near the fan’s edge if desired, although the pattern itself is distinctive enough to stand alone.
10. Twisted Horn-Like Crown Ridges
For a dramatic silhouette without a separate headpiece, create two raised, curved ridges from twisted hair sections. Part the hair down the middle and take a thick section from each side of the crown. Twist each section tightly near the roots, then bend the length backward and slightly inward to form a raised ridge. Secure the shape with crossed pins hidden beneath the twist, keeping the two sides balanced without making them perfectly identical. The lower hair can be left loose or gathered into a sleek low arrangement so the ridges remain clearly visible.
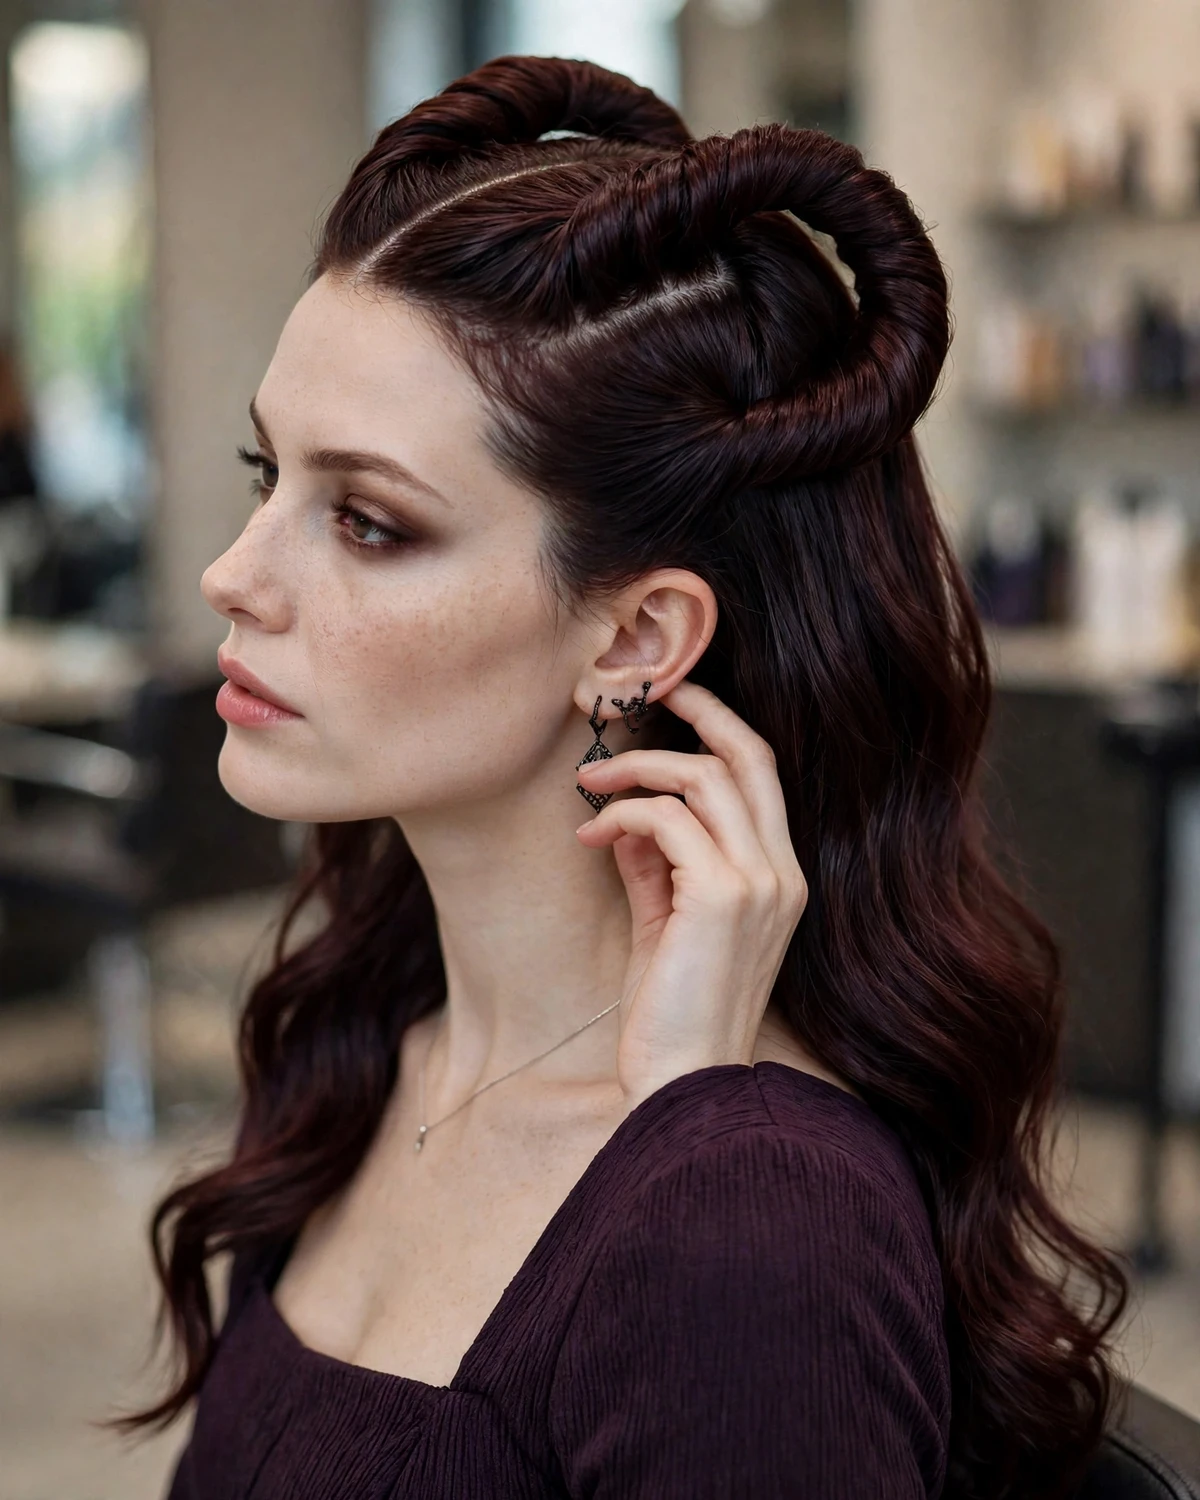
The aim is an abstract sculptural shape rather than literal pointed horns. Softly curved ridges create a more refined effect and are easier to secure than sharp projections. Longer hair provides more material for the shape, but padded inserts can help create height if the sections are shorter or finer. Apply styling product sparingly and check that the pins do not press uncomfortably against the scalp. This design is particularly effective for a dark fairy, fantasy villain, or avant-garde Halloween look. Because the silhouette is unusual on its own, avoid adding bulky accessories around the crown.
11. Braided Web Rosette
The braided web rosette forms a circular, flower-like structure with web-inspired crossings at its center. Begin with a small braid near the crown or just above one ear, then coil it into a flat spiral and pin it securely. Take several thin sections from around the spiral and arrange them in curved lines extending outward, connecting them to nearby hair with discreet pins. The combination of a central coil and radiating strands creates a rosette that resembles a flower, a web, or an ornamental wheel depending on the angle.
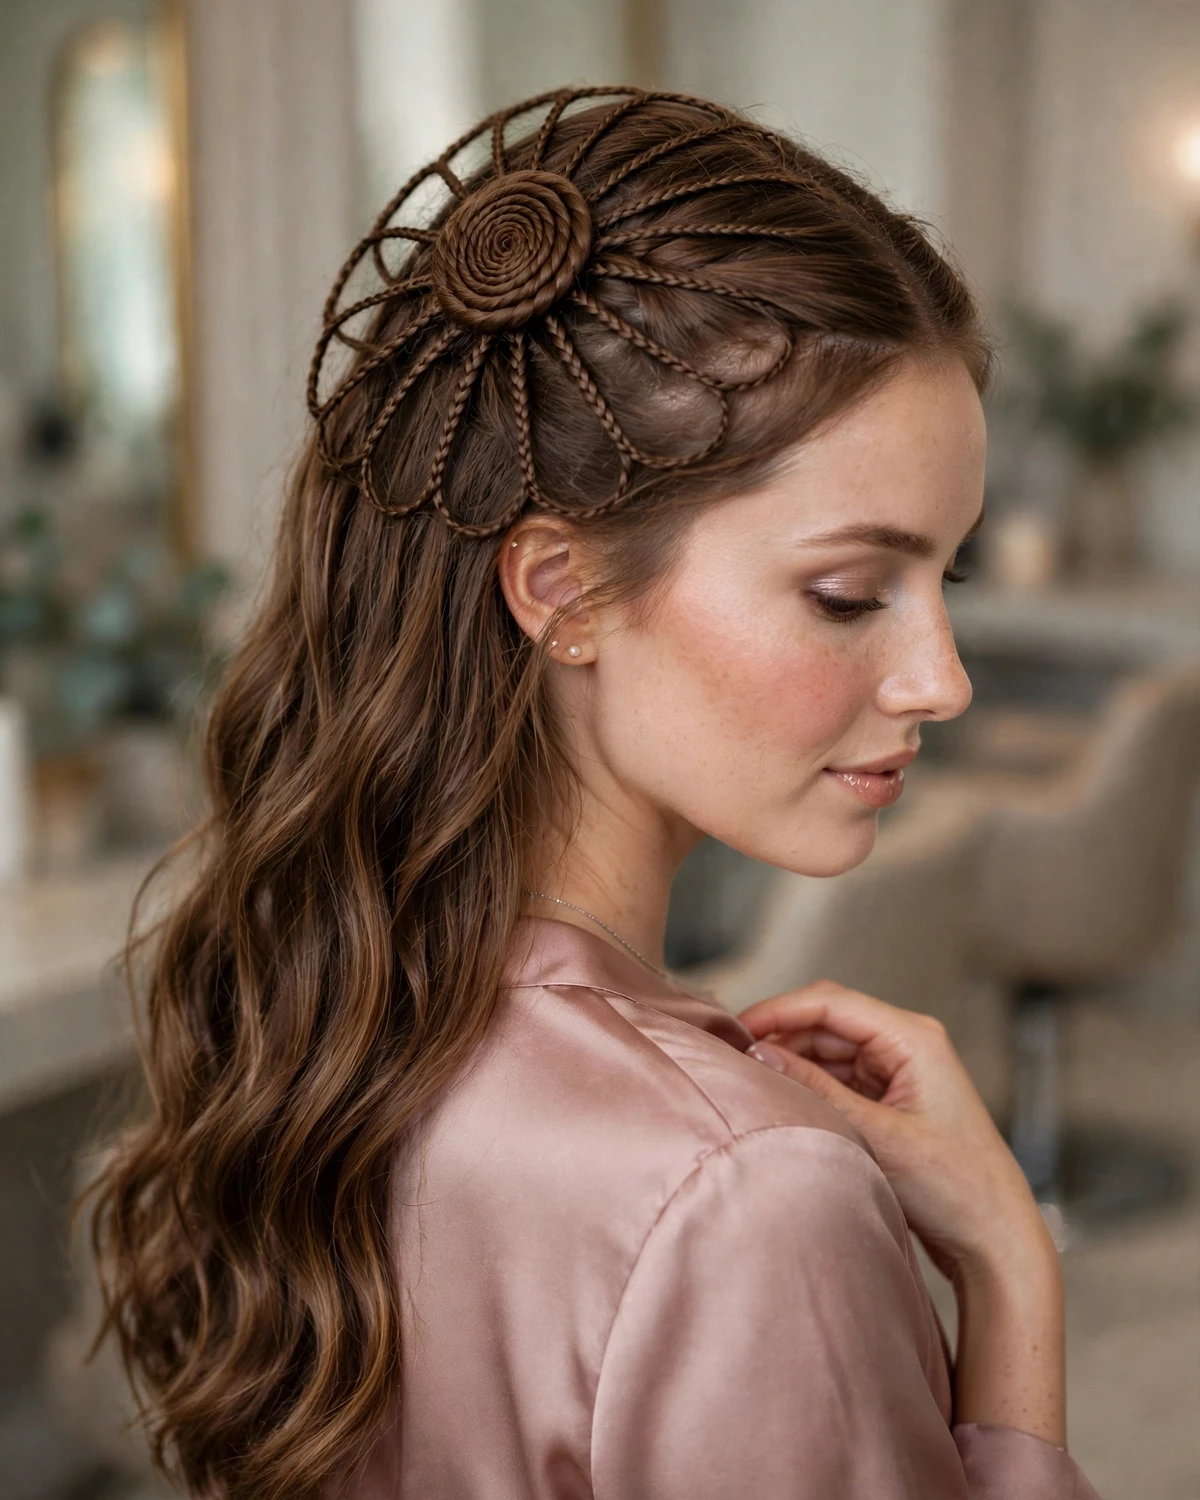
This design works best when the central braid remains compact and the outer strands are spaced evenly. It can be positioned at the back of the head as part of a half-up style or placed to one side for a more asymmetrical result. Long hair makes the radiating lines easier to construct, but a smaller version can be created with shorter sections and a compact braid. Use pins that match your hair color and check the pattern from several angles as you work. The rosette feels intricate and decorative without depending on a flower clip or a conventional braided bun.
12. Double Spiral Side Structures
Double spiral side structures create two visible coils near the temples, giving the hairstyle a strange, almost futuristic shape. Divide the front hair into two sections on either side of the face and twist each section tightly from the roots. Coil the twisted lengths into flat spirals above or behind the ears, pinning the centers securely so the coils stay in place. The rest of the hair can remain straight and sleek, be gathered into a low ponytail, or fall in loose waves to soften the strong geometry of the side structures.

The placement should feel deliberate rather than identical to ordinary space buns. Keep the coils relatively flat against the head and position them slightly behind the temples to create a more unusual profile. If your hair is short, small coils may be easier to secure; longer hair can create wider spirals with more visible texture. A little styling cream can help keep the twists smooth, while a few natural strands around the face prevent the design from looking too rigid. The result works particularly well for futuristic Halloween costumes, dark android concepts, or abstract editorial-inspired looks.
13. Interlocking Knot Grid
The interlocking knot grid turns the upper section of the hair into a repeated series of small knots. Divide the crown into a grid of narrow sections, then pair neighboring sections and tie each pair into a compact knot. Secure the knots at their bases and arrange the rows so that some knots sit slightly above others, creating an interlocking appearance. The lower lengths can be divided into thin braids or left straight, depending on how much detail you want the finished hairstyle to contain.
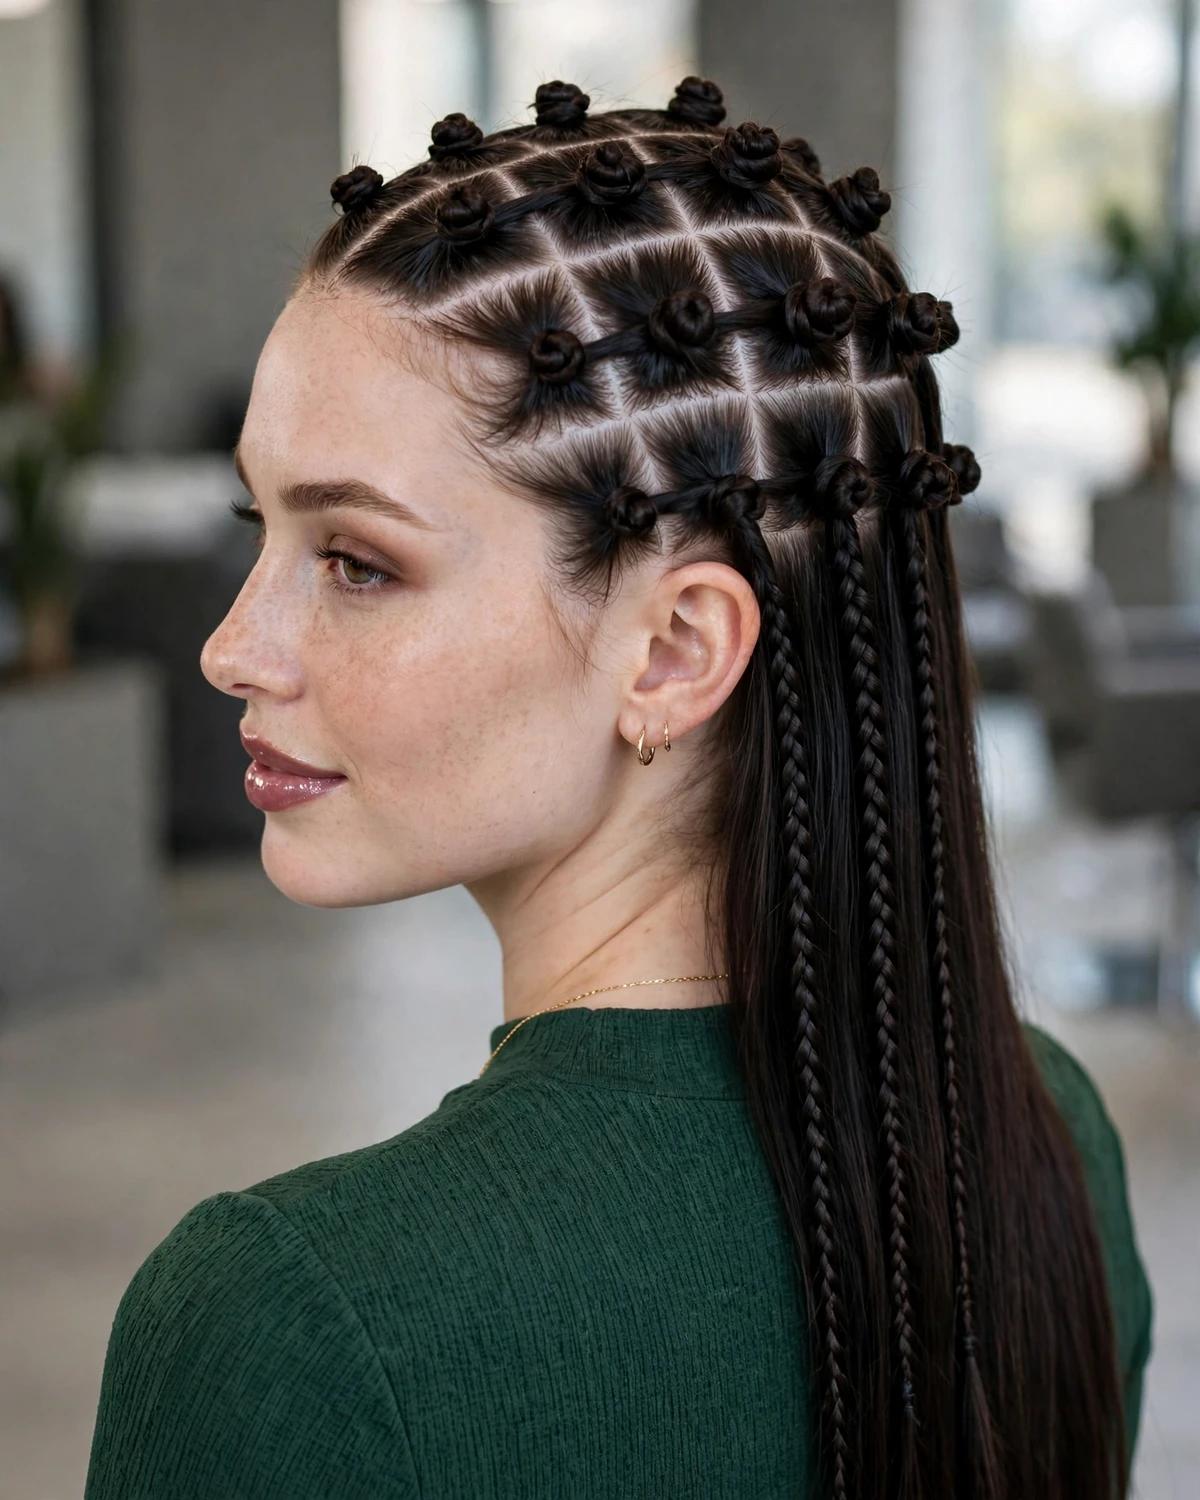
Unlike a conventional row of mini buns, the knots should visually connect across the crown, forming a deliberate pattern. This is a time-consuming style, so start with a small grid near the back of the crown before extending the design farther forward. It works best on medium-to-long hair that can be tied and secured without slipping. If your hair is very smooth, a small amount of texturizing product may help the knots hold. The result looks almost woven and gives the impression of an intricate hair structure rather than a collection of separate buns.
14. Broken Web Half-Crown
The broken web half-crown offers an intentionally irregular alternative to a symmetrical spiderweb design. Begin with a small twist or braid at one temple and carry it across the upper back of the head. Add thin connecting strands at uneven intervals, crossing some sections while leaving deliberate gaps between others. Secure each connection discreetly, allowing the pattern to resemble an incomplete web that has been stretched or interrupted. Keep the lower hair loose to make the delicate structure stand out against a simple background of waves or straight lengths.
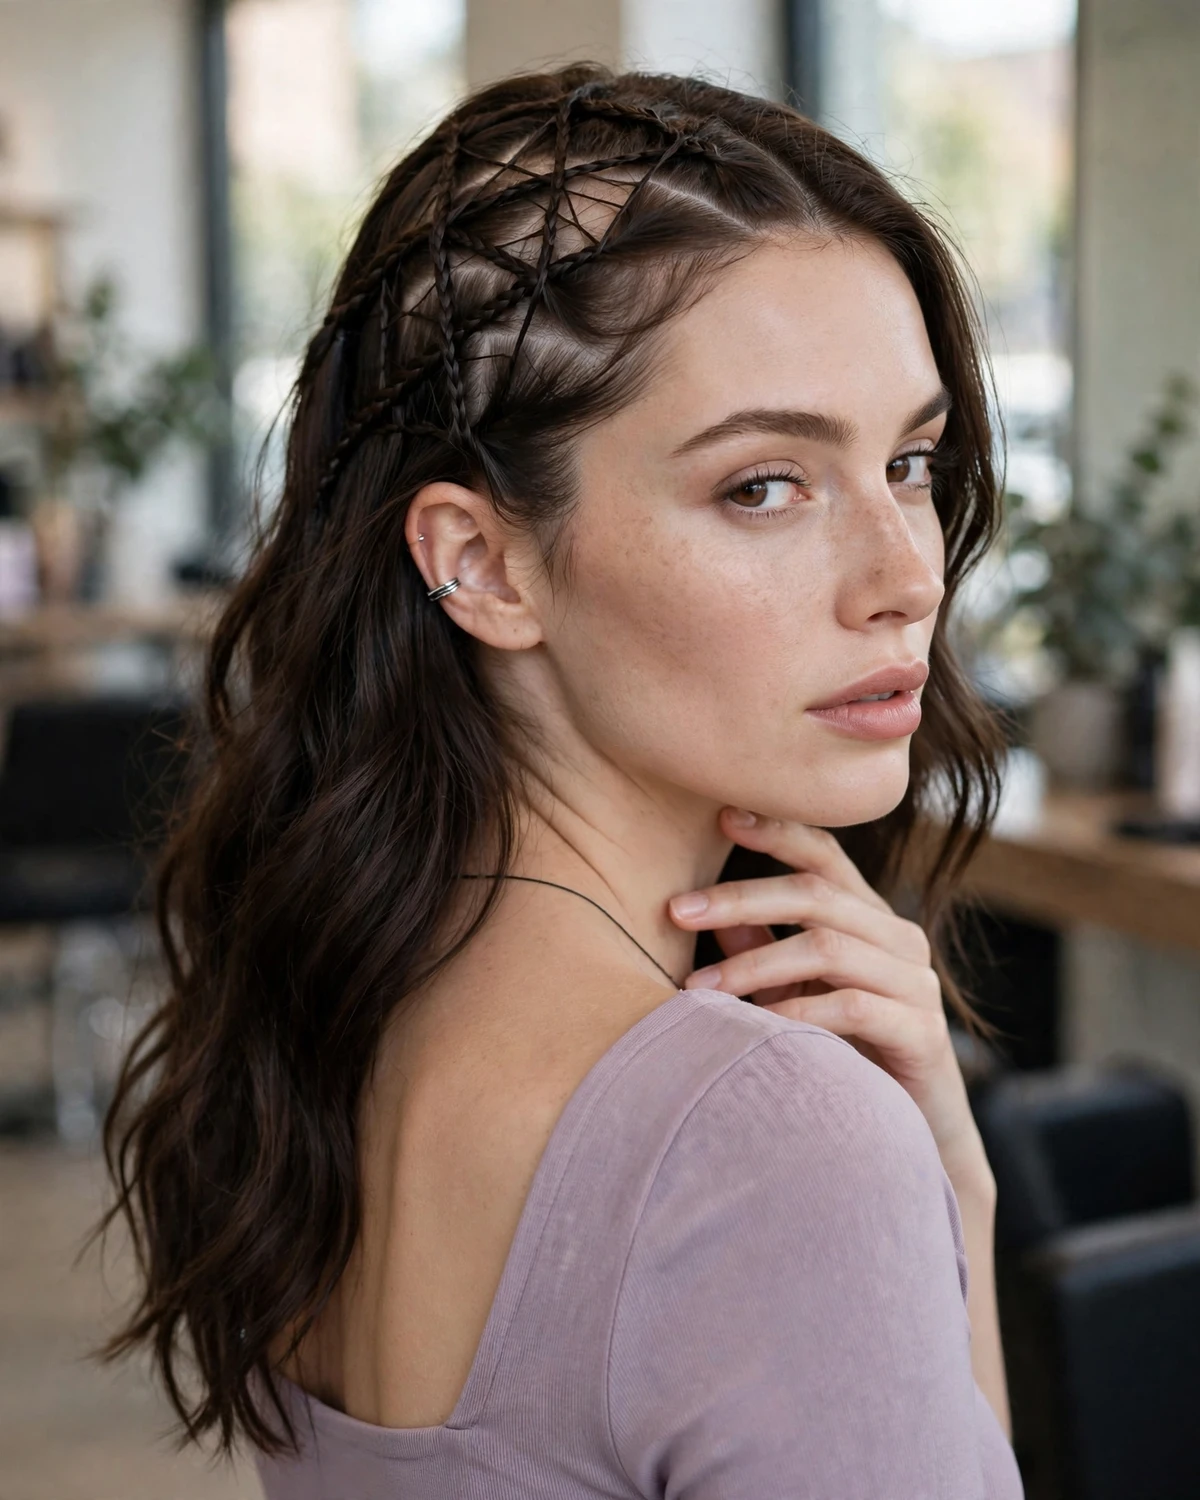
The irregularity is what makes this hairstyle interesting. Instead of forcing every line to match, vary the distance between crossings and allow one or two strands to curve farther than the rest. The result should still feel intentional, so check the overall shape from the back and adjust any sections that appear accidental rather than artistic. This look works well on medium-to-long hair and is particularly effective for a haunted woodland or dark fairy theme. A single tiny metallic detail can emphasize one intersection, but leaving the web mostly bare keeps the design more sophisticated.
15. Sculpted Bowless Loop Cascade
This hairstyle uses repeated loops without turning them into traditional bows. Take a section from the crown, fold it into an elongated oval loop, and secure it at the base. Repeat with additional sections beneath the first, positioning the loops in a descending cascade along the back of the head. Each loop should be visible as an individual shape, with the ends tucked underneath so no loose pieces distract from the outline. The lower lengths can remain loose or be gathered into a small, neat tail beneath the final loop.
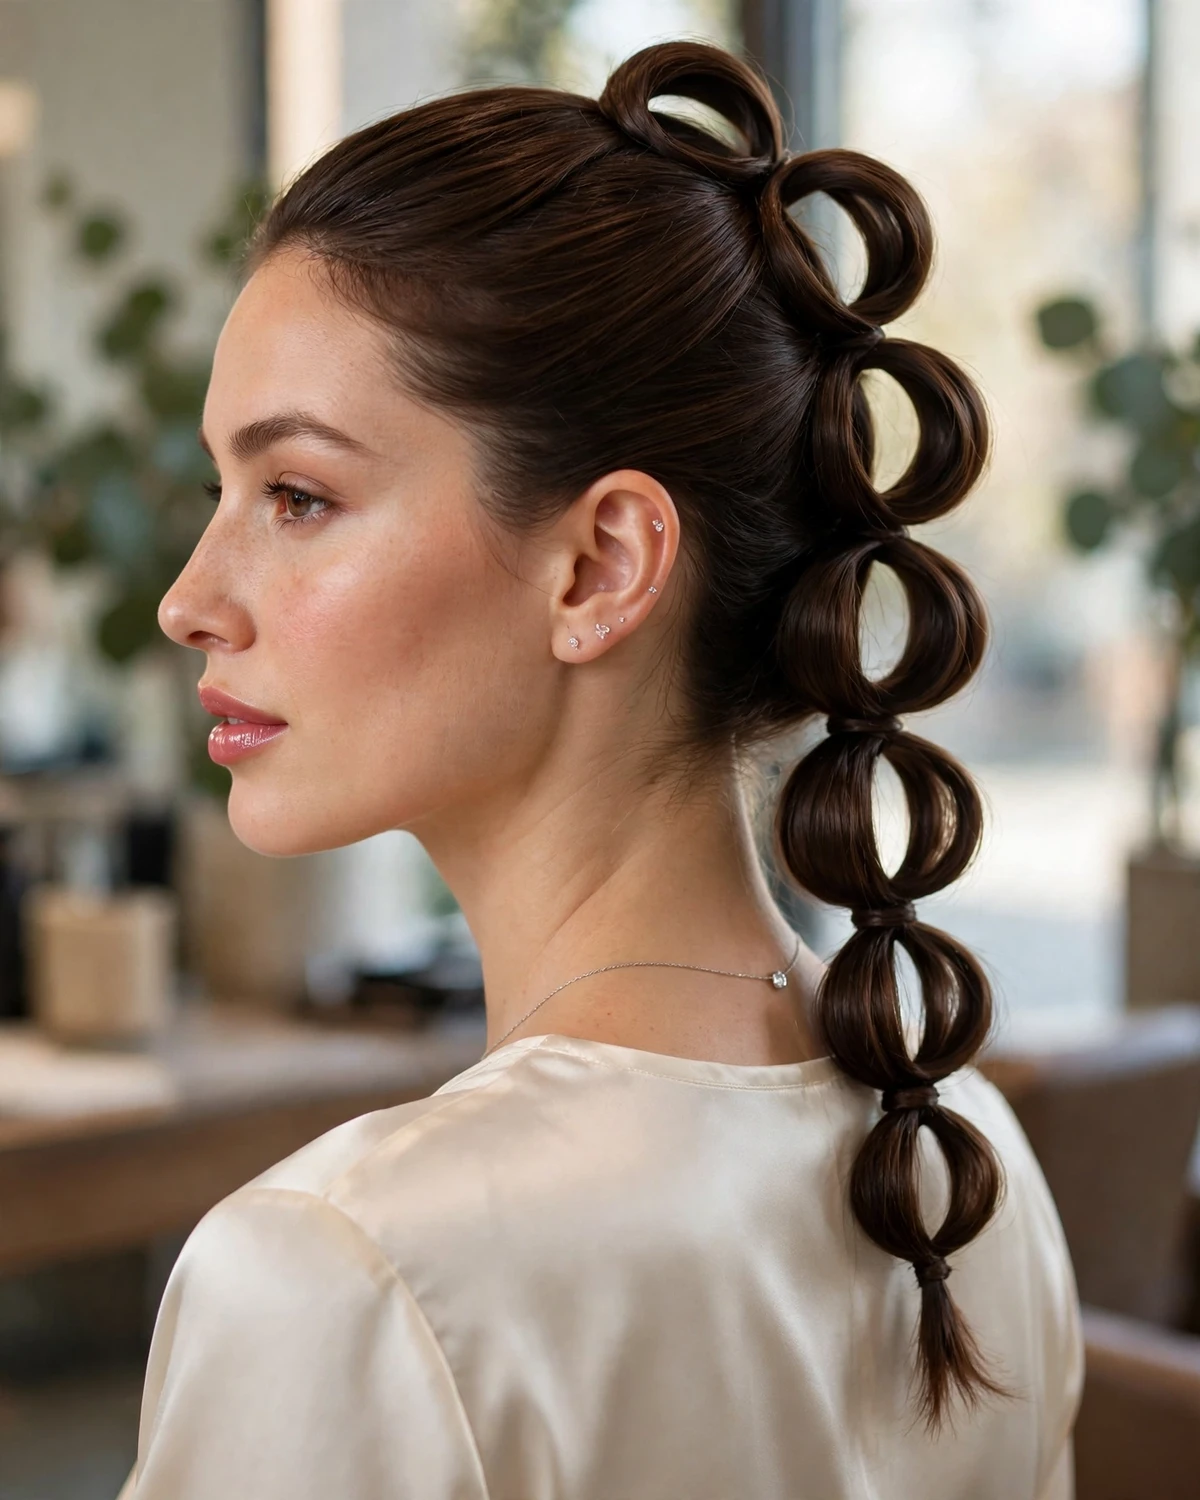
The design is inspired by abstract sculpture rather than familiar hair accessories, making it a good choice for someone who wants a dramatic silhouette without a literal Halloween symbol. Keep the loops narrow enough to retain their shape and vary their size slightly to create movement. Longer hair makes the cascade easier to construct, while shorter hair may work better with two or three compact loops. Use lightweight pins and flexible hold spray so the shapes stay secure without becoming stiff. The finished style photographs beautifully from behind because the repeating curves create a strong visual pattern.
16. Spiral Staircase Braid
The spiral staircase braid winds around the back of the head in a descending diagonal, creating the impression of a staircase rather than a straight plait. Start with a small braid near one side of the crown and gradually incorporate new sections as you move diagonally downward. Keep the braid close to the head at the top, then allow it to curve around the back before finishing near the opposite side of the nape. The remaining length can be incorporated into a second, narrower braid or tucked into a compact knot.
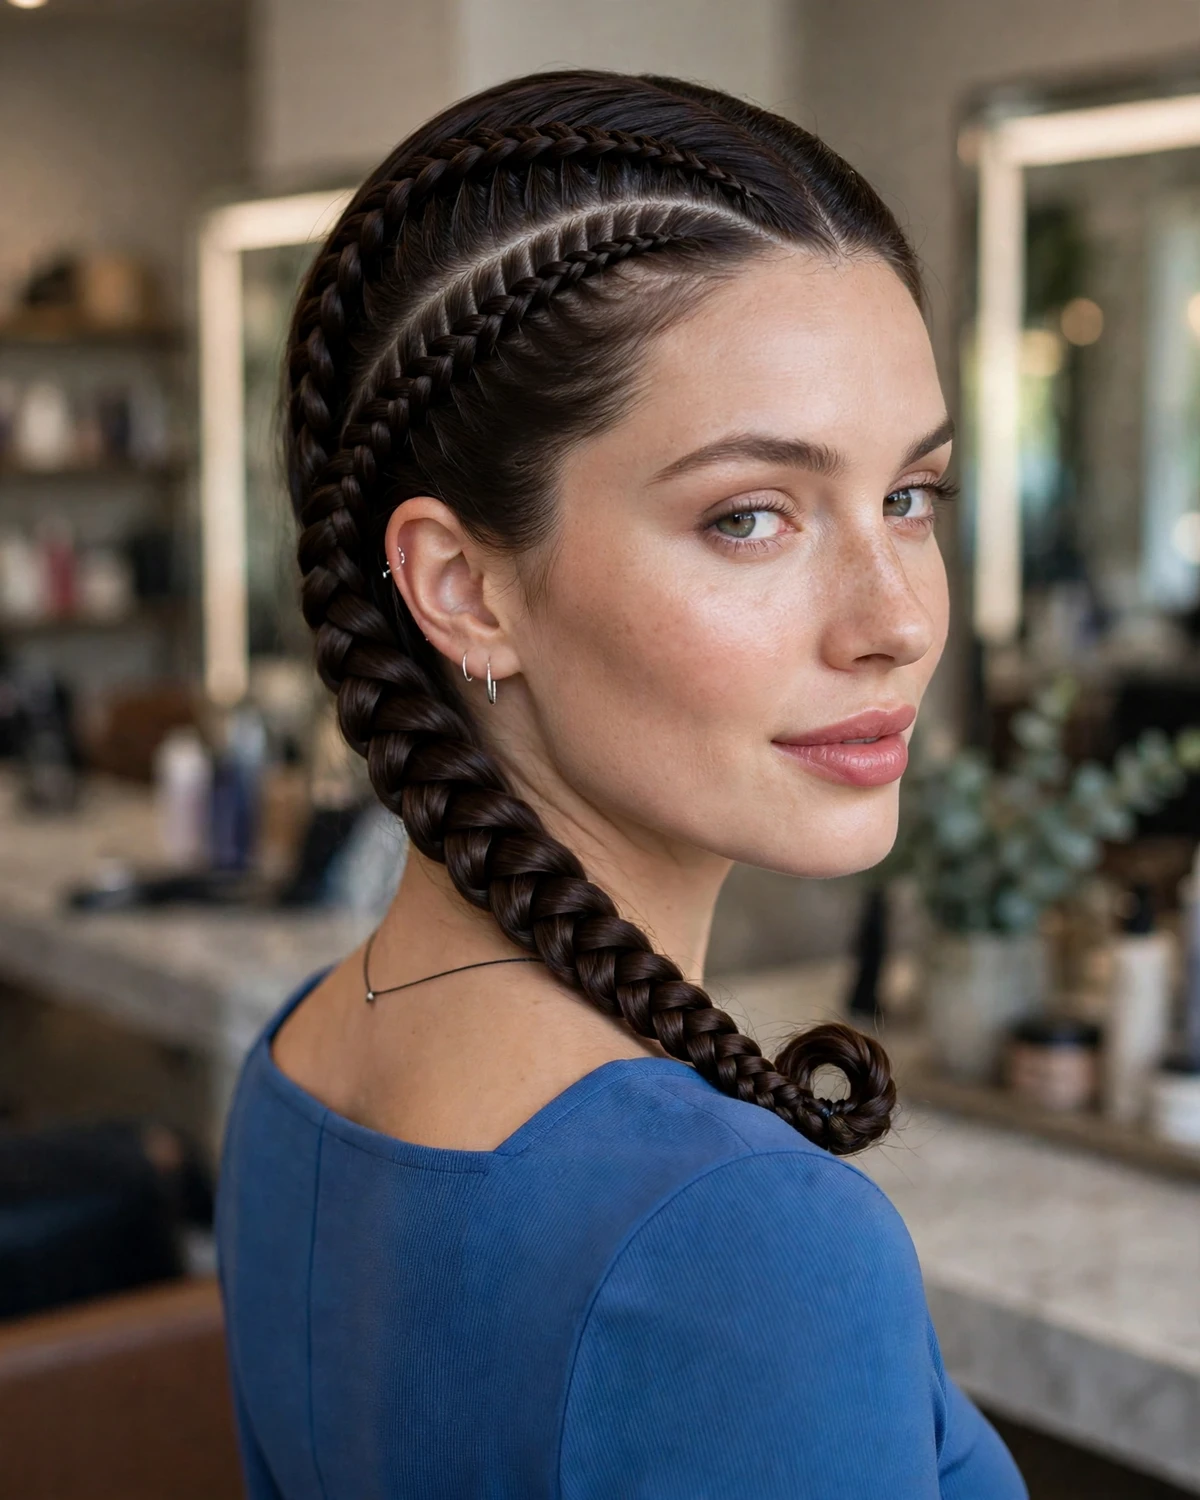
To emphasize the staircase effect, keep each diagonal crossing visible and avoid pulling the braid into a perfectly vertical line. Slightly loosen the outer edges after securing the style so the curve becomes more dimensional. This design is especially effective on long hair, but a smaller diagonal version can work on medium lengths. Choose a hairstyle base with minimal accessories so the direction of the braid remains clear. For Halloween, the unusual route across the head feels more distinctive than a standard side braid and can complement a costume with angular or architectural details.
17. Spider-Leg Twist Accents
Spider-leg twist accents create a series of fine, curved tendrils extending from a central hair structure. Gather a small section at the crown into a compact knot or braided center. From around that center, take several narrow strands and twist them tightly, shaping each one into a curved line that extends outward before being pinned at the end. Vary the directions so the tendrils spread across the crown rather than falling in a uniform row. The lower hair can be left down or secured into a sleek finish to keep attention on the sculptural top.

The tendrils should look like deliberate lines, not loose flyaways. Use small pins that match your hair color and bend each twist gently before securing it. For a more dramatic result, make a few tendrils longer than the others, but keep the overall shape balanced enough to stay wearable. This style is easier to construct on medium-to-long hair, although extensions can help create extra length for the curved sections. A small spider accessory is optional; the twisting pattern already suggests the inspiration. The finished hairstyle has a striking silhouette that feels theatrical without requiring a full headpiece.
18. Negative-Space Ribbonless Web Braid
This web braid is built around the gaps between sections rather than around ribbons or decorative accessories. Create a narrow braid at the back of the head, then take small strands from either side and pin them across open spaces to form a series of diamond-shaped gaps. Keep the crossing strands slim and the gaps relatively consistent so the negative spaces become the main visual feature. The hair beneath can remain loose, making the pattern look like an open framework laid over a flowing base.

The technique is more about careful sectioning than complex braiding. Use a tail comb to define each strand and secure the crossings with tiny pins hidden at the edges of the pattern. This style works best on straight or softly waved hair because the open diamonds remain clearly visible. On curly hair, larger sections can create a looser, more organic web effect without fighting the natural texture. The absence of ribbons, beads, or clips makes the hairstyle feel especially unusual: the design comes entirely from the arrangement of hair and the spaces between its lines.
19. Offset Sculptural Crown Knots
Offset sculptural crown knots create an uneven line of raised shapes across the top of the head. Take several sections from the crown and tie each into a loose knot, then pin them at different heights and slightly different distances from the center part. Instead of arranging the knots in a symmetrical pair, build the shape diagonally from one side toward the opposite back corner. Leave small spaces between the knots so each form remains distinct, and keep the lower lengths smooth or softly waved.
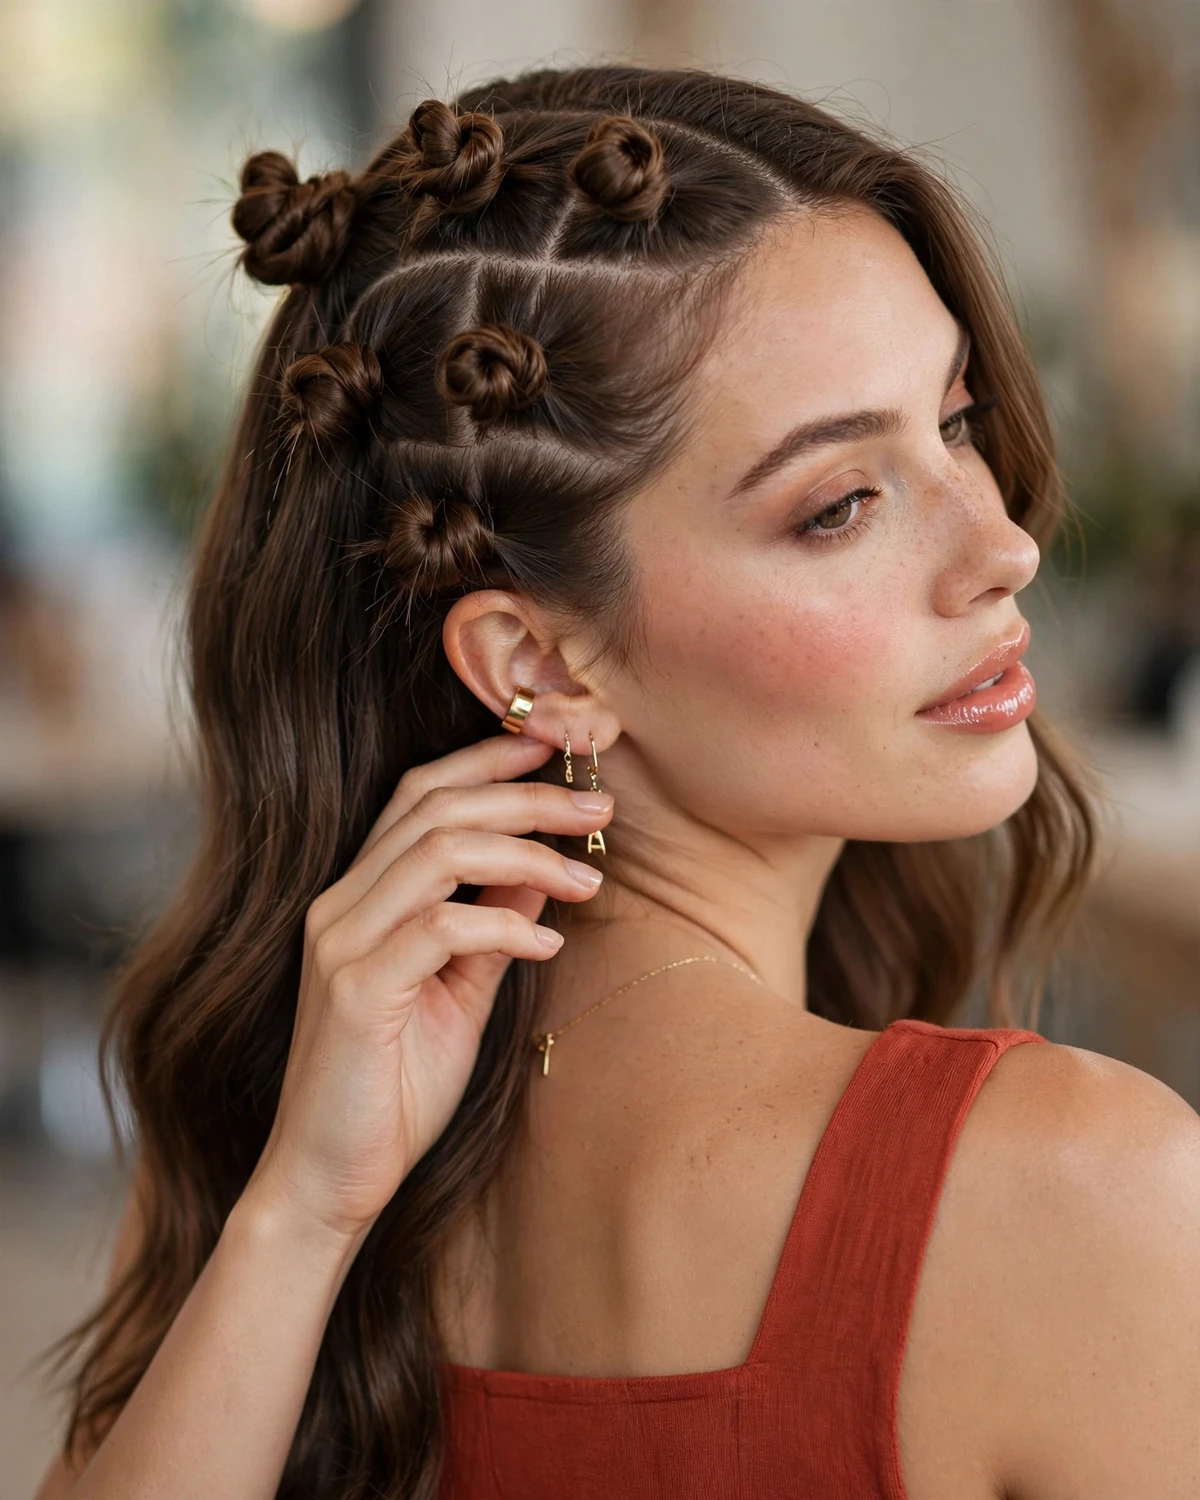
This is a good option for anyone who wants a hairstyle that feels experimental without relying on a recognizable Halloween motif. The offset arrangement gives it a fashion-editorial quality, while the knots provide enough texture to make the design interesting from multiple angles. It works best on medium-to-long hair, and the knots can be made smaller or larger depending on the available length. Use crossed pins at each base and check the balance from the side as well as from behind. A minimal outfit and subtle makeup allow the unusual crown to become the main feature.
20. Braided Web Tail with Sculptural Ends
The braided web tail combines an intricate upper pattern with an unexpected finish at the end of a long braid. Begin with a web-like arrangement across the crown, connecting small sections with narrow crossings. Gather the remaining hair into a long braid, but instead of finishing with a conventional straight plait, divide the last few inches into separate strands and fold them into small loops. Pin the loops into a compact, fan-shaped arrangement that appears to grow from the braid’s end.
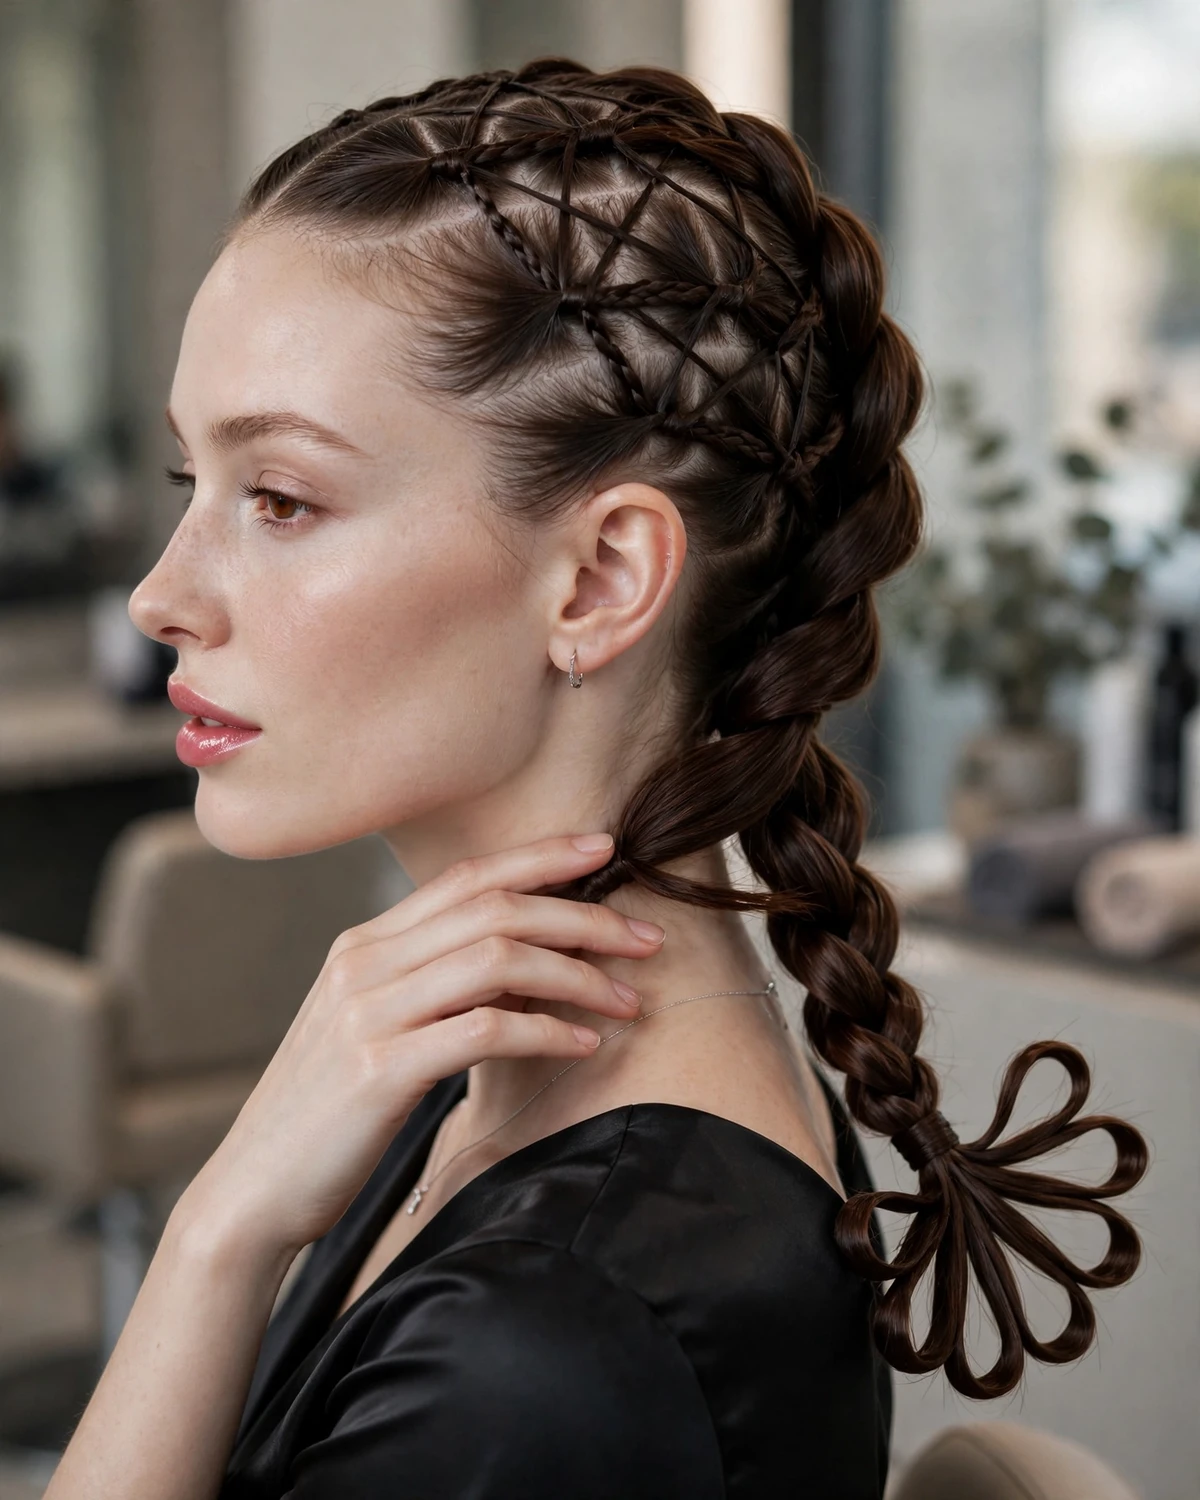
The contrast between the precise web and the sculptural finish makes the hairstyle feel designed from top to bottom. Keep the upper pattern neat and the end loops slightly softer, so the two structures complement each other without looking identical. This style is best for long hair because both the web and the finishing shape need enough length to remain visible. If your hair is layered, use small clear elastics to stabilize the braid before forming the loops. The result is unusual from the crown to the ends, making it especially effective for a Halloween look photographed from the back.
21. Twisted Eclipse Updo
The twisted eclipse updo uses overlapping curved sections to create a dark, circular shape at the back of the head. Gather the hair into a low base and divide it into several wide sections. Twist each section inward and wrap it around the base, leaving a small central opening or creating a narrow curved gap between the overlapping sections. Pin the twists in place so they form an uneven ring rather than a conventional round bun. The final silhouette should suggest an eclipse: a central shadow surrounded by curved layers of hair.
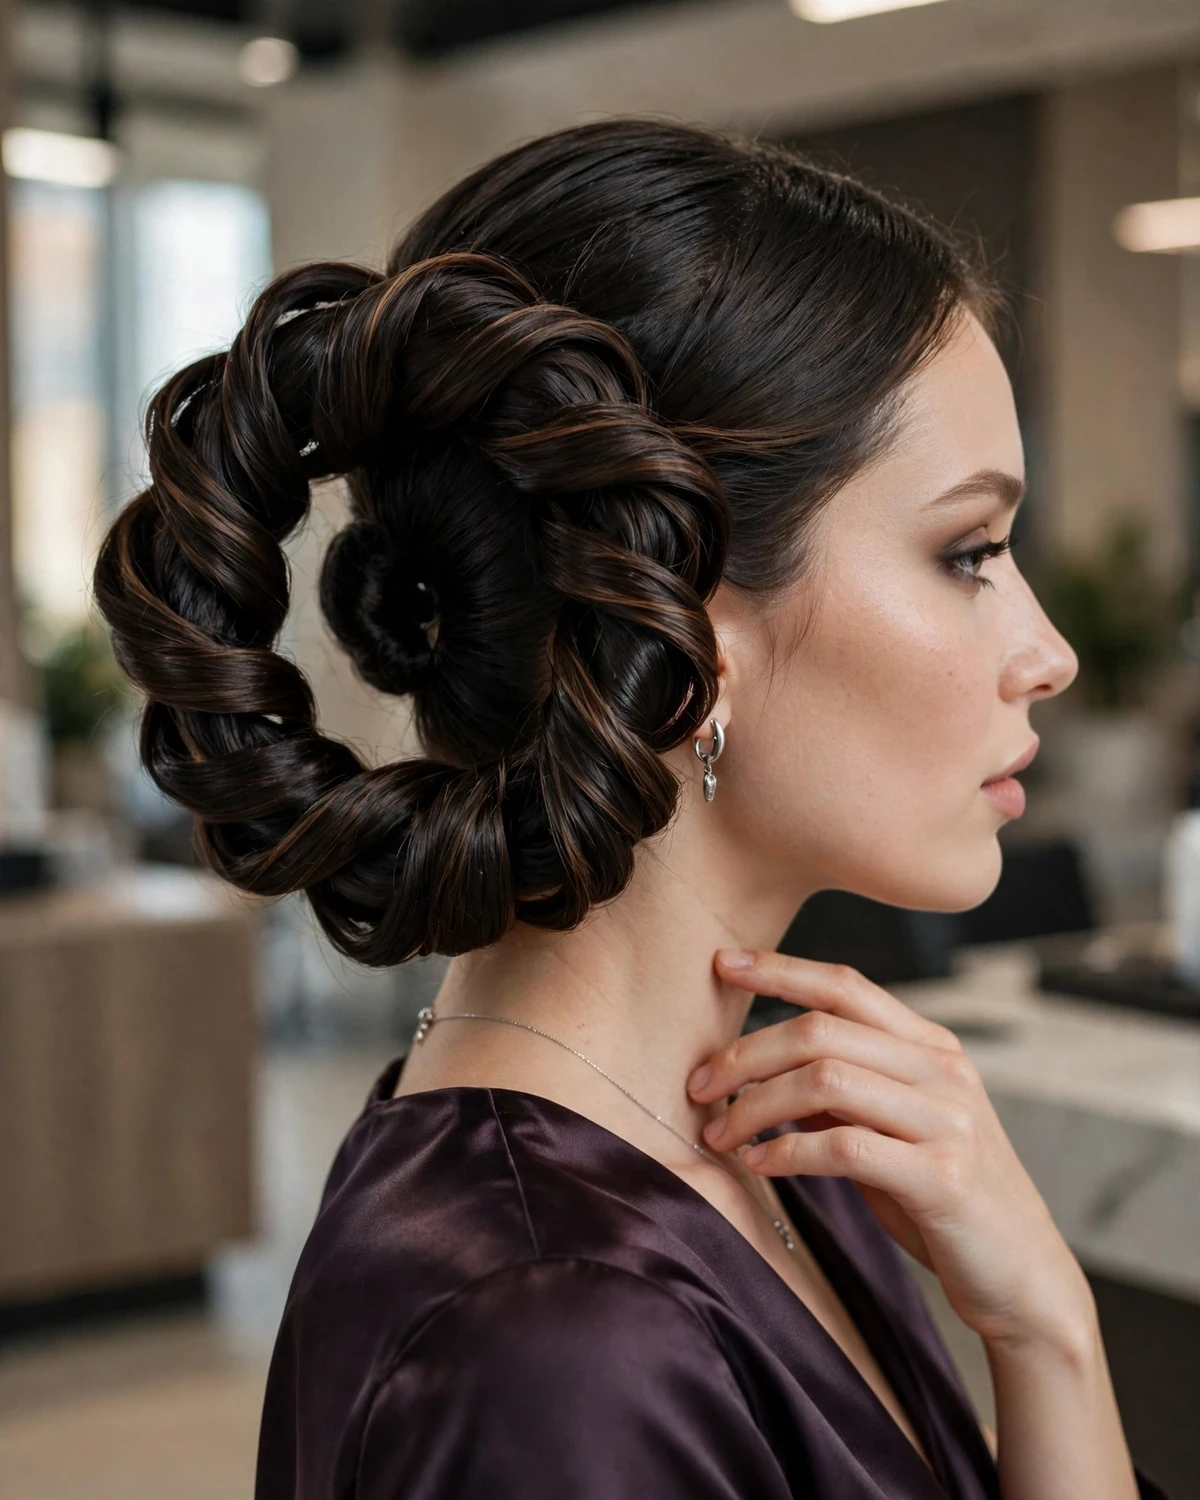
The beauty of this design lies in its controlled irregularity. Keep the twists smooth enough to reveal their direction, but allow their sizes to vary slightly so the updo feels sculptural rather than perfectly symmetrical. Longer hair can create fuller overlapping curves, while medium hair may form a smaller, more compact ring. Use discreet pins and flexible hold spray to keep the sections in place throughout the evening. The hairstyle pairs particularly well with gothic, celestial, or dark fantasy costumes because its shape is abstract and atmospheric without relying on obvious seasonal accessories.
Final Thoughts
The most distinctive Halloween hairstyles are often the ones built around an unexpected shape rather than a familiar accessory. Spiderweb structures, interlocking knots, sculptural loops, diagonal braids, and curved crown designs offer plenty of ways to make hair feel artistic and unusual. Choosing one clear visual idea helps the hairstyle look intentional, whether you prefer a delicate web pattern or a dramatic raised silhouette. For more creative ideas, try our unique pumpkin patch hairstyles.
Before styling, consider your hair length, texture, and how long the design needs to last. Use small elastics and pins for intricate crossings, flexible styling products for sculptural shapes, and lightweight padding only when extra volume is necessary. Practice the most complicated sections before Halloween night, and take photographs from the front, side, and back to check that the pattern is visible from different angles. You do not need every hairstyle to be elaborate from root to tip; one carefully constructed feature can be enough to create a memorable look. With a little patience and creative sectioning, these unusual designs can turn a Halloween hairstyle into the centerpiece of the entire outfit. For more ideas, explore our Halloween hairstyles for long hair and dark feminine Halloween hairstyles, or browse the full fall hairstyles roundup. For more fantasy ideas, see our Halloween hairstyles for dark fairy costumes.